Getting Started with Password Management
The Password Management feature (along with the Account Discovery feature) is an integral part of Syteca's Privileged Access Management (PAM) functionality. It allows the credentials of shared privileged accounts to be securely stored and managed in account secrets (where these credentials are stored in encrypted form in the database), and role-based access control to be implemented. The system supports the JIT (Just-in-Time) PAM approach.
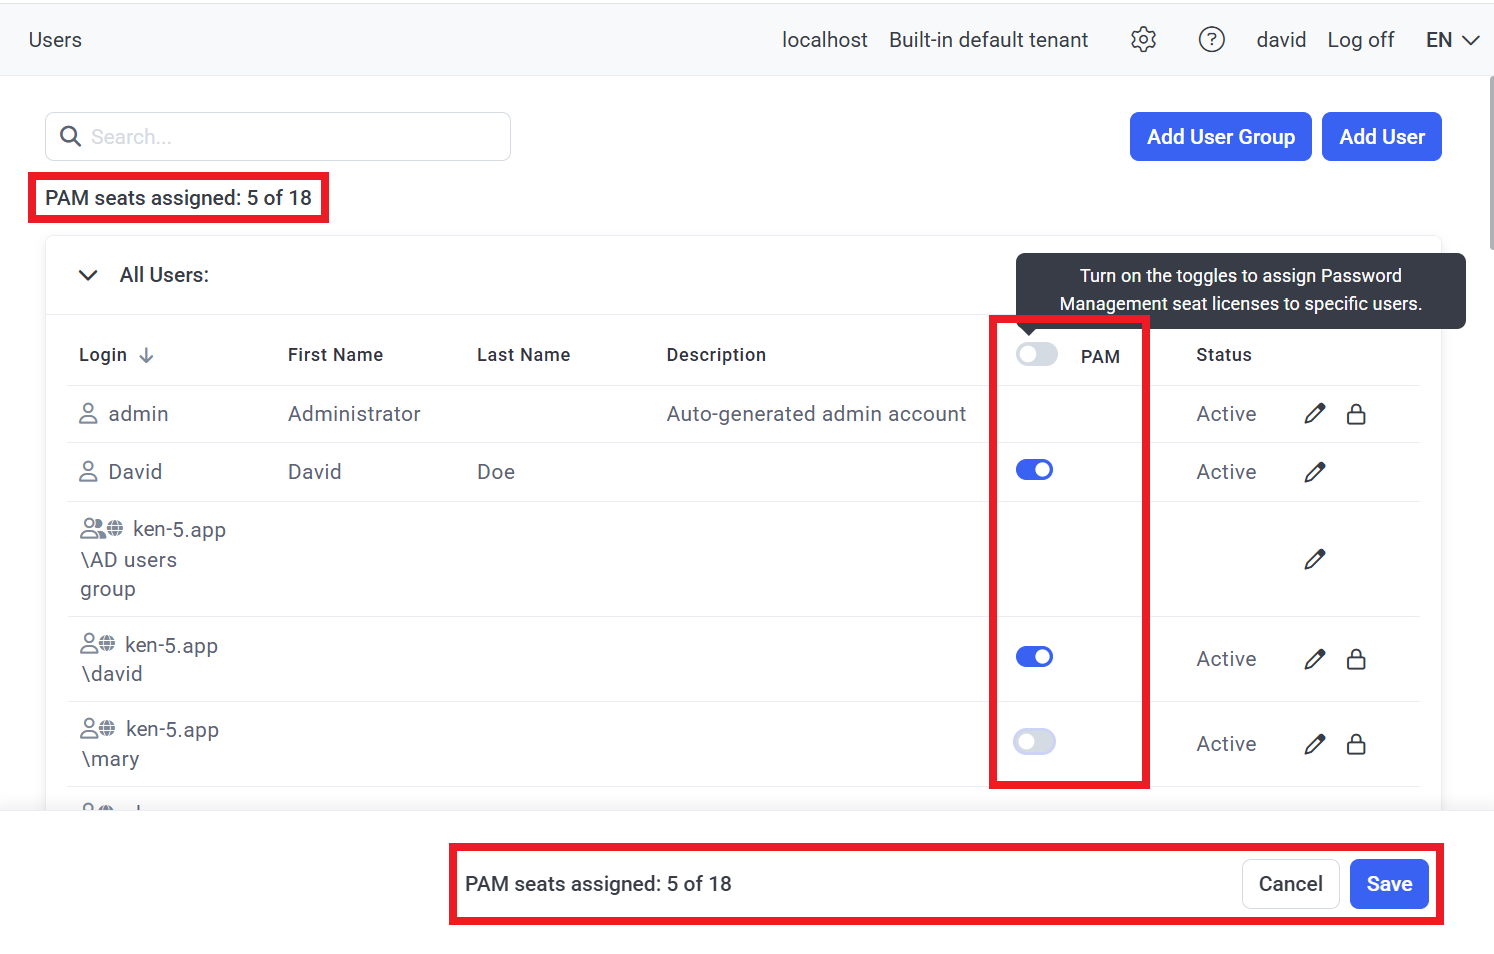
NOTE: This feature is only available with an activated product license serial key that includes the Password Management application and features, and PAM seat licenses.
NOTE: PAM seat licenses first need to be assigned to users (on the Users page) for them to be able to use the PAM functionality (i.e. for users to get access to both the Password Management and the Account Discovery pages in the Management Tool, as well as to the desktop version of Syteca Connection Manager on a Windows computer used (e.g. on a jump server) and to Syteca Web Connection Manager, both of which allow connecting to the corresponding privileged accounts by using the account secrets).
NOTE: Syteca Desktop Connection Manager requires .NET Framework 4.8 to be installed on the Client computer (i.e. the computer with Syteca Desktop Connection Manager).
To be able to use secrets as follows (by users who have been granted the corresponding Role Type permissions to use each secret to connect to the corresponding account), any of these options first need to be configured (as described below):
1. Syteca Web Connection Manager: Allows using secrets directly from the Management Tool by users with any administrative permission by way of either (or both) of the following options:
• Launch locally: Allows all types of secrets to be launched locally on a Windows computer, which requires the Syteca Client to be installed (in a specific way by clicking the Install Syteca Client button after selecting the Launch locally option only - see below), and allows user activity to be monitored and recorded.
• Launch in browser (also known as agentless PAM): Allows Active Directory account, Windows account, and Unix account (SSH) secrets to be launched in the browser on any computer, and does not require the Syteca Client to be installed, since user activity cannot be monitored and recorded.
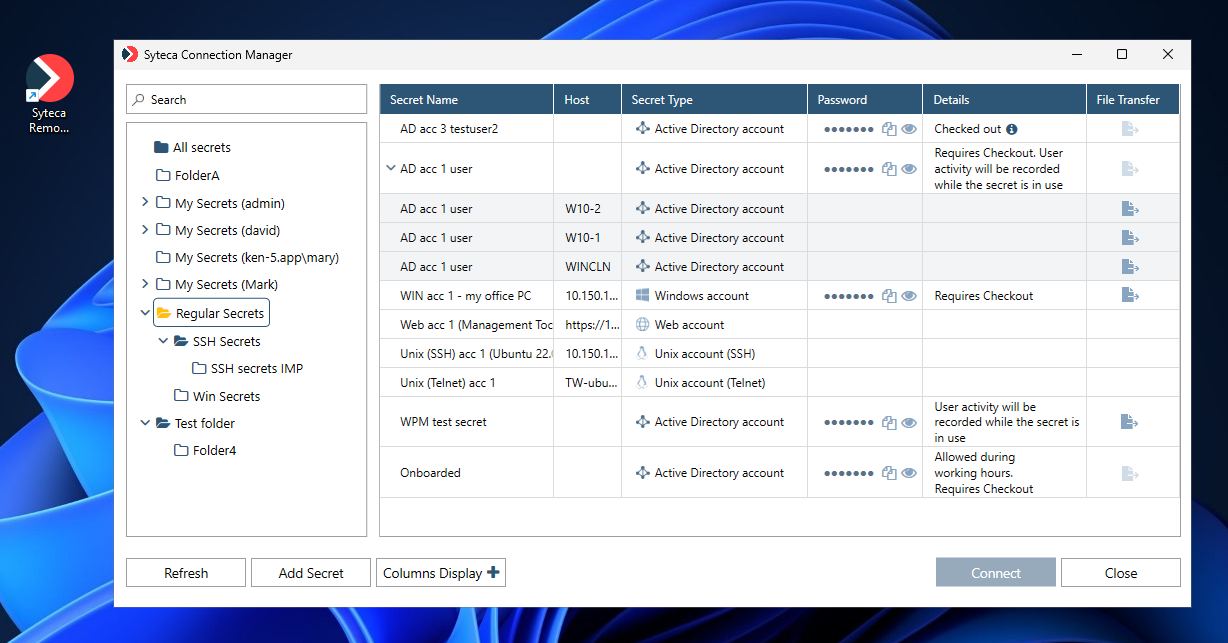
2. Syteca Desktop Connection Manager: Allows using secrets in the desktop version of Syteca Connection Manager by way of a Windows Client computer (e.g. on a jump server).
Follow the steps below (as required) to configure the Password Management functionality for using secrets.
Table of Contents
1. Configuring the "Launch Locally" Option for Syteca Web Connection Manager
1.1. Prerequisites
If recording user activity is required, the Record user activity while the secret is in use checkbox needs to be selected to enable this functionality in all the required secrets.
NOTE: The "Launch in browser" option is not available if the "Record user activity while the secret is in use" option is enabled in the secret.
1.2. Configuring the “Launch Locally” option
To be able to use the “Launch locally” option, the Syteca Client application first needs to be downloaded and installed, in the following specific way:
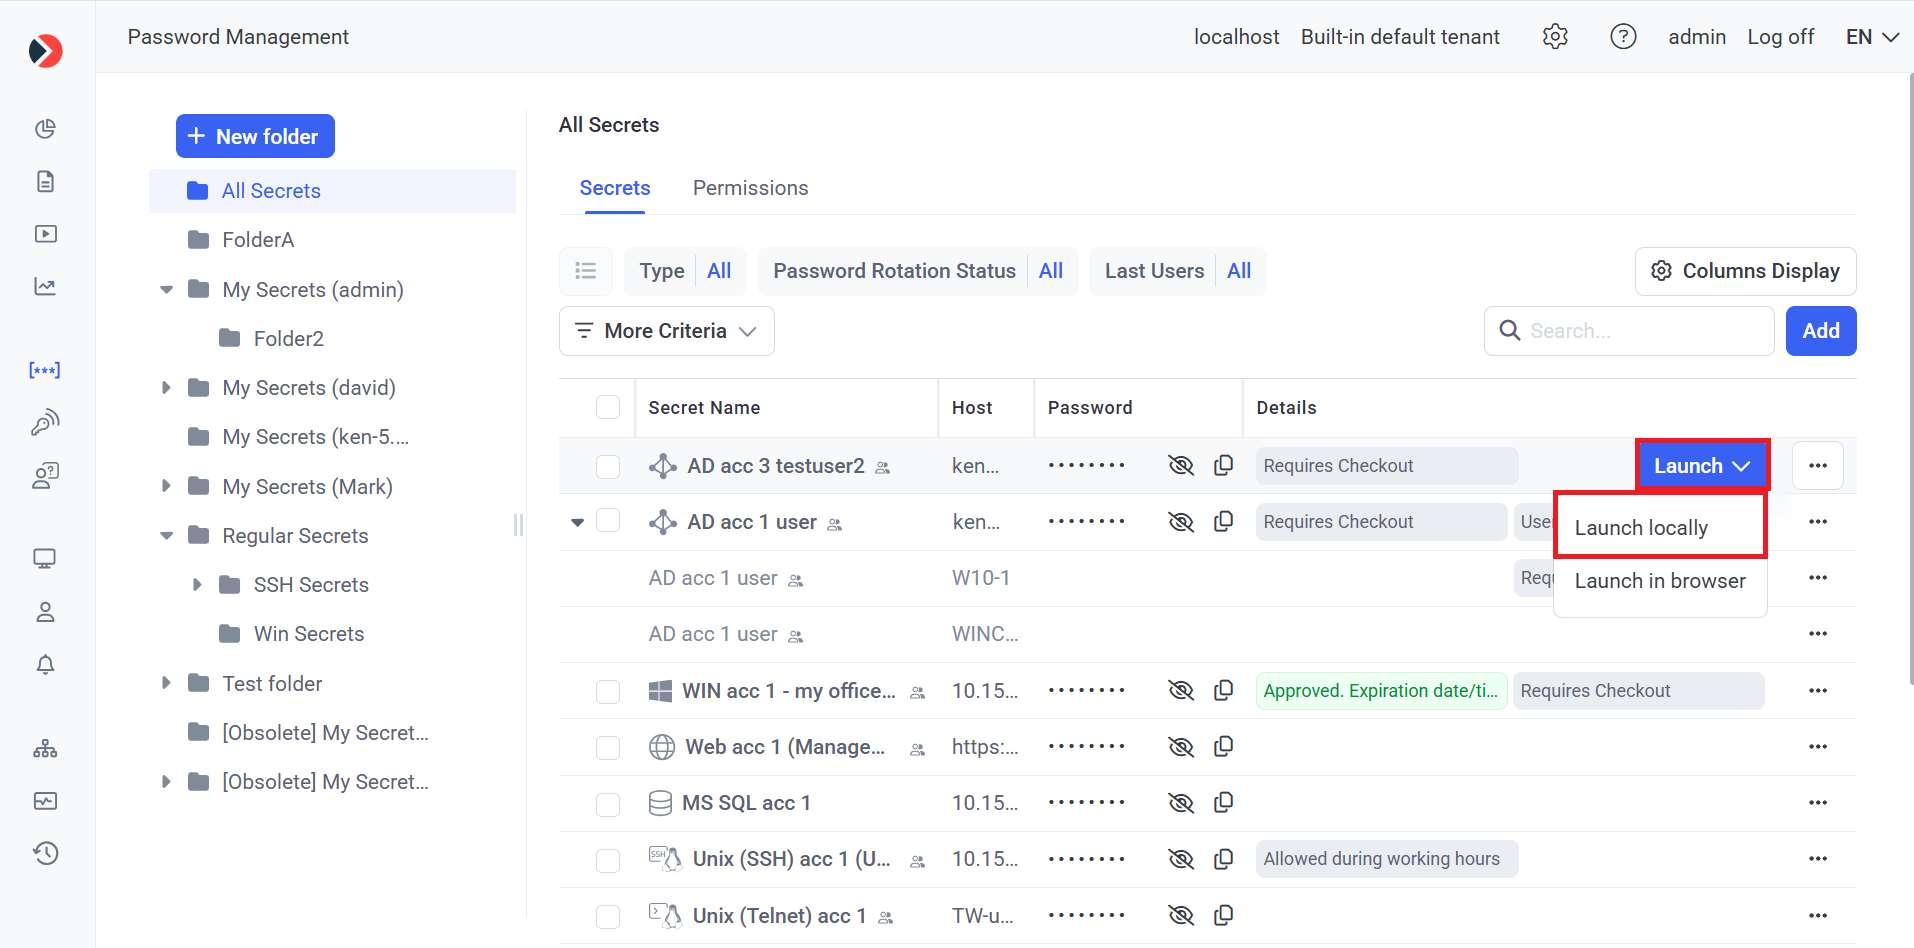
1. Log in to the Management Tool as a user with a PAM seat license (and any administrative permission) assigned to them.
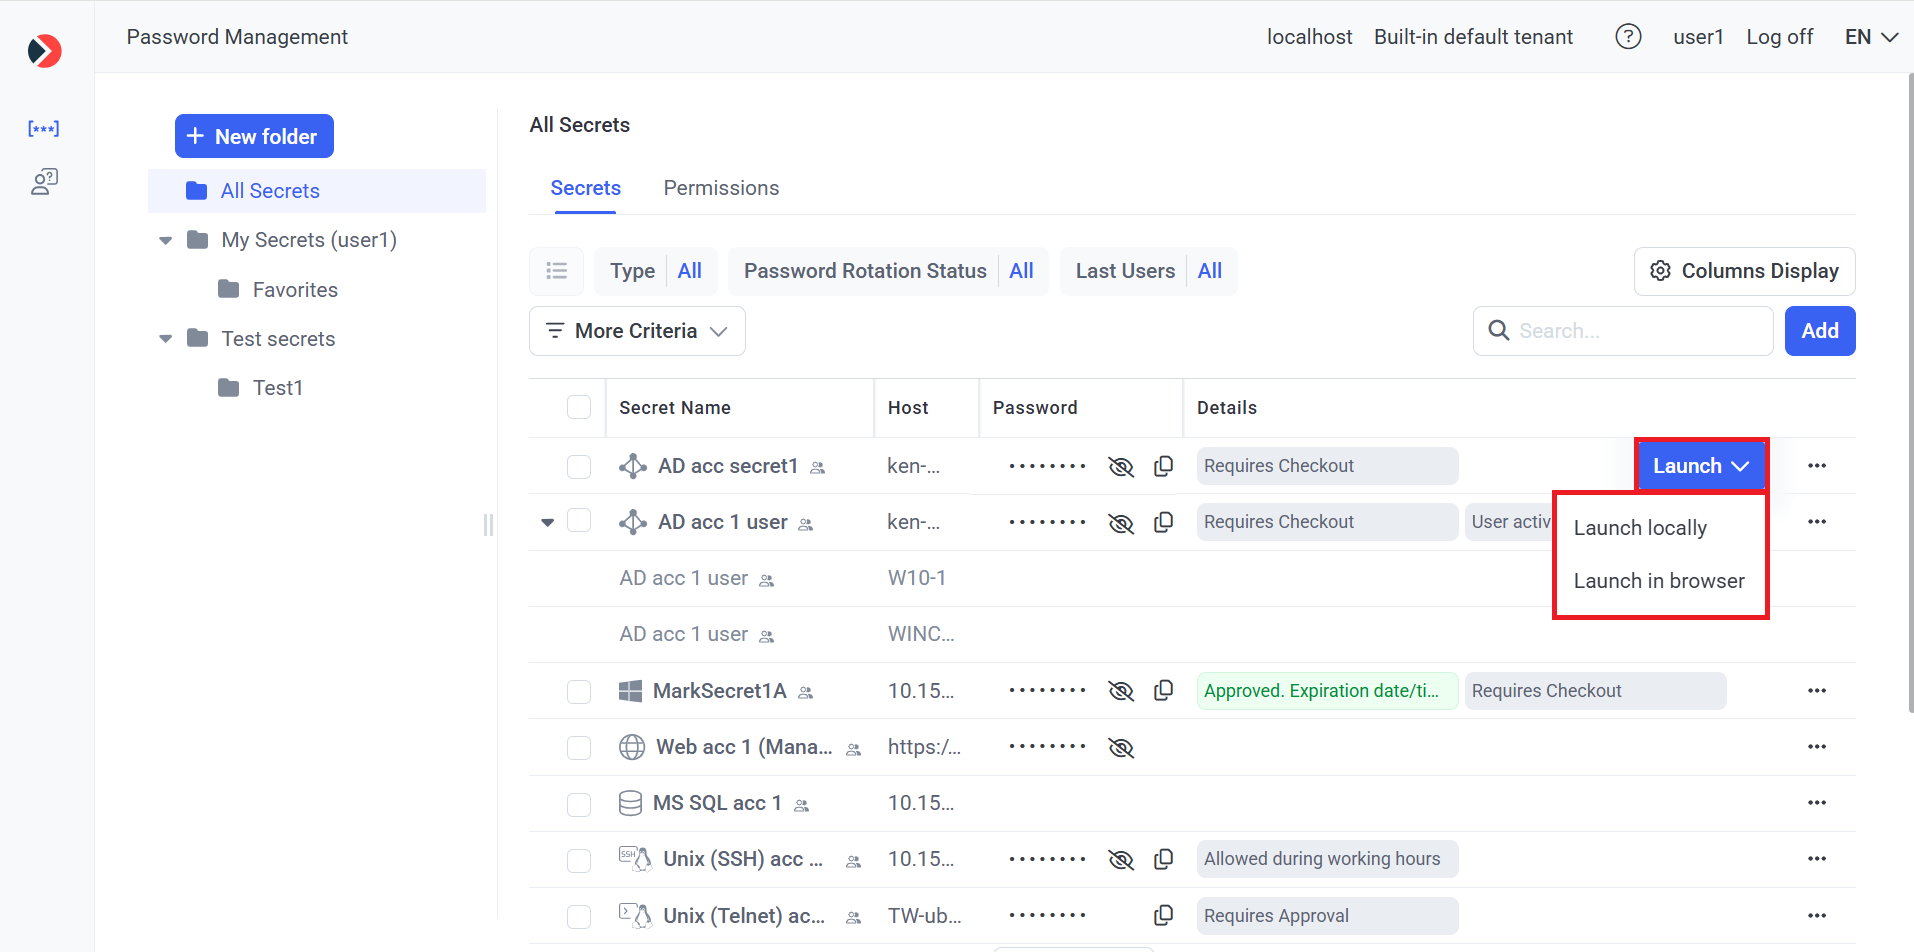
2. Hover over the required secret displayed in the grid (that the user has been granted the required Role Type and Advanced permissions to use), and click the Launch button (that is displayed in the floating bar).
3. In the drop-down list that is displayed, select the Launch locally option to connect to the secret in the third-party application that is then launched locally.
4. After clicking the Launch locally option, the following page opens (in a new browser tab):
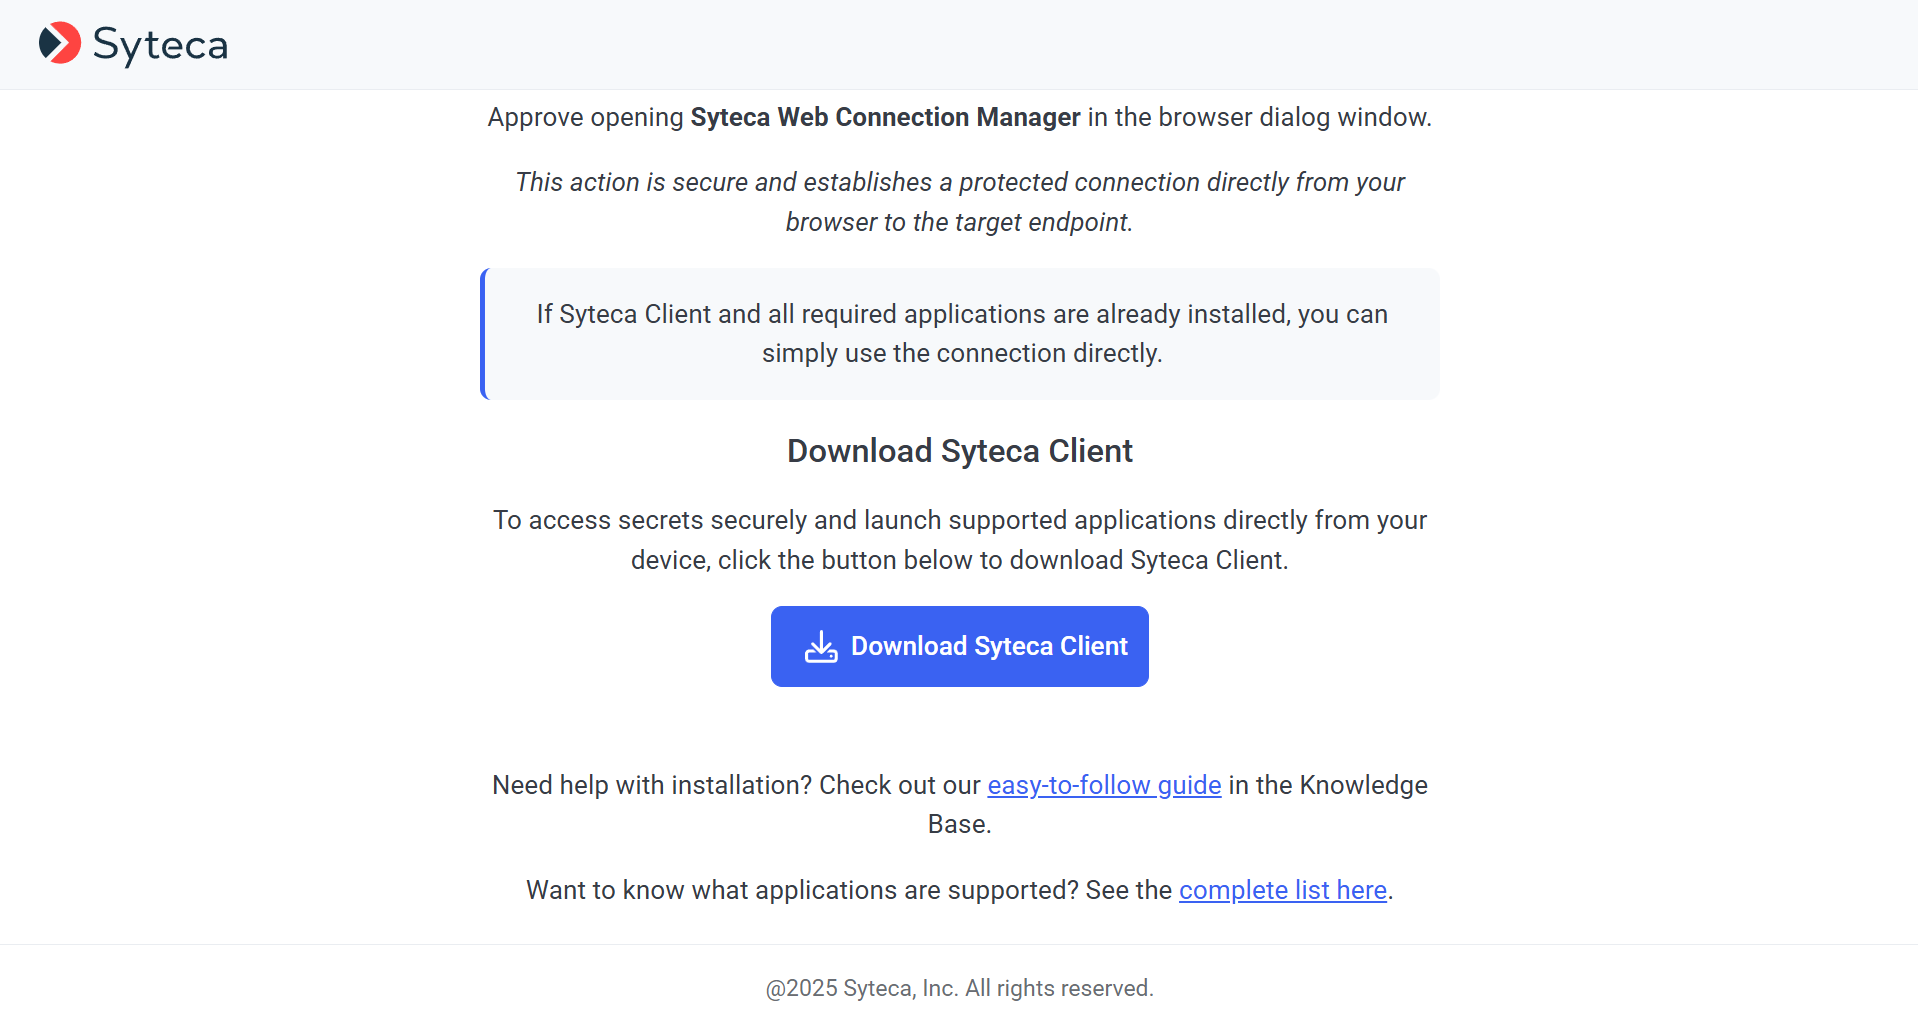
5. If the Syteca Client has not yet been installed in this specific way, click the Download Syteca Client button to download it, and then install it (in the usual way).
NOTE: If the Syteca Client was previously installed on the computer from which the Web Connection Manager is being used in the Management Tool, but not by way of the Download Syteca Client button, it needs to be re-installed by clicking the Download Syteca Client button (and does not need first to be uninstalled and deleted in the Management Tool).
6. After installing the Syteca Client, it is automatically added to the default PAM Clients group (only) in the Management Tool.
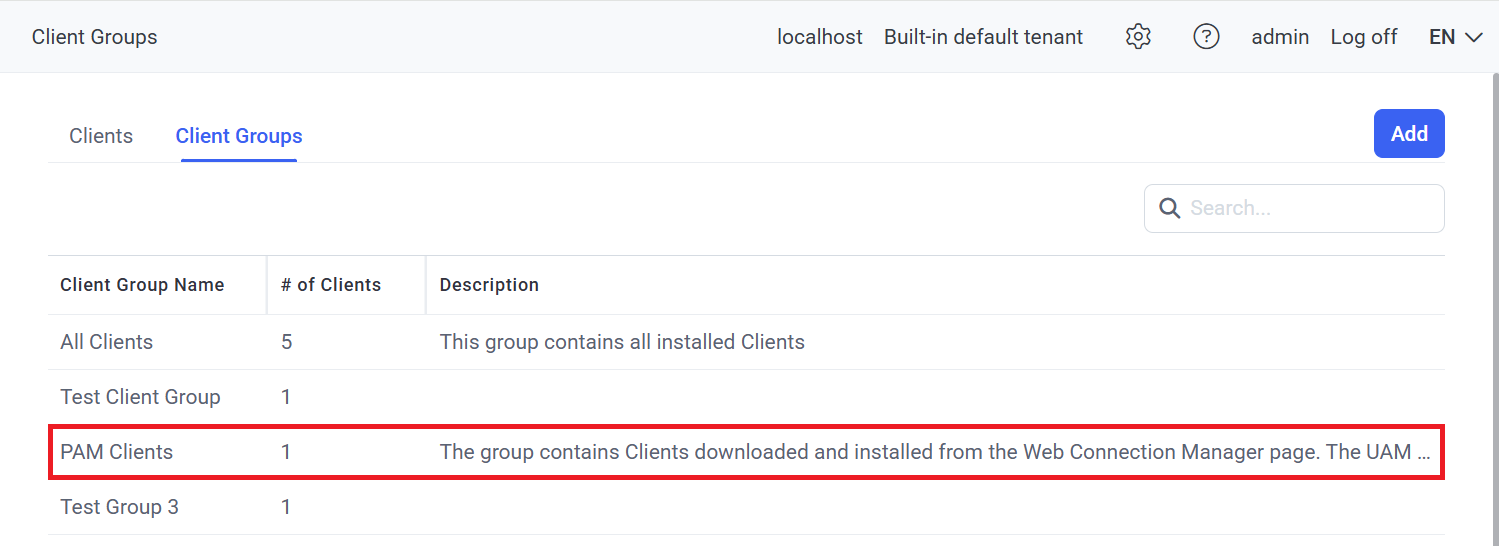
NOTE: The PAM Clients group is a special Clients group used only for the "Launch locally" option in the Web Connection Manager, and allows user activity to be recorded (if the "Record user activity while the secret is in use" option is enabled in the secret), unlike when using the "Launch in browser" option.
NOTE: Clients in the PAM Clients group (i.e. those downloaded using the Download Syteca Client button, and installed) cannot be added to any other Client groups, and can only be removed from this group by uninstalling and then deleting them on the Clients page, and the PAM Clients group cannot be deleted.
2. Configuring the "Launch in Browser" Option for Syteca Web Connection Manager
2.1. Prerequisites
The following browsers are supported: MS Edge and Google Chrome.
To be able to configure Syteca Web Connection Manager, the computer where the Management Tool is installed must be running on Windows Server 2022 or higher.
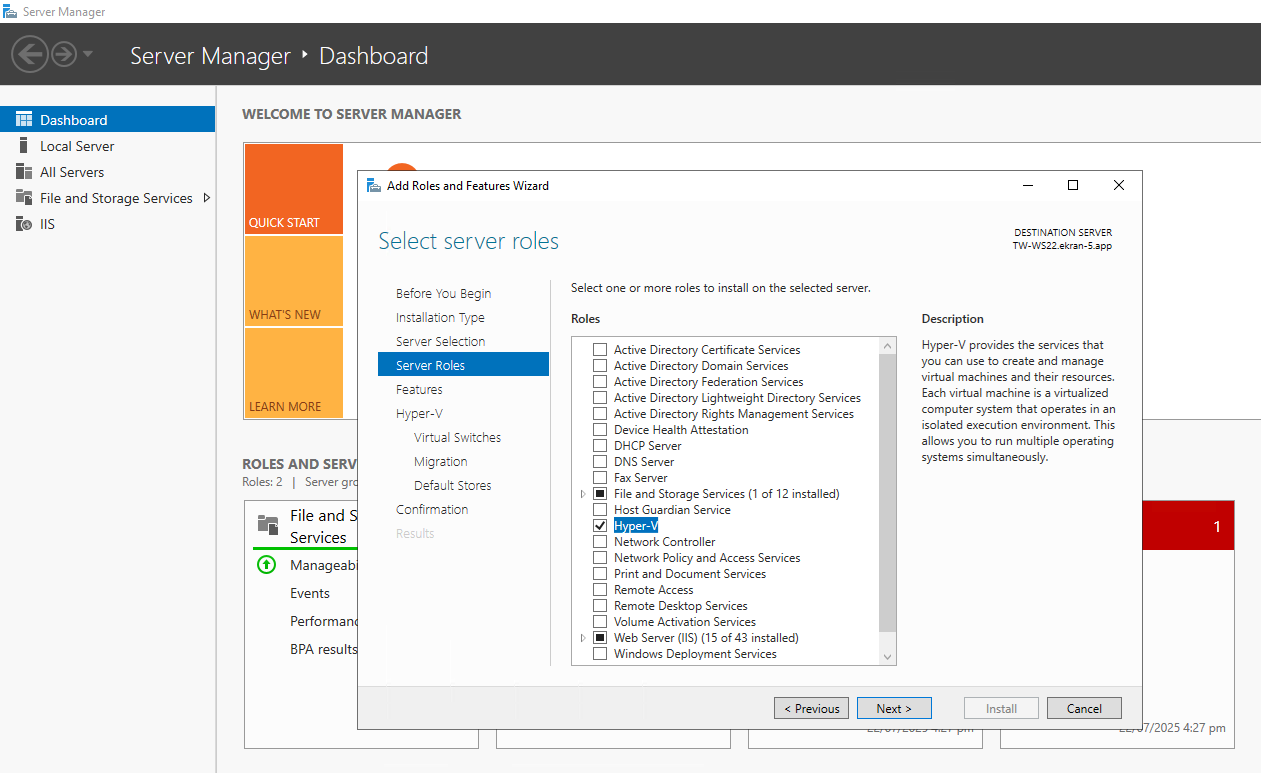
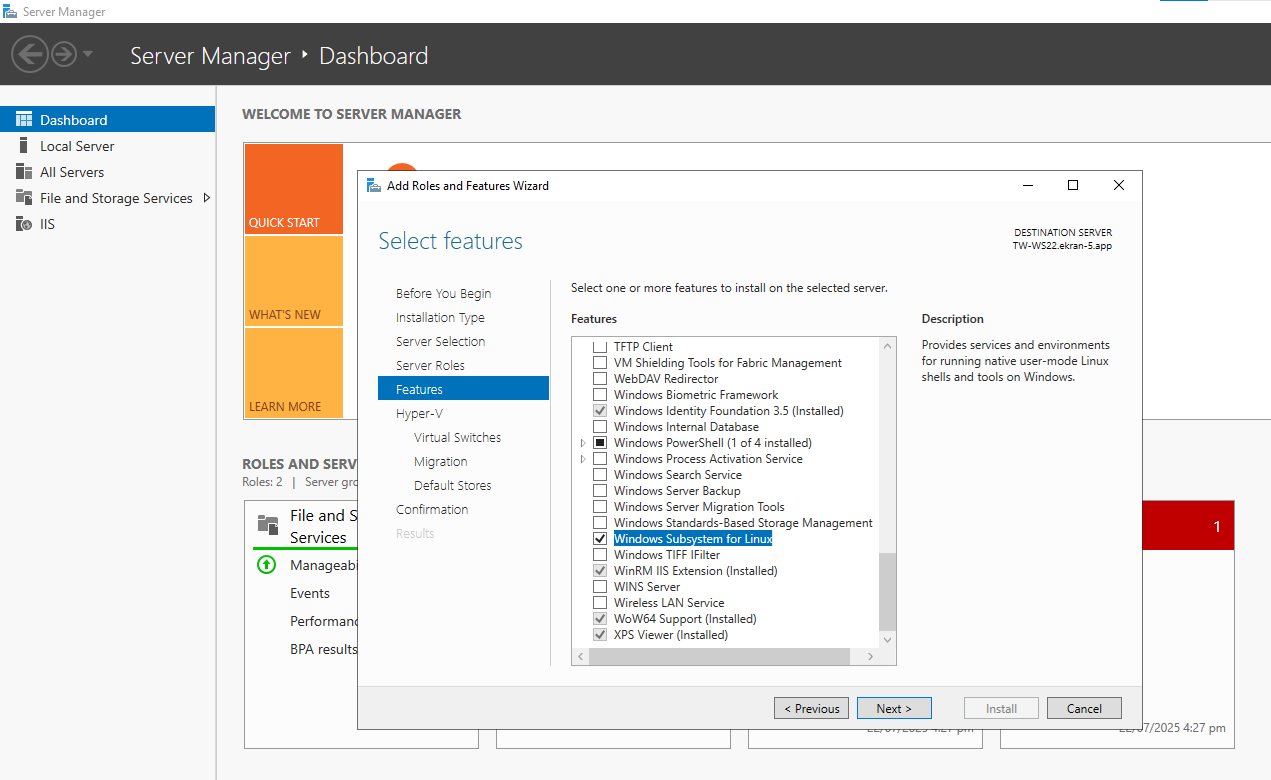
Furthermore, before Syteca Web Connection Manager can be used to launch secrets in the browser, the Windows Subsystem for Linux (WSL) feature and the Hyper-V role first need to be installed on the computer where the Management Tool is installed, by doing the following:
1. Use Windows Server Manager to install the WSL feature and Hyper-V role (to be able to enable the Enable Syteca Web Connection Manager toggle, so as to use the Launch in browser option), as shown in the following screenshots (examples using Windows Server 2022):
• Hyper-V.
• Windows Subsystem for Linux.
• Continue, and wait until installation is complete.
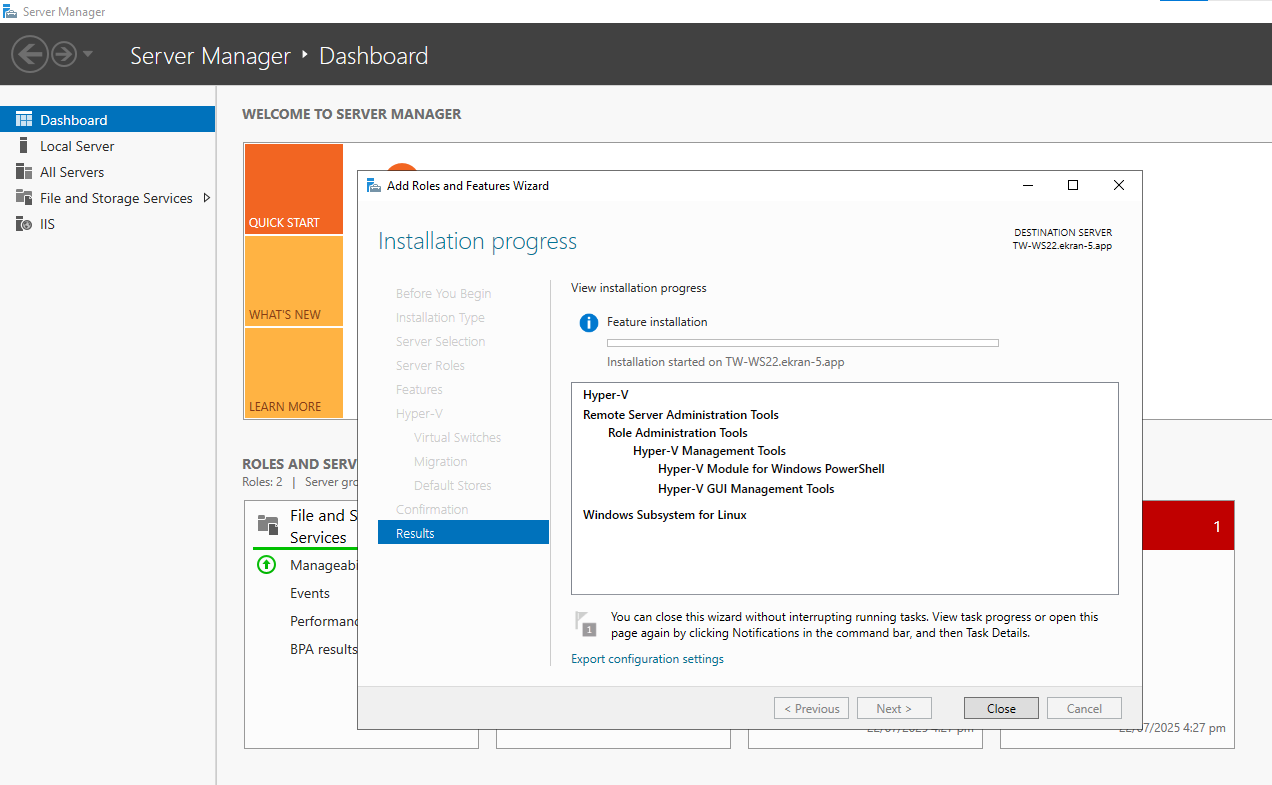
2. After installing WSL and Hyper-V, restart the computer where Syteca Application Server is installed.
3. [When using Windows Server 2025 only:] It is required to install version 2 of WSL (including enabling the Virtual Machine Platform feature), so first check whether WSL 2 is installed, and (if not) upgrade to WSL 2 (see Install WSL | Microsoft Learn) after enabling the Virtual Machine Platform feature (see Manual installation steps for older versions of WSL | Microsoft Learn), and then restart the computer where Syteca Application Server is installed again.
2.2. Configuring the "Launch in Browser" Option
IN SAAS ONLY: The functionality in this section is not available to users by default, and can only be enabled on request by contacting your Syteca vendor, or the Syteca Support Team at: info@syteca.com
To be able to launch secrets in the browser, Syteca Web Connection Manager first needs to be configured, by doing the following:
1. Log in to the Management Tool as a user who has both the administrative Privileged Accounts Management and Tenant Management and System Configuration permissions.
2. Click on the Cog (
NOTE: The “Web Connection Manager” tab is only available if the Password Management (PAM) toggle is enabled in the license serial key.
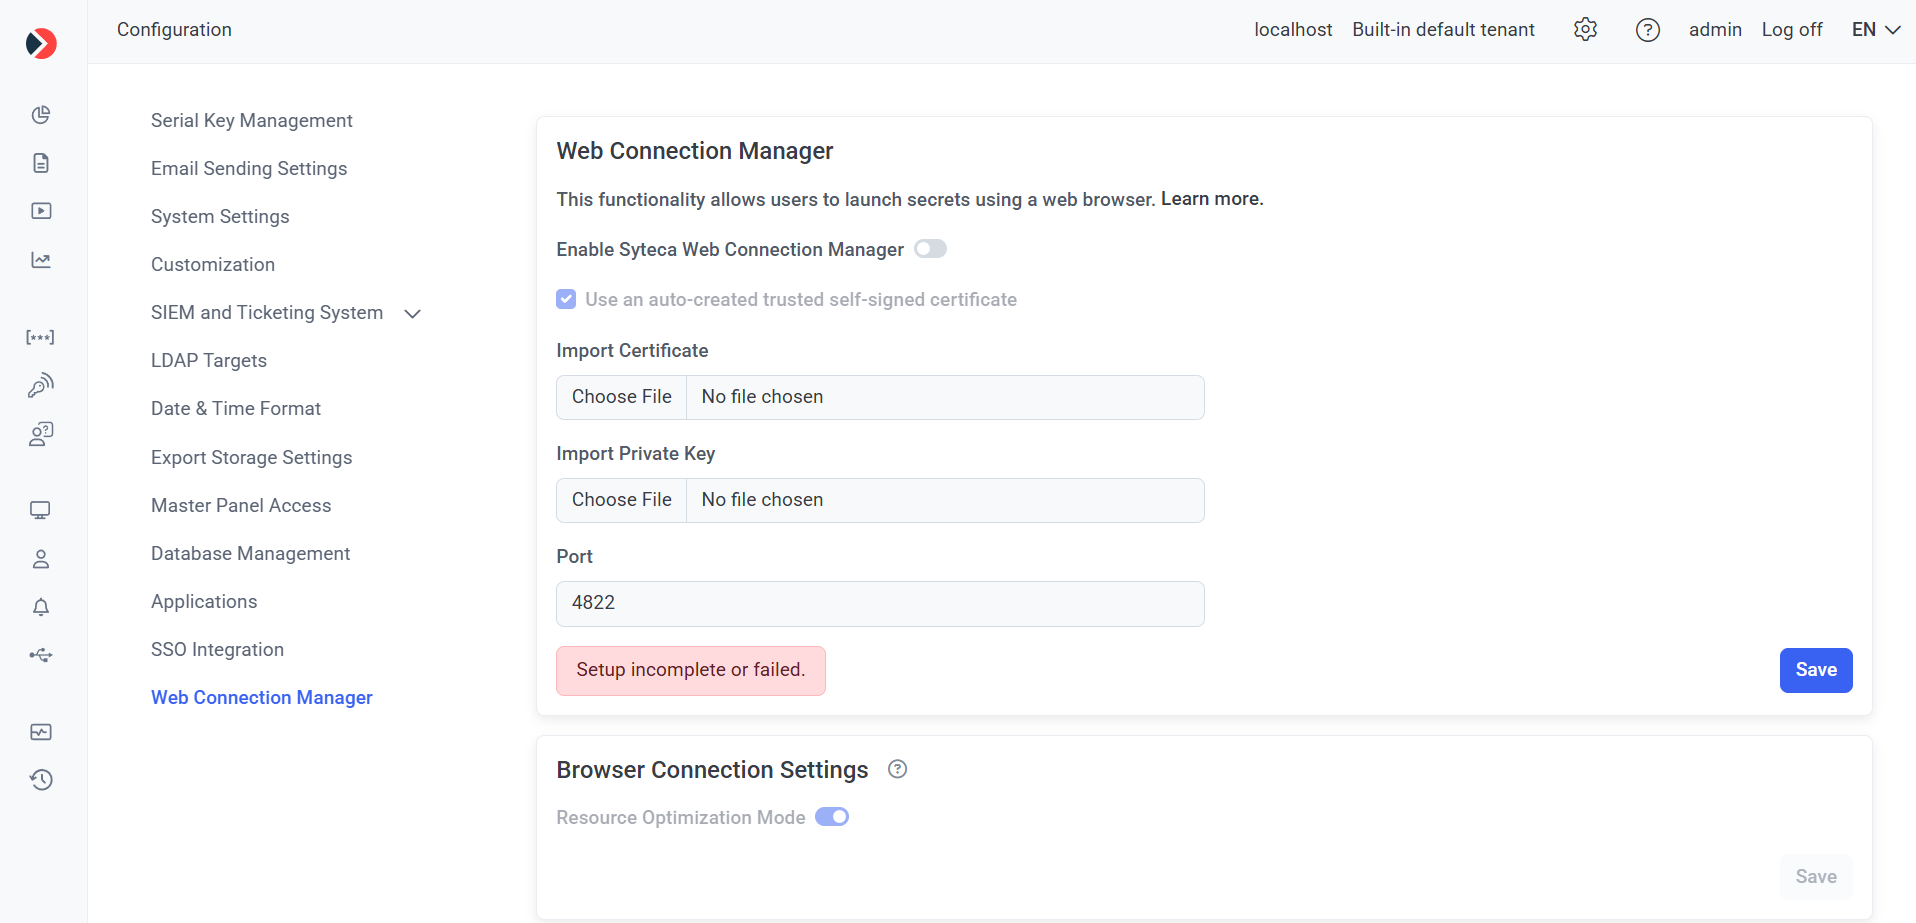
3. On the Web Connection Manager tab, do the following:
a) Move the Enable Syteca Web Connection Manager toggle to the right to enable this functionality.
NOTE: This toggle cannot be enabled unless the WSL feature and Hyper-V role are first installed (see above).
b) Either:
- Select the Use an auto-created trusted self-signed certificate checkbox (which is selected by default, in which case a default self-signed certificate is automatically generated and used for connecting to the Apache Guacamole server).

- In the Import certificate and Import private key fields, upload the required files to use a custom certificate and private key (if used) respectively (by clicking the Choose File buttons).

c) Enter the required Port number to be used for Apache Guacamole (or use the default value of “4822”).
d) Click the Validate and Set Up button to automatically both:
- Check whether Apache Guacamole is installed, and automatically install it if not.
- Check whether the Web Connection Manager is configured correctly (i.e. that all the connection parameters specified on the page above are valid), and save the parameters.
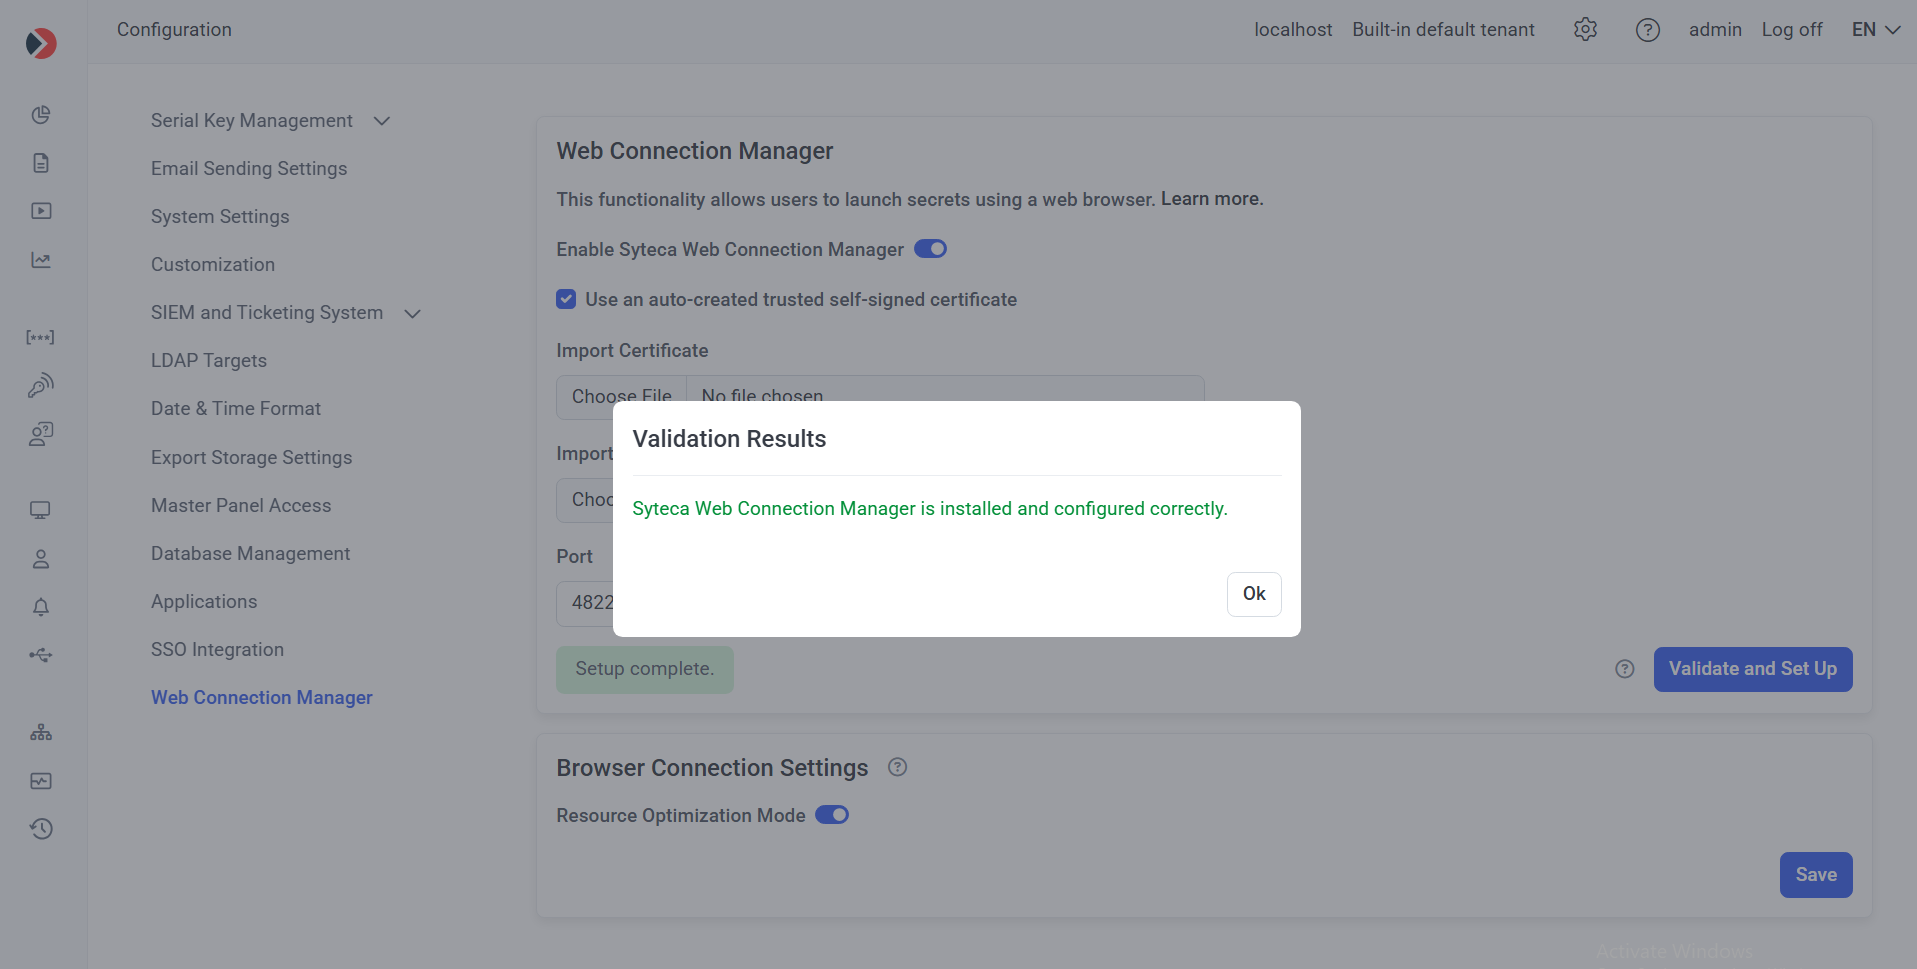
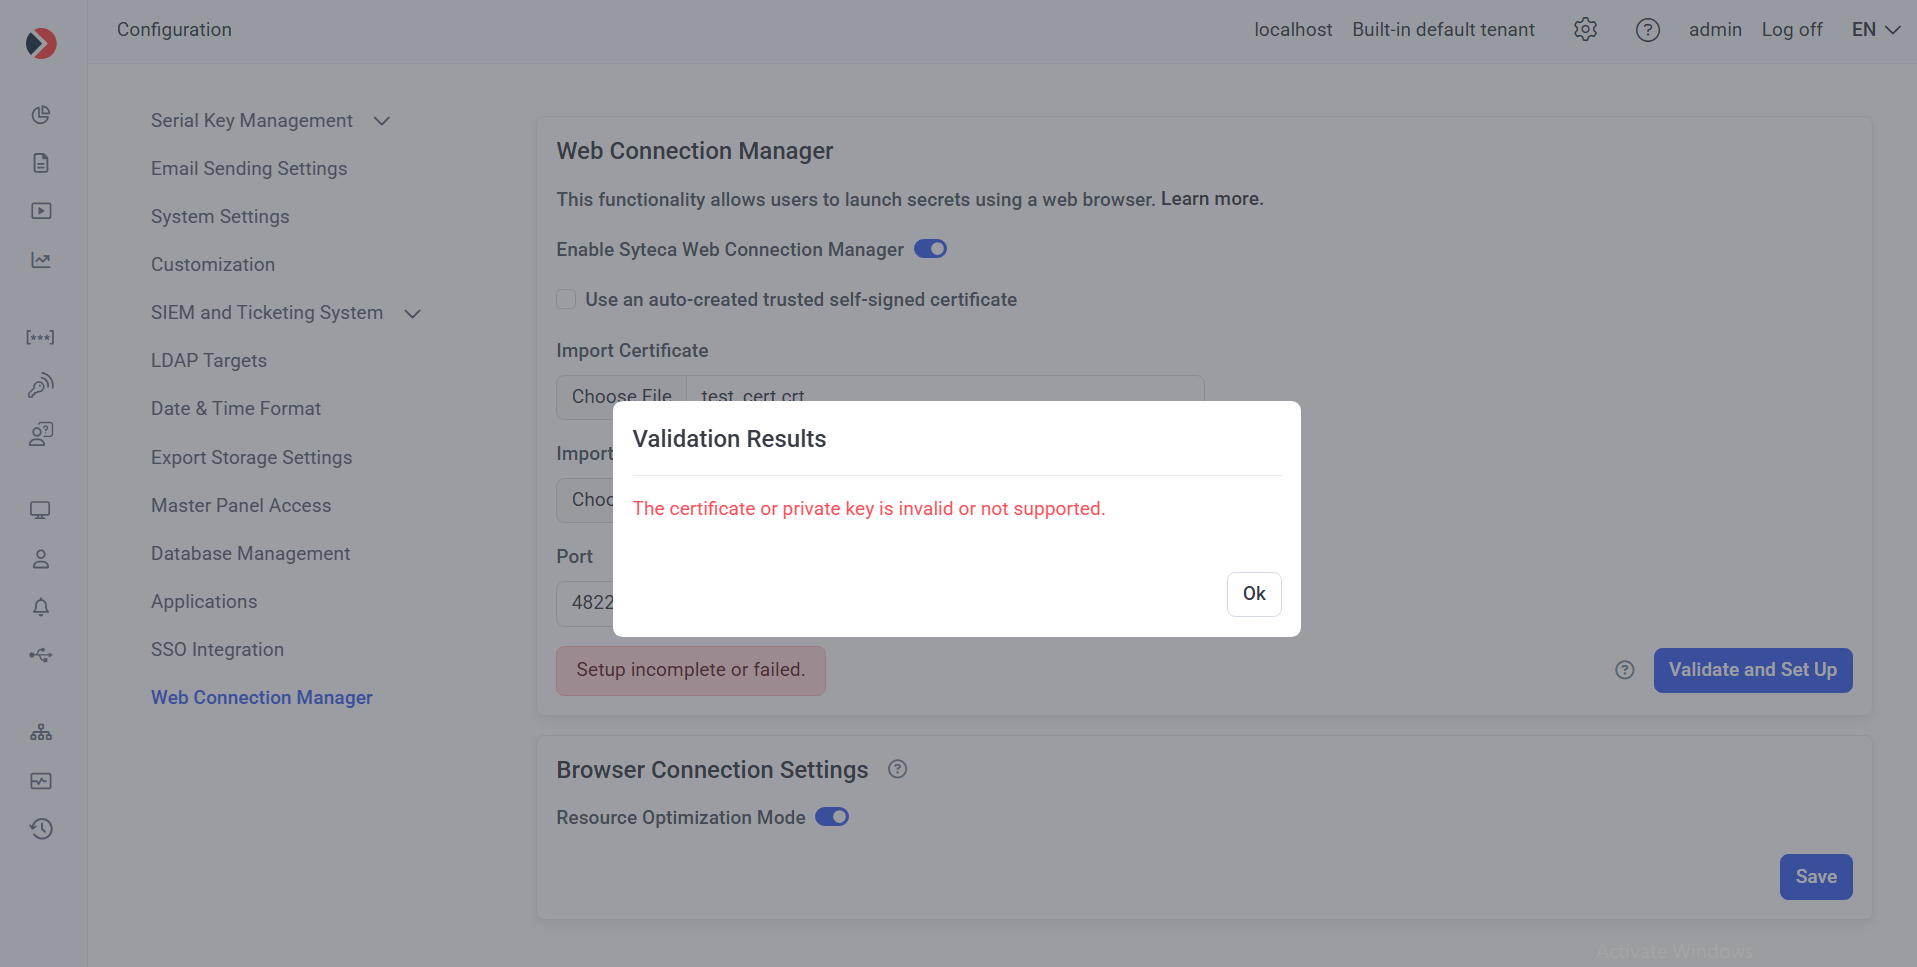
e) Wait for the Validation Results to be displayed in the pop-up window that opens.
NOTE: In High-Availability mode, the “Validate and Set Up” button needs to be clicked in each Management Tool (i.e. on each node for each Application Server instance).
f) If the connection validation and set up fails, the message “Setup incomplete or failed.” is displayed, and the Validation Results pop-window displays one of the following error messages (in which case this issue needs to be fixed before proceeding as described below):
- “The certificate or private key is invalid or not supported”: Import a valid certificate (i.e. with valid contents) and also the private key (if used).
- “Port <4822> is in use by another application”: Free up the port specified, or enter another port number,
- “Insufficient disk space available for Web Connection Manager installation”: At least 220 MB of free disk space is required.
- “The required Windows features for WSL are not enabled”: The Windows WSL feature and Hyper-V role need to be installed (see Section 2.1 above).
- "The latest version of WSL is required. Please upgrade WSL.": Upgrade WSL to version 2 or higher (see Section 2.1, Point 3, above).
- “An unknown error occurred.”: An error occurred for any other reason (except for the above).
4) Optionally, in the Browser Connection Settings section, move the Resource Optimization Mode toggle to left to disable it, and then click the Save button (in the bottom right).
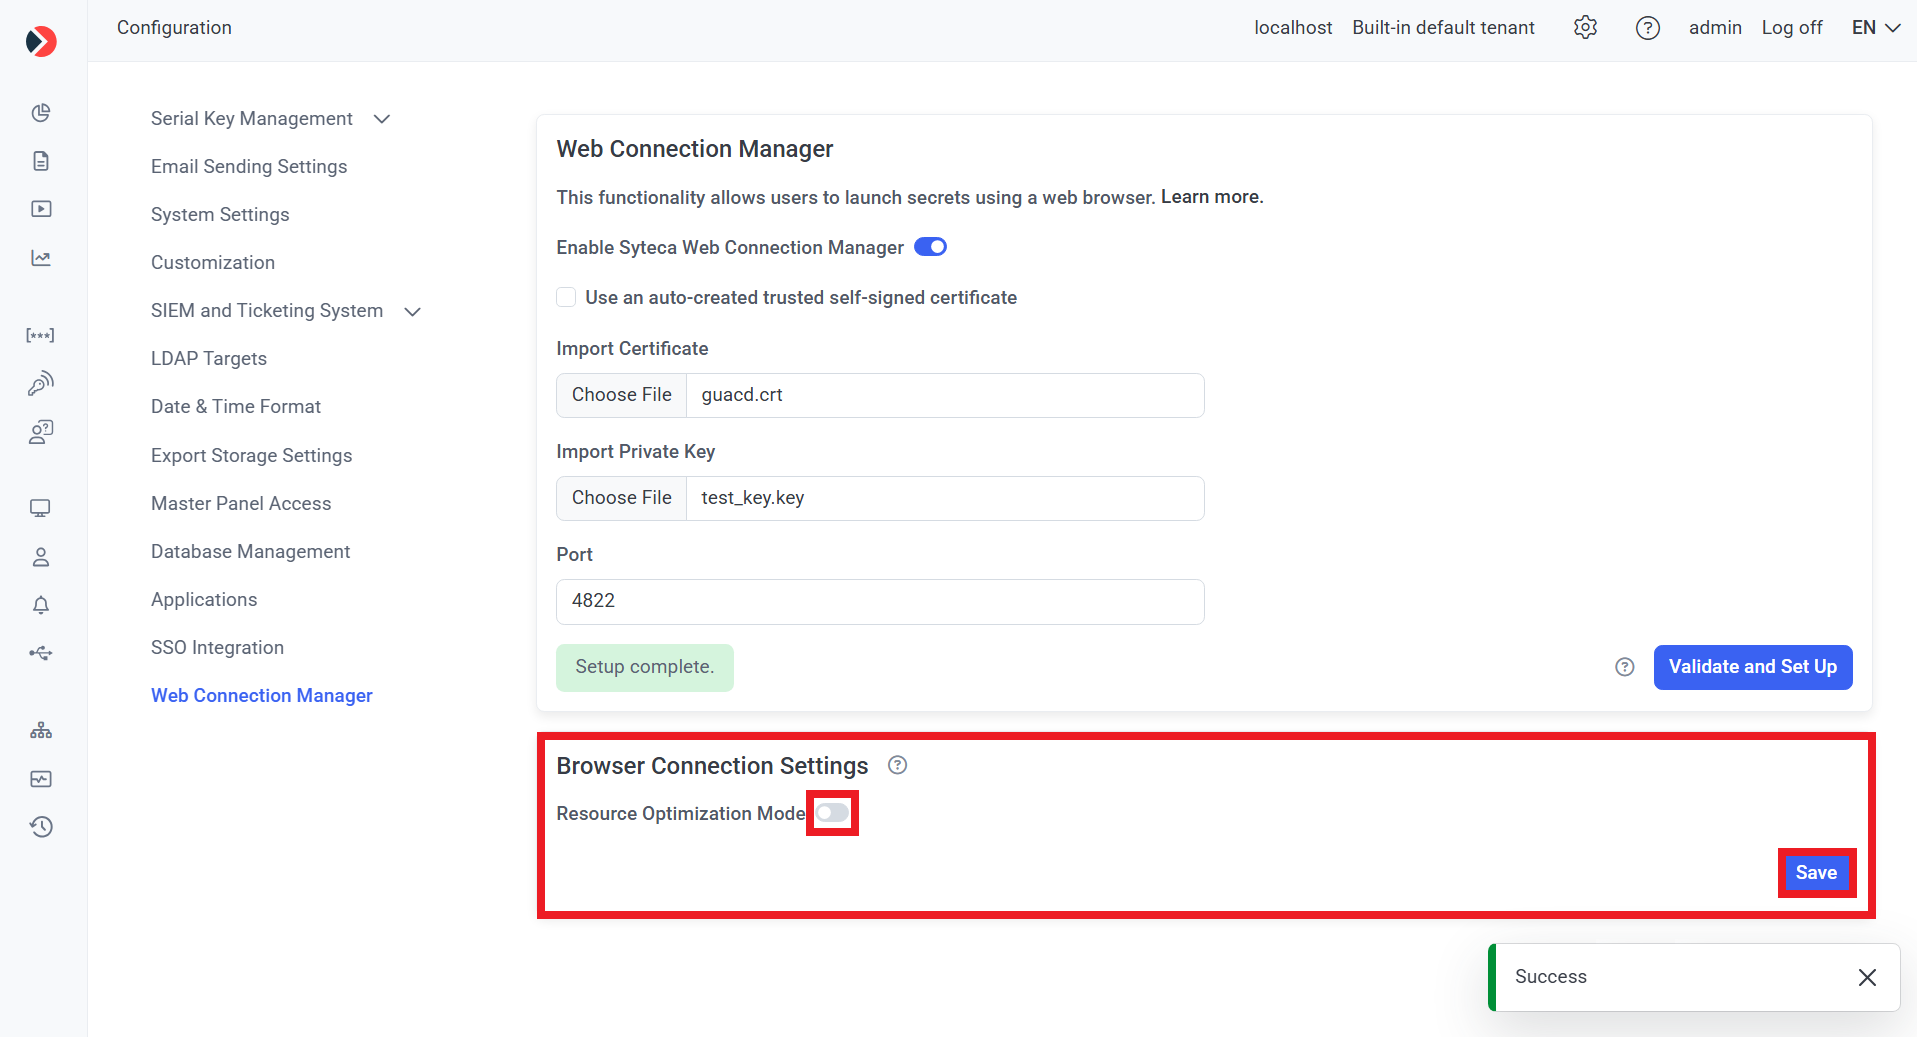
NOTE: The “Resource Optimization Mode” toggle is enabled by default, where the amount/quality of visual effects is reduced to improve connection stability and decrease resource usage. Disabling it (by moving the toggle to the left) means all effects are enabled, which may impact performance in some environments.
NOTE: In Multi-Tenant mode, the specified settings are applied to all tenants, but can only be enabled by a user of the built-in default tenant.
3. Configuring the Client Computer for Syteca Desktop Connection Manager
To configure a Windows Client computer (e.g. as a jump server) with the desktop version of Syteca Connection Manager enabled, do the following:
1. Log in to the Management Tool.
2. Click the Clients navigation link (on the left).
3. On the Client Management tab that opens, find the Windows Client that will be used as the jump server Client computer, and click its name in the Client Name column.
NOTE: A jump server computer is only required if two or more concurrent sessions are required on the Client computer with Syteca Connection Manager, and it is recommended to use a Windows Server operating system for the correct functioning of Syteca Connection Manager on a jump server computer.
4. On the Properties tab that opens, scroll down to Client Mode section, and select the following checkbox(es):
• Enable the Syteca PAM Connection Manager: To enable Syteca Connection Manager on the Client computer.
• Replace Windows Shell with the Syteca PAM Connection Manager: To optionally only display the open Syteca Connection Manager window to users (i.e. without the Client computer's desktop).
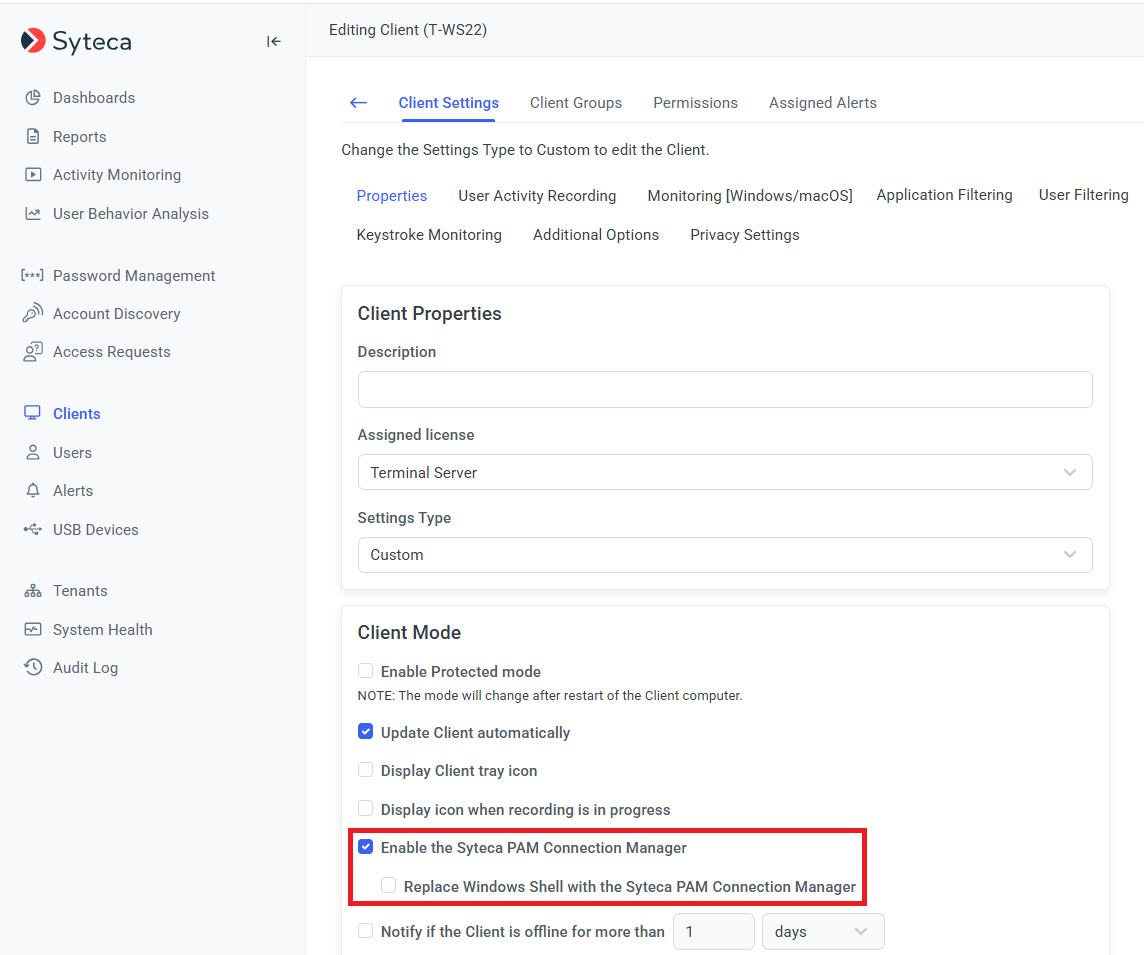
5. Syteca Connection Manager is then enabled for use.
NOTE: When using a custom Windows shell, the Syteca Connection Manager application (shortcut icon) may not be displayed on the desktop, but can be found in the C:\Users\Public\Desktop folder.
6. To finalize configuration of the Client, select the Authentication Options tab, and scroll down to the Two-Factor and Secondary Authentication section, then select the Enable secondary user authentication on login checkbox to allow users of the Client machine to access secrets.
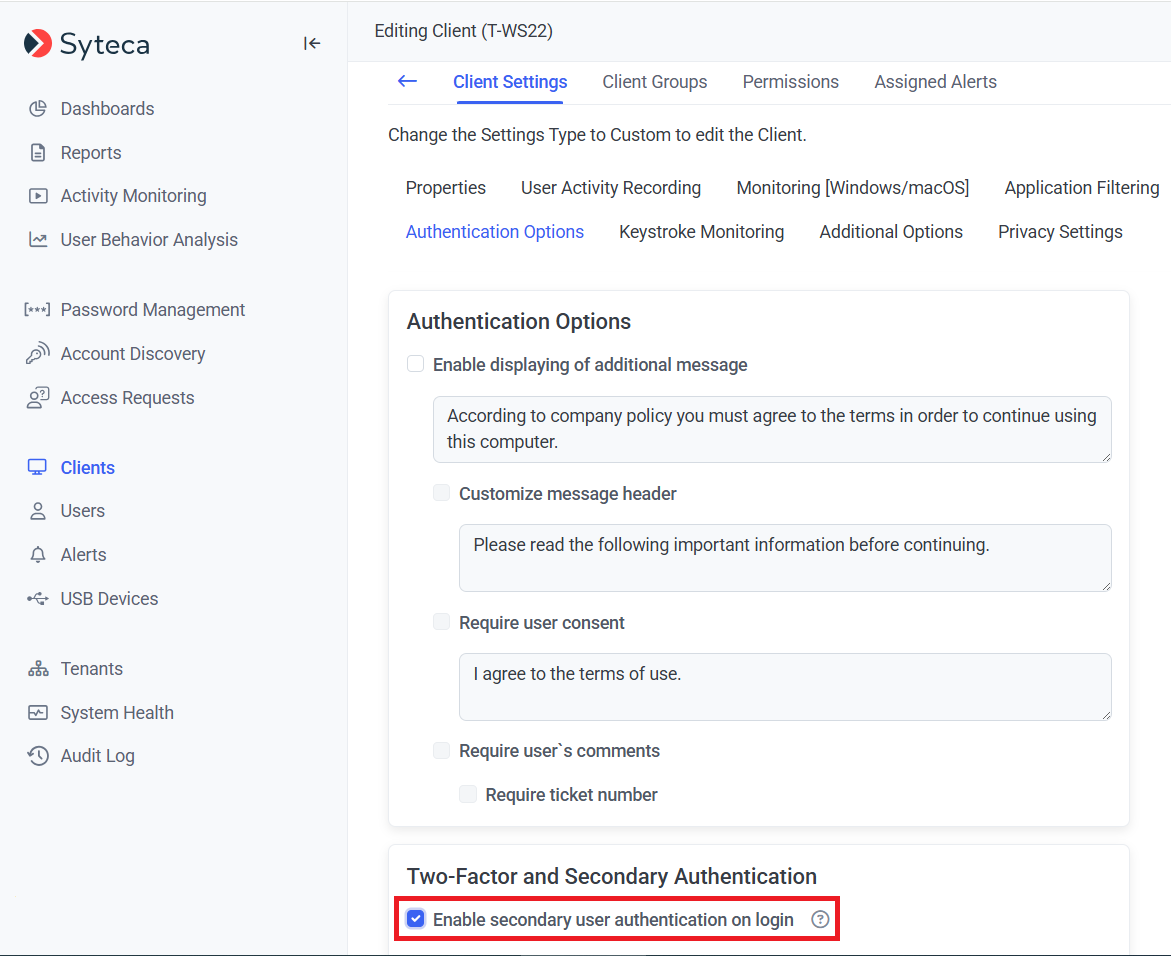
NOTE: It is not required to enable secondary user authentication for Active Directory users.
7. Click the Finish button to apply the changes.
8. The Client as then configured (on which users will be able to connect to the accounts in the corresponding secrets by using Syteca Connection Manager).
4. Adding and Configuring Secrets
The credentials of shared privileged accounts are stored in secrets.
To create and configure any type a secret (to be used to manage and access a privileged account), do the following:
1. Log in to the Management Tool, and click the Password Management navigation link (on the left).
2. On the Password Management page that opens, on the Secrets tab, click the Add button (in the top right of the page).
NOTE: Only users specifically added to the Management Tool as separate users, but not those only belonging to an Active Directory user group added, can add secrets/folders (please refer the Management Tool Issues and Error Messages page for more information).
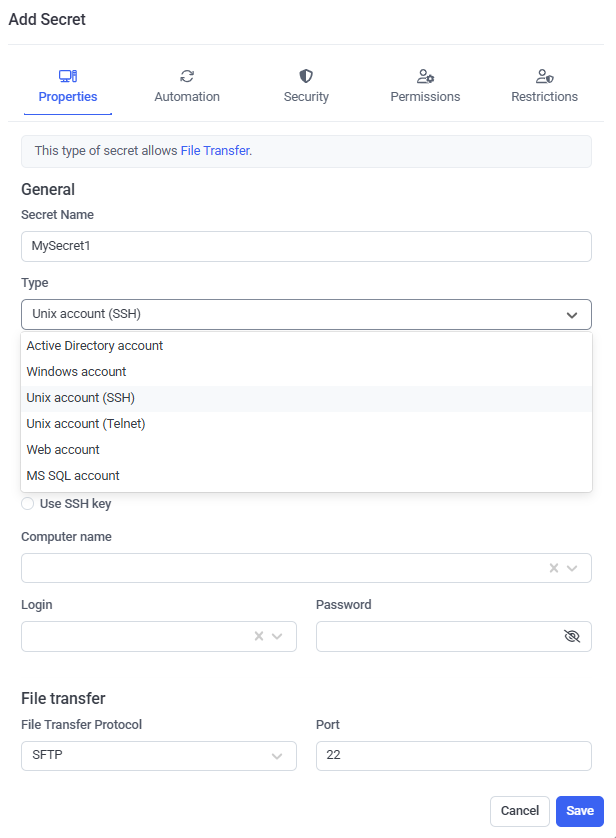
3. In the Add Secret pop-up window that opens, on the Properties tab, specify the following:
• Secret Name: Enter a unique name for the secret.
• Secret Type: Select the type of secret required (Active Directory account / Windows account / Unix account (SSH) / Unix account (Telnet) / Web account / MS SQL account).
• Description: Enter a description for the secret (optional).
• Current folder: If required, change the folder where the secret will be stored (in the Tree-View folder structure).
4. In the Account section, specify one of the following for the remote account on the host (e.g. remote) computer that users of the secret will connect to by using Syteca Connection Manager:
• Enter (or select in the drop-down list displayed) the following (depending on the type of secret):
- Domain: The Active Directory domain name.
- Computer name: The hostname (or IP address) of the computer.
- URL: The URL.
- Server: The hostname (or IP address) of the computer with the MS SQL database (where the port can also be specified, separating them with a comma).
• Login: Enter the secret's login name, which must be the existing user name of the account to be accessed by using the secret.
• Password: Enter the secret's password, which must be the existing password for the account to be accessed by using the secret.
• [For the Active Directory account secret type only:] Select specific computers for which connections will be allowed: Select this checkbox, and then select the required Computers in the drop-down list below it, to only allow access to specific computers (in the Domain specified above).
NOTE: [For the Unix account (SSH) secret type only:] The "Use SSH key" option can also be selected, in which case, instead of entering a Password for the account, a PPK file containing the Private Key needs to be uploaded, and the Private Key Passphrase entered.
NOTE: [For the Windows account and Unix account (SSH) secret types only:] In the File Transfer section, if this functionality is to be used, please refer to the Transferring Files Using the WinSCP Application page.
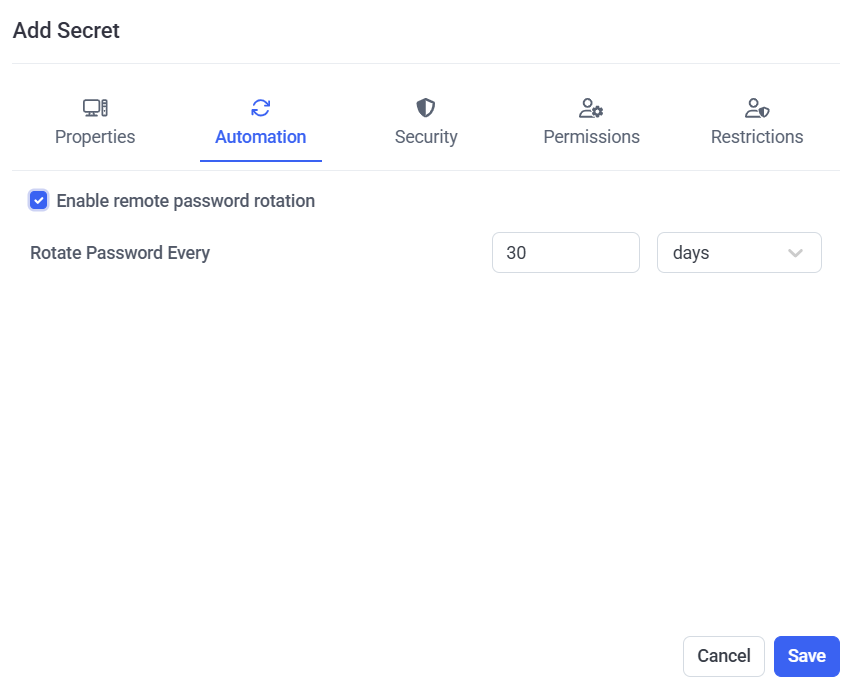
5. [For the Active Directory account, Windows account, Unix account (SSH), and MS SQL account secret types only:] On the Automation tab, if the Remote Password Rotation functionality is to be used, do the following:
• Enable remote password rotation: Select this checkbox to allow the account's password (and the secret's password, which is the same) to be changed automatically (and manually at any time).
NOTE: After a secret is added, when editing it later, the Rotate Now button is also displayed on the Automation tab, which can be clicked at any time to manually change the account's password at any time.
• Rotate Password Every: Select the frequency at which the account's password will be changed automatically.
NOTE: [For the Windows account and Unix Account (SSH) secret types only:] For Remote Password Rotation to work, the preconditions first need to be met on the remote host where the account is located (i.e. on the computer that the secret connects to by using Syteca Connection Manager).
NOTE: If Remote Password Rotation ever fails, the "Failed" status is displayed in the (non-default) Password Rotation Status column on the Password Management page, as well as the corresponding error event on the System Health page. In this case, subsequent password changes will no longer occur.
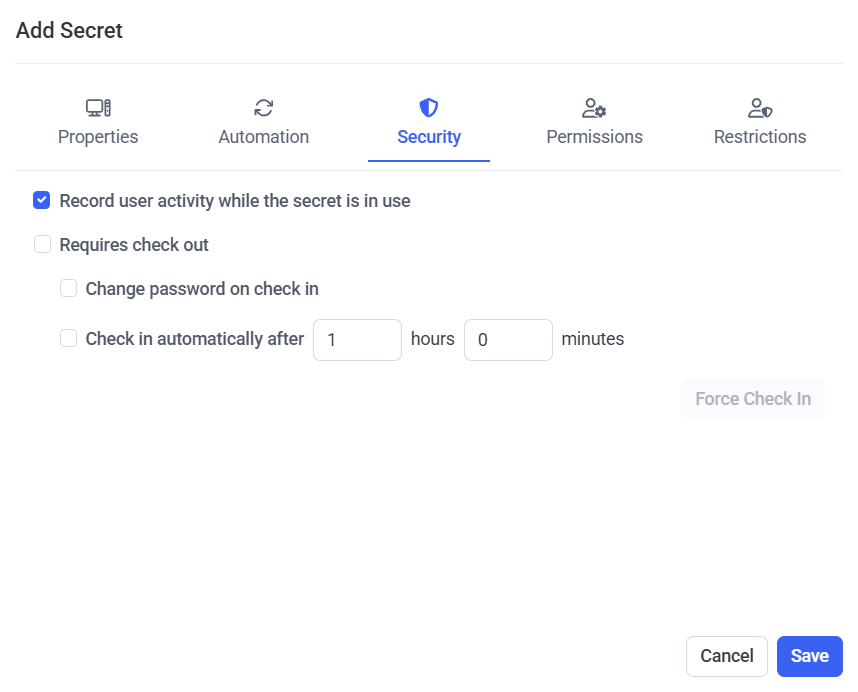
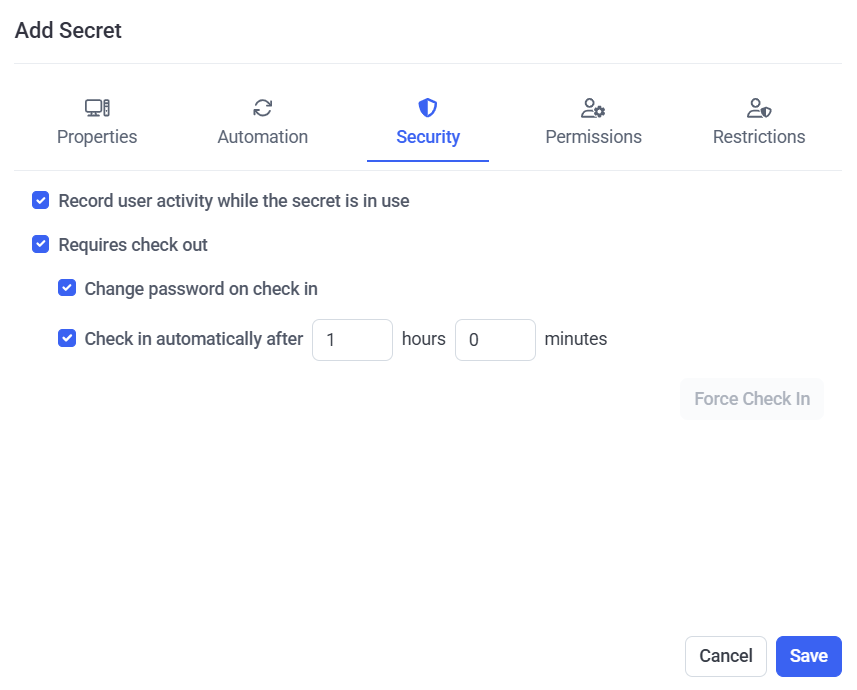
6. On the Security tab, user activity recording when the secret is being used can be enabled, and security can be enhanced by enabling the Password Checkout functionality so that only one user will be able to use the secret at any given time, along with several other options for the Password Checkout functionality, as follows:
• Record user activity while the secret is in use: Select this checkbox to enable user activity to be recorded only whenever the secret is in use (i.e. whenever a user is connected to the corresponding account on the host (e.g. remote) computer by using Syteca Connection Manager). For more detailed information, please refer to the Adding Secrets page.
• Requires check out: Select this checkbox to enable the Password Checkout functionality, so that only one user can check out the secret's password (i.e. can connect to the account that the secret connects to) at any given time.
• [For the Active Directory account, Windows account, Unix account (SSH), and MS SQL account secret types only:] Change password on check in: Select this checkbox for the password to be rotated every time the secret's password is checked back in (i.e. every time a user disconnects or is disconnected from the account that the secret is connected to).
• Check in automatically after: Select this checkbox to specify a time period, after the expiry of which the secret's password will be automatically checked back in (i.e. after which the current user of the secret will be forcibly disconnected from the account that the secret is connected to).
• Force Check In (button): After adding the secret, while editing it later, this button can be clicked at any time to manually check the secret's password back in (i.e. to forcibly disconnect the current user of the secret from the account that the secret is connected to) at any time.
7. On the Permissions tab, add the required users who will be able to use the secret (by clicking the Add button and then selecting the required users / user groups), along with the permissions to be granted to each of them, as follows:
• Role Type permissions must be granted to the users / user groups added, by selecting either Owner, Editor or PAM User in the Role Type column.
• Advanced permissions can also be granted to any users / user groups added, by selecting the checkboxes (
- [For the Active Directory account, Windows account, Unix account (SSH)secret types only:] File Transfer (
- View Password (
- Copy Password (
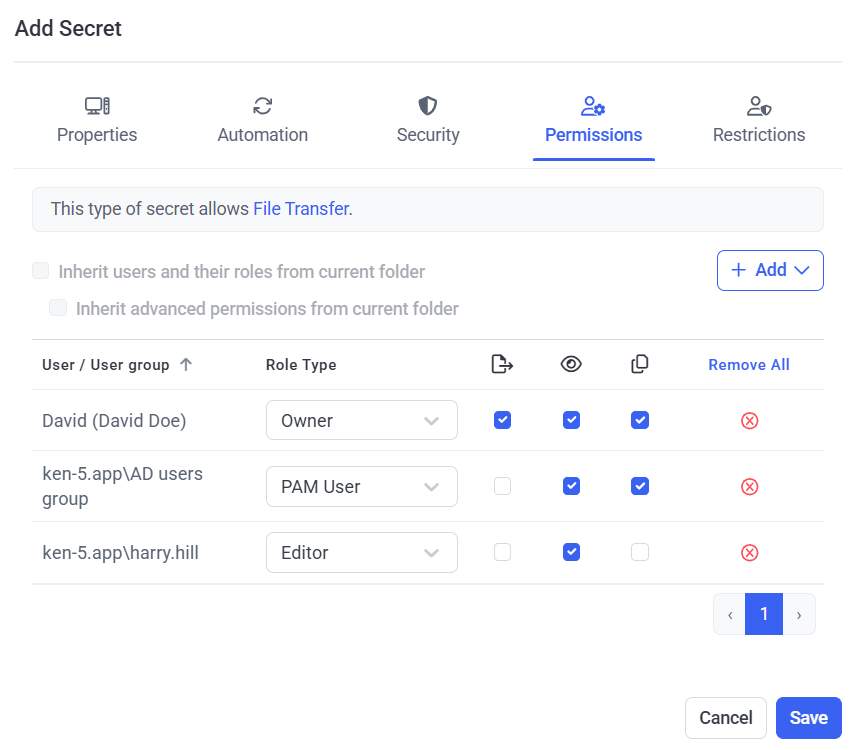
NOTE: Alternatively, the users / user groups who will be able to use the secret, along with their permissions, can be inherited from the parent folder if configured as required in this folder(except from the "All secrets" folder) by selecting the "Inherit users and their roles from current folder" checkbox (to inherit the users / user groups along with their Role Type permissions from the current folder) and the "Inherit advanced permissions from current folder" checkbox (to inherit the "View Password" and "File Transfer" advanced permissions for the users / user groups from the current folder).
NOTE: The default Syteca admin user as a root user will be able to access and modify all secrets created by other Syteca users.
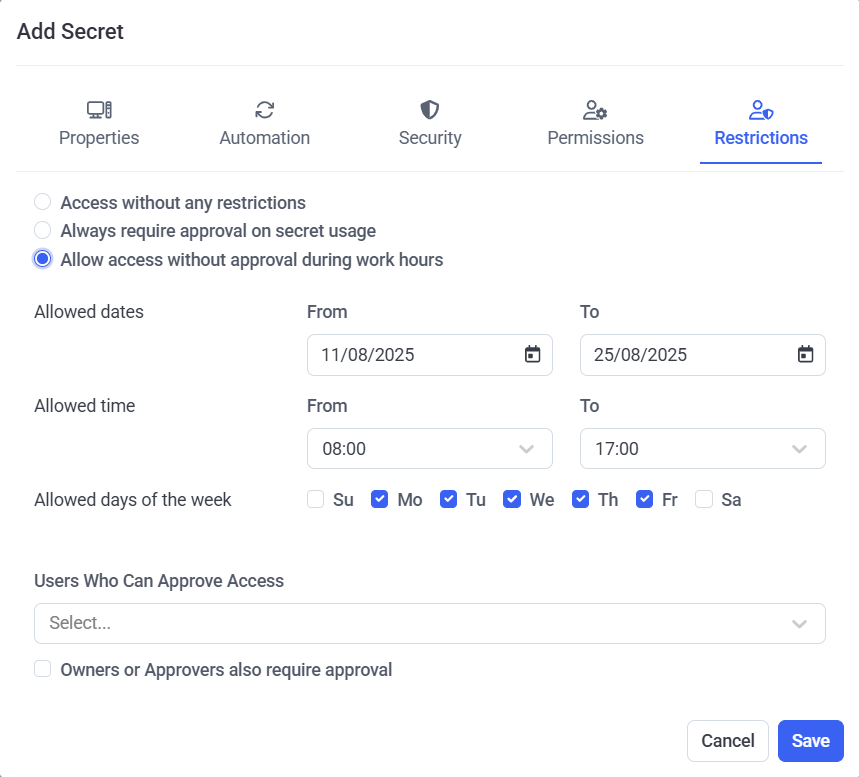
8. On the Restrictions tab, to configure any access restrictions required for the users of the secret, do the following:
• Select the required option:
- Access without any restrictions: If this option is selected, the secret's users will be able to use the secret without any restrictions.
- Always require approval on secret usage: If this option is selected, the secret's users will require approval when they attempt to use the secret.
- Allow access without approval during work hours: If this option is selected, specify the date range, work hours, and days of the week when the secret's users will be able to use the secret without approval.
• Users Who Can Approve Access: Select the Management Tool users (i.e. Approvers) who will be able to approve access requests to use the secret.
• Owners or Approvers also require approval: Select this checkbox to also require approval (e.g. by the default admin user) for Owners and Approvers to use the secret.
NOTE: Approvers receive notifications by email, and can approve access either by clicking the link in the email or by way of the Management Tool (see the Access Requests section).
9. Click the Save button (in the bottom right) to complete creating the secret.
5. Using Secrets
NOTE: The functionality described in this section for the desktop version of Syteca Connection Manager can alternatively be used in a similar way (but instead directly from the Management Tool) by using Syteca Web Connection Manager.
The different types of secrets described below are used to access the corresponding different types of accounts.
3.1. Active Directory Accounts
The Active Directory account secret type allows you to select which computer you want to connect to in the Active Directory domain.
NOTE: Microsoft Remote Desktop Connection (mstsc.exe) needs to be installed on the computer with Syteca Connection Manager.
After selecting the required secret and clicking Connect, in the additional pop-up window that opens, enter the name of the Computer (or its IP address) that you want to access, and then click Connect.
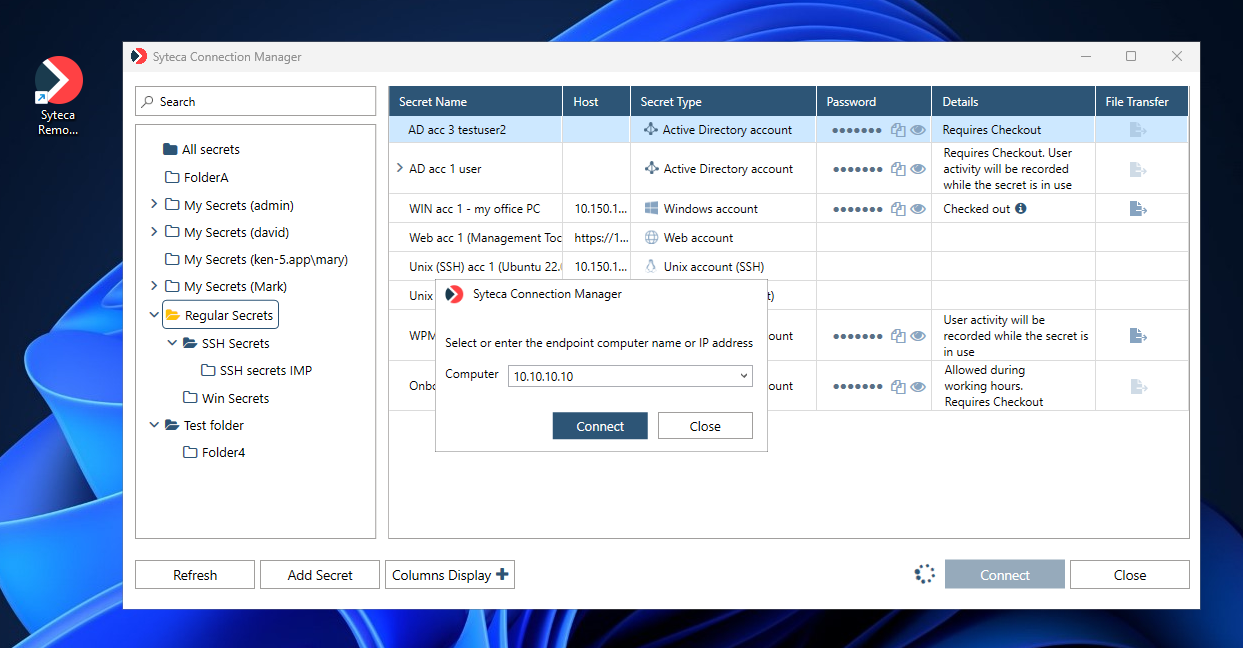
The system then automatically logs the user in to the Active Directory account, after clicking Connect to start using the secret.
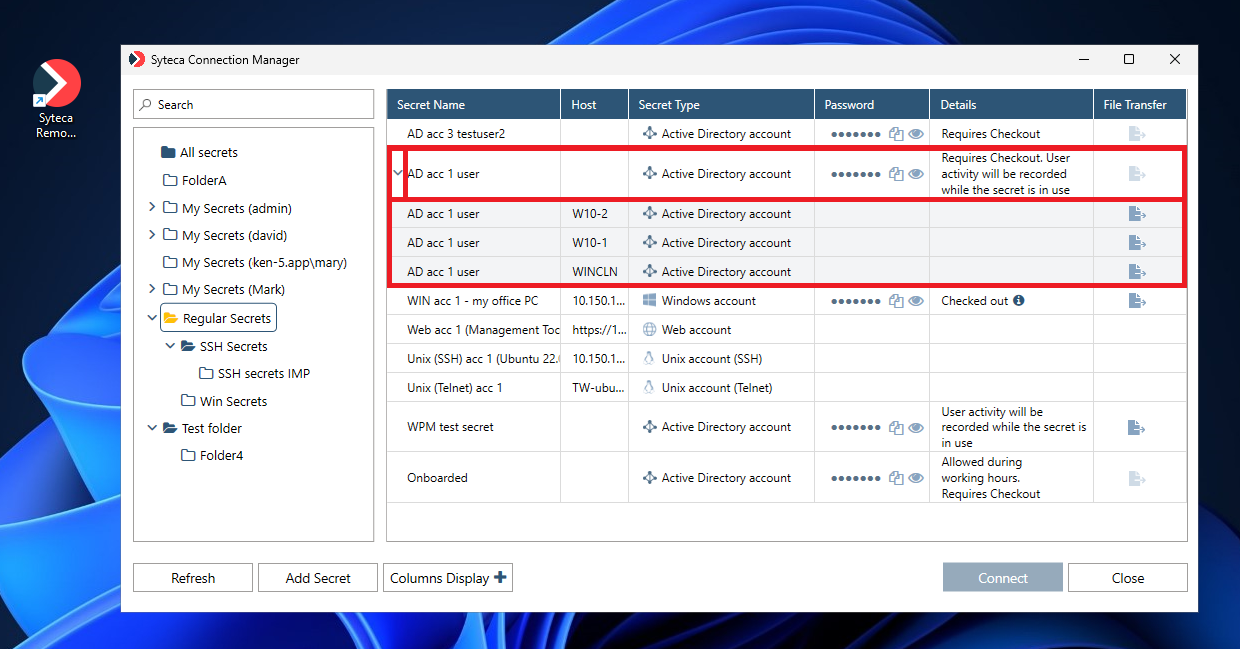
NOTE: If connections are only allowed to specific computers in the domain, the “parent” secret first needs to be expanded (by clicking the down-arrow (
3.2. Windows Accounts
The Windows account secret type allows you to work with local and domain user accounts on a specific computer.
NOTE: Microsoft Remote Desktop Connection (mstsc.exe) needs to be installed on the computer with Syteca Connection Manager.
The system automatically logs the user in to the selected Windows account (after clicking Connect in Syteca Connection Manager) to start using the secret.

3.3. Unix Accounts (SSH)
The Unix account (SSH) secret type allows you to configure a secret user’s connection to a Unix account.
NOTE: PuTTY needs to be installed on the computer with Syteca Connection Manager, and the "Use SSH key" option can also be selected instead of the "Use password" option when editing/adding a secret.
The system automatically logs the user in to the Unix account (SSH), after clicking Connect to start using the secret.

3.4. Unix Accounts (Telnet)
The Unix account (Telnet) secret type allows you to configure a secret user’s connection to a Unix account.
The system automatically logs the user in to the Unix account (Telnet), after clicking Connect to start using the secret.

3.5. Web Accounts
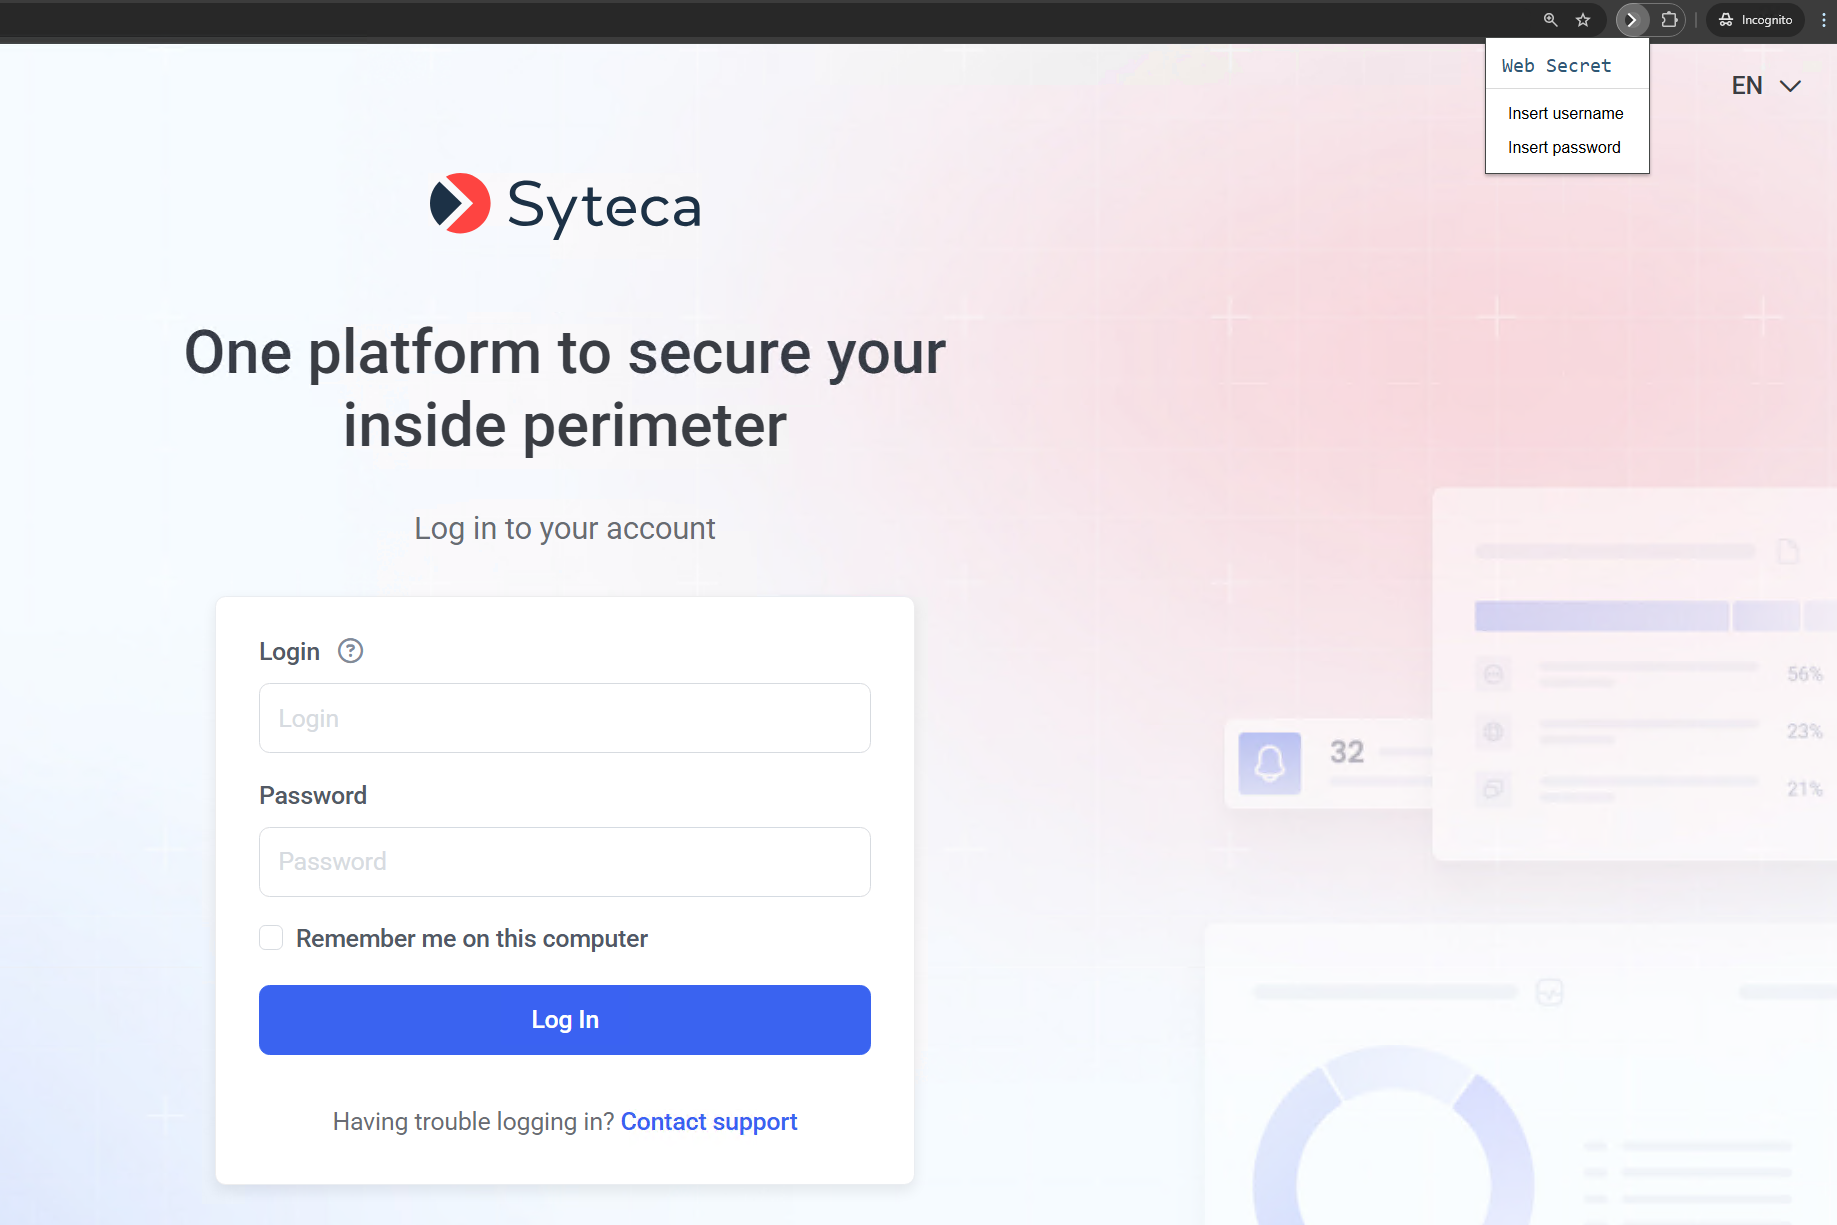
The Web account secret type allows you to configure a secret user’s connection to a Web account.
NOTE: The Web account secret type is only compatible with the Google Chrome browser (this type of secret will not function correctly in other browsers), which needs to be installed on the computer with Syteca Connection Manager. Also, Web account secrets always open in Incognito mode, which does not allow the browser to cache data.
The system automatically logs the user in to the Web account, after clicking Connect to start using the secret.
NOTE: If the system does not log you in automatically, a Syteca extension for the Google Chrome browser is available that allows you to insert the username and password for the Web account.
3.6. MS SQL Accounts
The MS SQL account secret type allows you to configure a secret user's connection to the database.
NOTE: Version 18.0 or higher of Microsoft SQL Server Management Studio needs to be installed on the computer with Syteca Connection Manager for this type of secret to function correctly.
The system automatically logs the user in to MS SQL Management Studio, after clicking Connect to start using the secret.

4. Summary of Third-Party Applications Required to Use Secrets
To be able to use the different types of secrets, the applications listed below must first be installed on the computer with Syteca Desktop Connection Manager or Syteca Web Connection Manager (to be able to use the Launch locally option only).
| # | Secret Type | Application Required (to be Installed) |
| 1 | Active Directory account | Microsoft Remote Desktop Connection (mstsc.exe) |
| 2 | Windows account | Microsoft Remote Desktop Connection (mstsc.exe) |
| 3 | Unix account (SSH) | PuTTY |
| 4 | Unix account (Telnet) | [No third-party application required] |
| 5 | Web account | Google Chrome browser |
| 6 | MS SQL account | Microsoft SQL Server Management Studio (SSMS) |
NOTE: To be able to use the File Transfer feature (which is only available for the Active Directory account, Windows account, and Unix account (SSH) secret types), please refer to the Transferring Files Using the WinSCP Application page.