Account Discovery
Along with Password Management, the Account Discovery feature is an integral part of Syteca's Privileged Access Management (PAM) functionality.
The Account Discovery feature allows both:
1. Account discovery: Automatic network scanning to detect privileged (and some other) user accounts on the network.
2. Account onboarding: Adding new Password Management account secrets by onboarding the user accounts discovered to the vault, using the following account parameters:
• Login
• Password (or Private Key and Passphrase (if used) for Linux accounts with public SSH keys).
• Domain (for Active Directory accounts) or Computer name (for Windows local and Linux accounts).
To discover accounts, account discovery rules of the following types (as required) must first be created:
• Active Directory Discovery rules (for privileged Active Directory domain accounts).
• Computer Discovery rules (for privileged Windows local accounts).
• NOT AVAILABLE IN SAAS Linux Discovery rules (for privileged Linux accounts, and (optionally) also service and application accounts, and accounts with public SSH keys).
NOTE: Discovering Linux accounts is not currently supported on Solaris computers.
New and modified Active Directory, Windows local, and Linux accounts can then be discovered on the network automatically by running the rules (to perform network scans), after which these accounts can selectively be onboarded into new Password Management account secrets, either individually or by using Bulk Action to onboard/manage multiple accounts simultaneously, and without needing to know their credentials.
NOTE: For Active Directory and Windows local accounts to be discovered, the associated LDAP target must first be added on the LDAP Targets tab (on the Configuration page).
NOTE: The Account Discovery page is only available for use by Management Tool users with the administrative Privileged Accounts Management permission and a PAM seat license.
Table of Contents
1. Viewing (and Editing) Account Discovery Rules
To view (and edit) existing account discovery rules, do the following:
1. Log in to the Management Tool as a user with the administrative Privileged Accounts Management permission.
2. Click the Account Discovery navigation link (on the left).
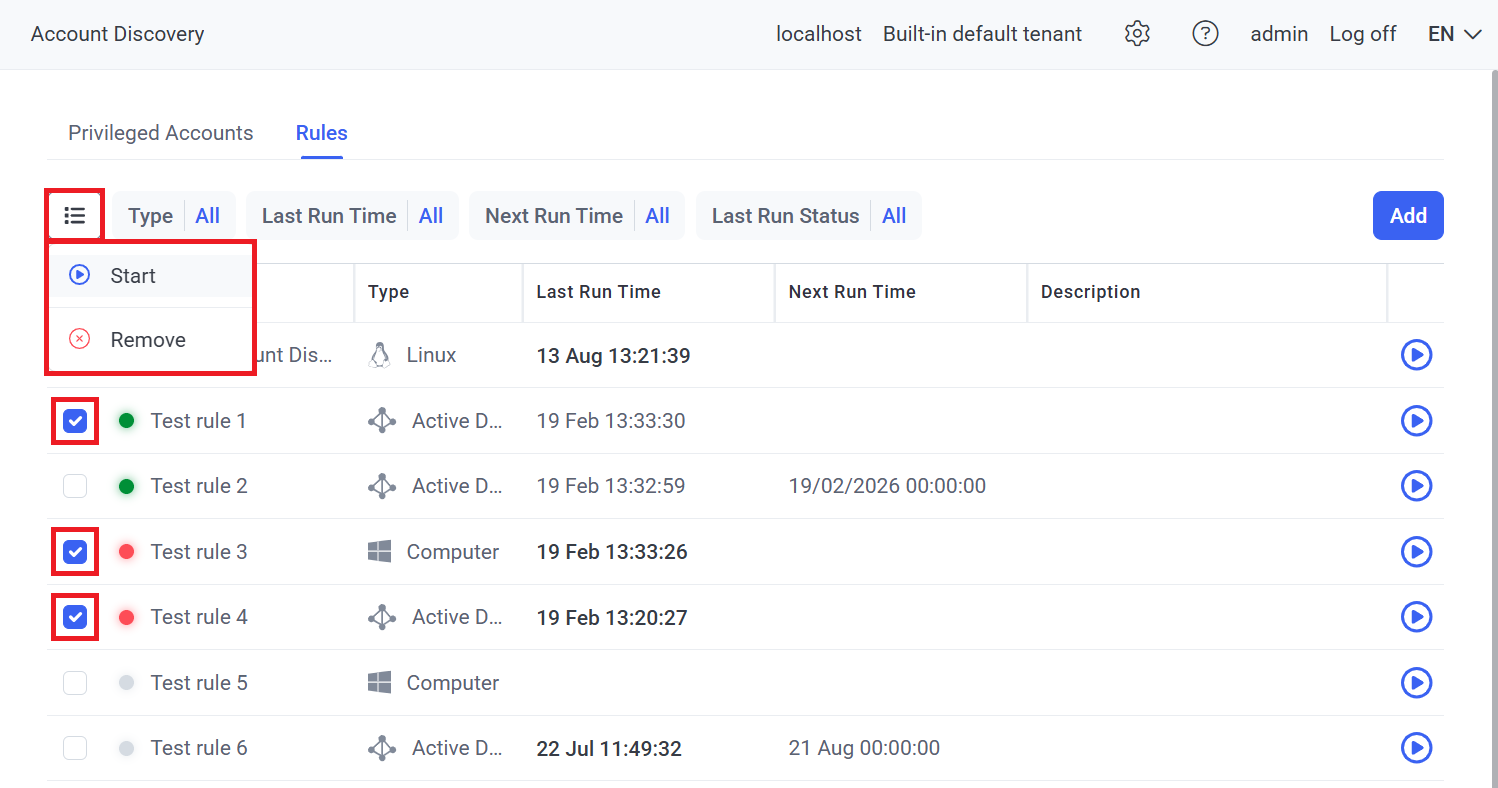
3. On the Account Discovery page that opens, select the Rules tab, that displays a list of all existing rules added, where the following information is displayed in the corresponding columns for each rule in the grid:
• 


•Name: The name of the account discovery rule, along with a color-coded Status icon for the last time the rule was run, where the status can be either:
- 
- 
- 
- 
• Type: Either:
- Active Directory (
- Windows (
NOTE: To maximize the number of privileged accounts the system can detect when discovering computers, the WMI and Powershell scanners used can also be configured.
- Linux (
NOTE: To discover Linux accounts, SSH connections for Linux scanning must first be configured.
• Last Run Time: The date & time when the rule was last run (not displayed if the rule has never been run).
NOTE: The date & time displayed can be clicked on to open the Tasks List tab (displaying the corresponding Account Discovery task only) in a new browser tab filtered by the rule.
• Next Run Time: The date & time when the rule is scheduled to run next (only if Scheduled Discovery is enabled in the rule).
• Description: The description of the account discovery rule.
• The Start (

4. To edit a rule (and optionally remove it by clicking the Delete button while editing), click anywhere on the corresponding row displayed in the grid (and edit it in the popup window that opens, in a similar way to as when adding a rule – see below).
2. Adding (and Running) Account Discovery Rules
To add new (and run or remove) account discovery rules, do the following:
1. Log in to the Management Tool as a user with the administrative Privileged Accounts Management permission.
2. Click the Account Discovery navigation link (on the left).
3. On the Account Discovery page that opens, select the Rules tab which displays a list of all existing rules added in the grid.
4. Click the Add button (in the top right of the Rules tab)
5. In the Add Discovery Rule pop-up window that opens, specify the required values in the following sections:
• General:
- Rule name: Enter a name for the account discovery rule (where only unique names are permitted).
- Description (optional): Enter a description for the account discovery rule.
- Type: Select either:
- Active Directory Discovery: For discovering privileged Active Directory domain admin accounts (i.e. AD users in the Domain Admins group or the Enterprise Admins group).
- Computer Discovery: For discovering privileged Windows local accounts on computers with either or both of:
- Administrator permissions (i.e. local computer users in the default Administrators group).
- Any privileged permissions that were granted via GPO (e.g. "Act as part of the operating system" (SeTcbPrivilege), "Back up files and directories" (SeBackupPrivilege), etc).
NOTE: To maximize the number of privileged Windows local accounts the system can detect (when discovering computers), the WMI and Powershell scanners used can also be configured.
- Linux Discovery: For discovering Linux accounts on computers (as specified in the Account type and Public SSH keys fields below):
- Either All Accounts (i.e. privileged, service, and application accounts).
- Or only Privileged Accounts (i.e. non-daemon accounts that were created manually, and the “root” account).
- And (optionally) including accounts with Public SSH keys (in either of the above cases).
NOTE: To discover Linux accounts, SSH connections for Linux scanning must first be configured.
- IP range for scanning [only available for the Linux Discovery rule type]: Enter the range of IP addresses to be scanned separated by a hyphen (e.g. “10.100.10.10-10.100.10.40”), or enter a list of the IP addresses to be scanned separated by semicolons (e.g. “10.100.10.10; 10.100.10.20; 10.100.10.30”).
- Account type [only available for the Linux Discovery rule type]: Select either:
- All Accounts: To scan the Linux computers in the IP range/list specified, and discover all accounts (i.e. privileged, service, and application accounts).
- Privileged Accounts: To scan the Linux computers in the IP range/list specified, and discover only privileged accounts (i.e. non-daemon accounts that were created manually, and the “root” account).
- Public SSH keys [only available for the Linux Discovery rule type] (optional): Select this checkbox to also allow scanning for accounts with public SSH keys on the Linux computers.
- Source domain [only available for Active Directory Discovery and Computer Discovery rule types]: Select a domain from the list of all domains added as associated LDAP targets on the LDAP Targets tab (on the Configuration page).
- Discover accounts from specific OUs / groups [only available for Active Directory Discovery and Computer Discovery rule types] (optional): Select one or multiple organizational units / groups in the drop-down list (i.e. from those in the selected Source domain).
- Select account to use for scans: Select the Password Management account secret(s) to be used to run network scans under, that the user has the Owner or Editor Role Type permissions for, either:
- one secret (in the drop-down list of both Active Directory account secrets and Windows account secrets displayed) [for the Active Directory Discovery and Computer Discovery rule types only].
- one or multiple secrets (in the drop-down list of Unix account (SSH) secrets with private SSH keys displayed) [for the Linux Discovery rule type only].
NOTE: For security reasons, only Unix account (SSH) secrets with private SSH keys can be selected in the "Select account to use for scans" field, and these secrets must also have passwordless sudo configured to be able to discover Linux accounts with public SSH keys.
NOTE: The "Add Secret" button (displayed at the top of the "Select account to use for scans" drop-down list) can also be clicked to add a new Active Directory account / Windows account / Unix account (SSH) secret with a private SSH key to the drop-down list of secrets available (by adding a secret in the usual way on the Password Management page that opens in a new browser tab).
• Scheduled Discovery (optional): Enable the toggle (on the right) to set the account discovery rule to run network scans automatically according to a schedule, as specified below:
- Recurring scans every: Specify the frequency for recurring network scans (either in days or in hours).
- Start at: Specify the start time for a scans (if the frequency is specified in days).
• Actions:
- Send email notification about new accounts found to (optional): Select the users to be notified by email about new accounts discovered when a network scan is Completed (or when a scan Completed with errors), where multiple users can be selected.
NOTE: The corresponding users must have an Email address specified in their user account (i.e. when editing or adding a user on the Users page).
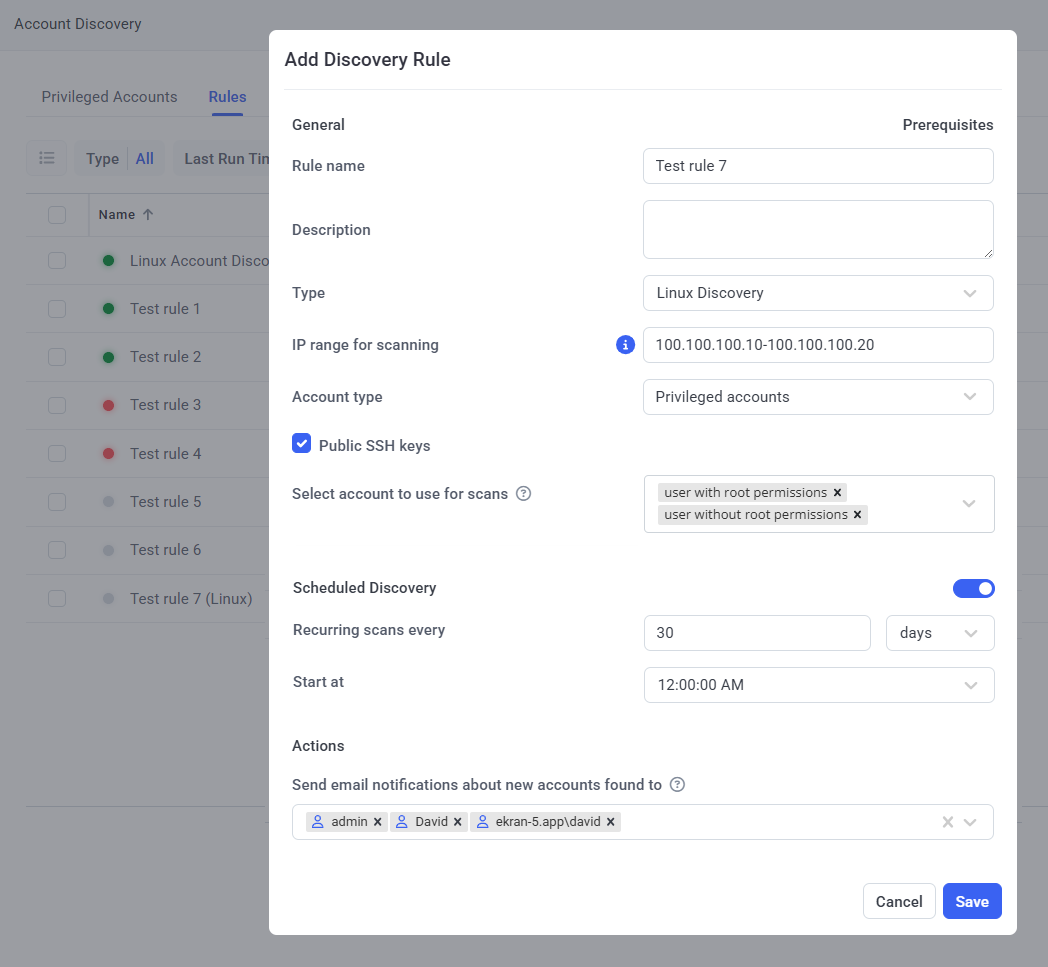
6. Click the Save button to add the new account discovery rule (which is then displayed in the grid on the Rules tab).
7. To run account discovery rules manually at any time (whether Scheduled Discovery is enabled in them or not), either:
• To run a single discovery rule: Click the Start (
• To run multiple discovery rules simultaneously: Select the checkboxes (
NOTE: While an account discovery rule is running, if the secret specified in the “Select the account to use for scans” drop-down list of the rule has either of the following checkboxes selected (when editing or adding the secret):
• “Enable remote password rotation” (on the secret’s "Automation" tab): Remote password (or SSH key) rotation is postponed, and the "Rotate Now" button is disabled.
• “Requires check out” (on the secret’s "Security" tab): The secret's password is checked out (by the system), so the secret cannot be used by another user.
8. When a discovery rule is run (either manually, or automatically if Scheduled Discovery is enabled in the discovery rule), the corresponding Account Discovery task is added to the list in grid on the Tasks List tab (on the System Health page), where:
• The task can be canceled (while its status is Queued or In progress), by clicking the Cancel (
• The task’s log file can be downloaded (when its status is Finished or Failed) by clicking the Download logs (

• The task can be deleted from the list in the grid along with its log file (while its status is Finished or Failed), by clicking the Remove (
9. When an Account Discovery task is completed (i.e. when its status is Finished or Failed, an email is sent to the email address(es) of the user(s) specified (in the Send email notification about new accounts found to field) of the rule.
If a task Failed (or does not start), this may be due to any of the following reasons:
• The secret specified to use for the scan (i.e. the secret selected in the Select account to use for scans field of the discovery rule), has any of the following issues:
- Remote password (or SSH key) rotation failed (i.e. the secret's most recent password (or SSH key) rotation failed).
- The account credentials stored in the secret are invalid.
- The secret is currently in use by another user, i.e. the secret’s password is checked out by another user (if the Requires check out checkbox is selected on the secret’s Security tab).
- The user account in the secret does not have the required domain admin privileges (i.e. the privileges for a user in the Domain Admins or Enterprise Admins user group).
• The LDAP target (added on the Configuration page) associated with the discovery rule (i.e. selected in the Source domain field) does not exist (e.g. because it has been deleted).
NOTE: If the system fails to scan the accounts on any computers in a rule of the Computer Discovery type or Linux Discovery type, the Account Discovery task has the "Failed" status (and the rule has the "Completed with errors" status), while user accounts discovered on other computers are added and displayed on the Privileged Accounts tab.
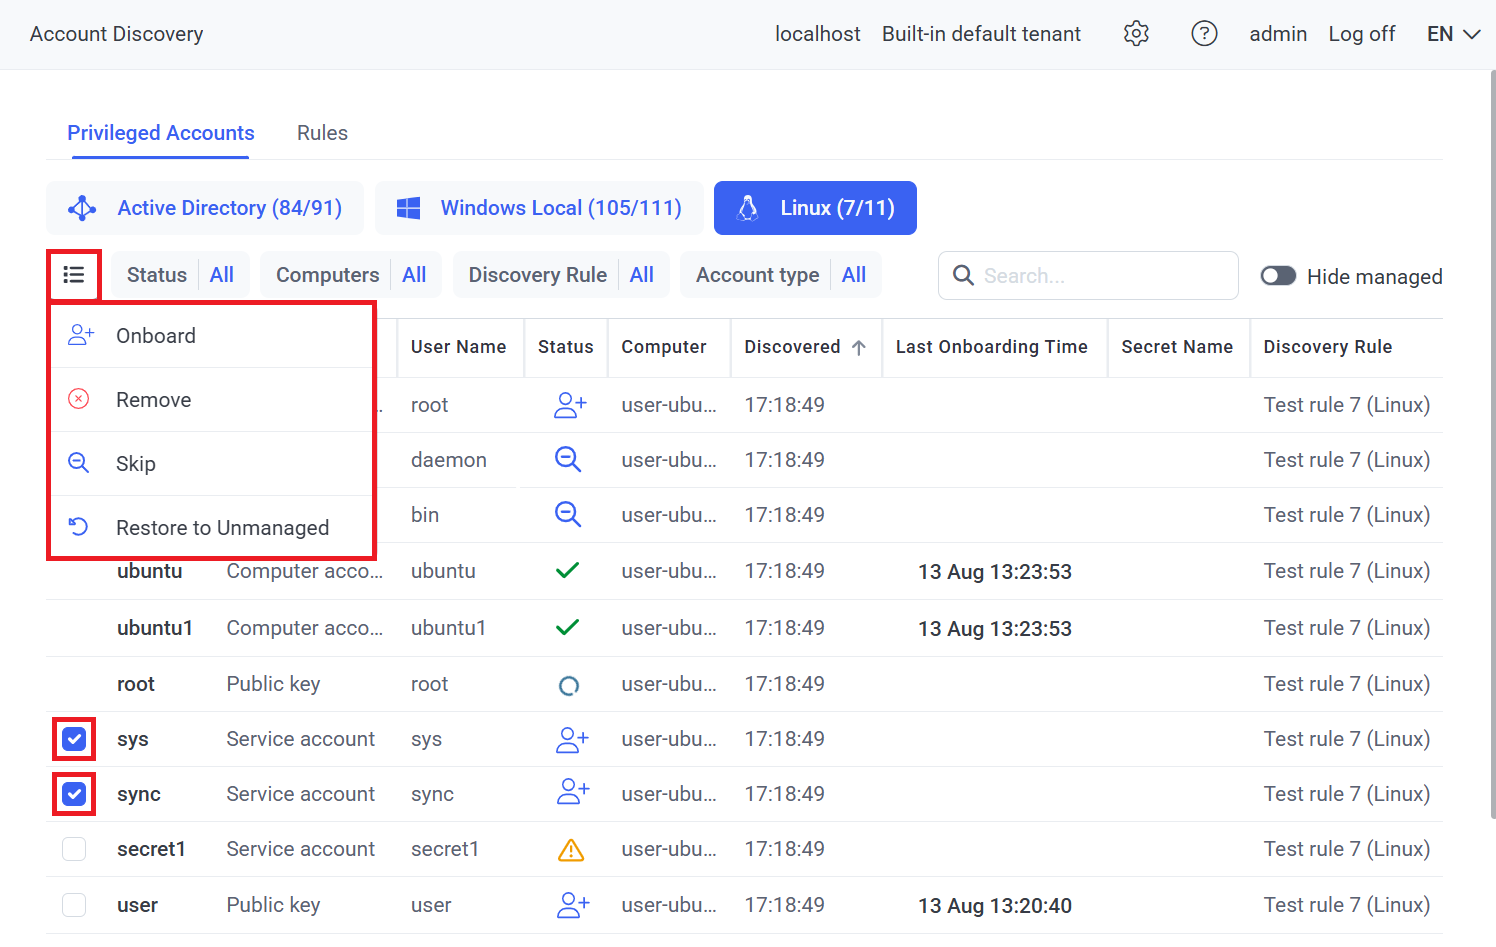
3. Viewing (and Managing) Accounts Discovered
To view (and manage) accounts discovered, do the following:
1. Log in to the Management Tool as a user with the administrative Privileged Accounts Management permission.
2. Click the Account Discovery navigation link (on the left).
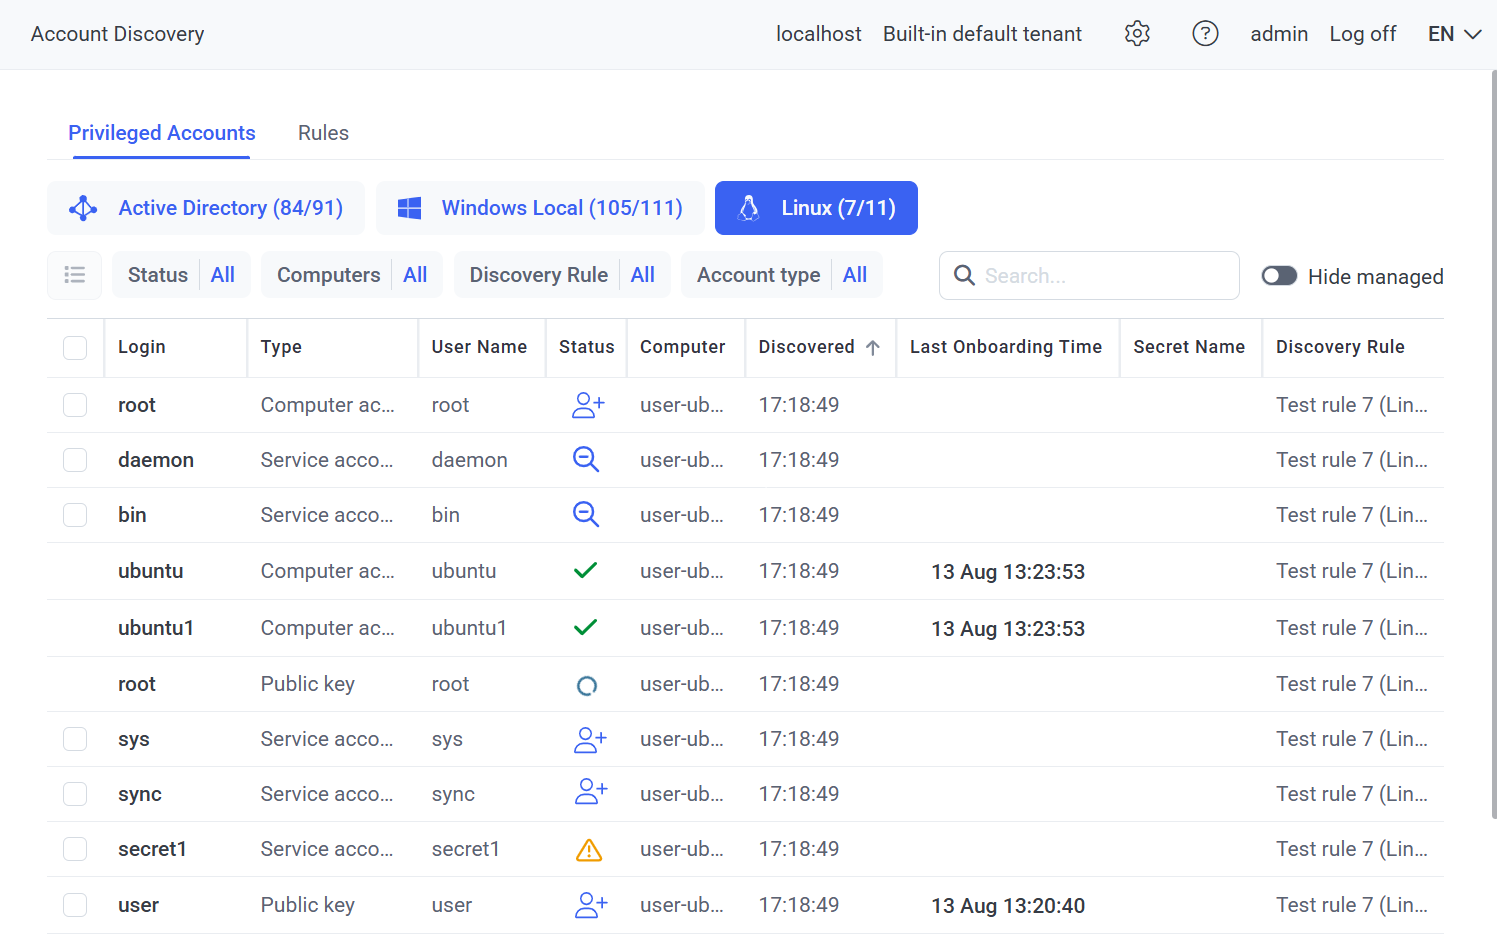
3. On the Account Discovery page on the Privileged Accounts tab that opens (on the Active Directory, Windows Local, and Linux sub-tabs), a list of accounts previously discovered by rules that have been run (i.e. Completed or Completed with errors) are displayed in the grid with the following columns:
• 
• Login: The user login name for the account discovered.
• User Name: The First Name and Last Name specified in the account discovered.
• Type [only available for Linux accounts]: Either:
- Service account (for Linux service and application accounts).
- Computer account (for privileged Linux accounts, i.e. non-daemon accounts that were created manually, and the “root” account).
- Public key (for Linux accounts with public SSH keys).
• Status: Either:
- 
- 
- 
- 
NOTE: If an account in the Skipped status is discovered in future scans, it remains in the Skipped status.
- 
• Computer [only available on the Windows Local and Linux sub-tabs]: The name of computer that the account was discovered on.
• Discovered: The date & time when the account was last discovered.
• Last Onboarding Time: The date & time when the most recent Account Onboarding task started for the account (if onboarded).
NOTE: The date & time displayed can be clicked on to open the Tasks List tab (displaying the corresponding Account Onboarding task only) in a new browser tab.
Secret Name: The date & time when the most recent Account Onboarding task started for the account (if onboarded).: The name of the secret that was created for this account (if onboarded).
NOTE: The name of a secret displayed can be clicked on to open the Password Management page (displaying the corresponding secret only) in a new browser tab.
• Discovery Rule: The name of the account discovery rule that discovered the account.
NOTE: If the same account was discovered by multiple rules, only one record (row) is added to the list in the grid, which is for the rule that was last run.
NOTE: If the rule associated with the account was deleted, the name of the rule is displayed in the "<Discovery rule name> (deleted)" format.
To onboard accounts discovered into new secrets, please refer to section 4. Onboarding Accounts Discovered (below).
To remove (i.e. delete from the database) any Unmanaged, Expired, or Skipped accounts discovered, select the checkboxes (
To skip (i.e. mark as not to be onboarded / prevent from being onboarded) any Unmanaged accounts discovered, select the checkboxes (
To restore any Skipped accounts discovered back to Unmanaged status, select the checkboxes (
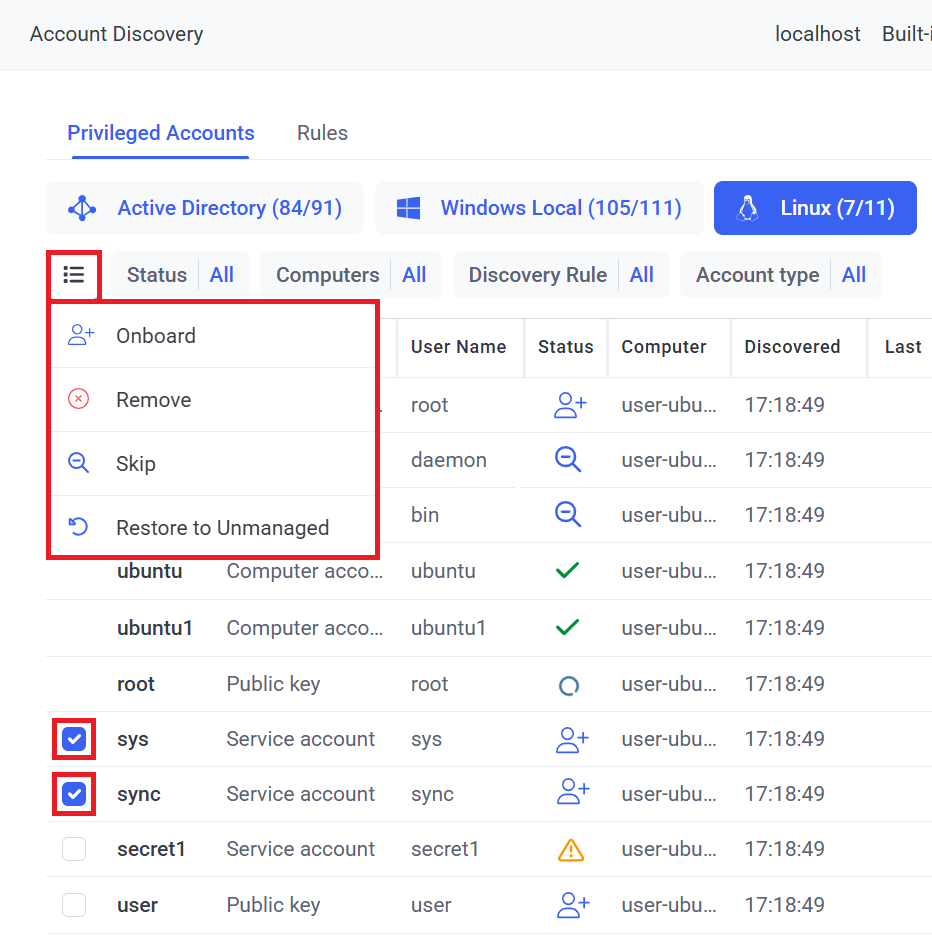
NOTE: Checkboxes are not displayed for accounts with the "Managed" (or "Onboarding in Progress") status, since they have already been (or are being) onboarded, and cannot therefore be removed, skipped or restored back to "Unmanaged" status (except by deleting the secret created on the Password Management page, in which case the account will be automatically restored back to "Unmanaged" status).
To search the accounts in the list, enter the name (or part of the name) in the Search box (in the top right of the page) to search by Login, User Name, Computer (for Windows local and Linux accounts only), or Secret Name.
To filter the accounts in the list, use the various filters (at the top of the page).
4. Onboarding Accounts Discovered
NOTE: Before onboarding accounts discovered, remote password (or SSH key) rotation must first be configured on the corresponding target host computers.
To onboard accounts discovered into new secrets, do the following:
1. Log in to the Management Tool as a user with the administrative Privileged Accounts Management permission.
2. Click the Account Discovery navigation link (on the left).
3. On the Account Discovery page that opens, on the Privileged Accounts tab (optionally use the filters e.g. the Status filter to select only Unmanaged accounts, and then) either:
• To onboard a single account: Click on the corresponding Unmanaged (
• To onboard multiple accounts simultaneously: Select the checkboxes (
NOTE: When using Bulk Action to onboard Linux accounts, accounts of the “Public key” type cannot be selected simultaneously with other types (i.e. with “Computer account” or “Service account”) of Linux accounts (otherwise the Bulk Action (
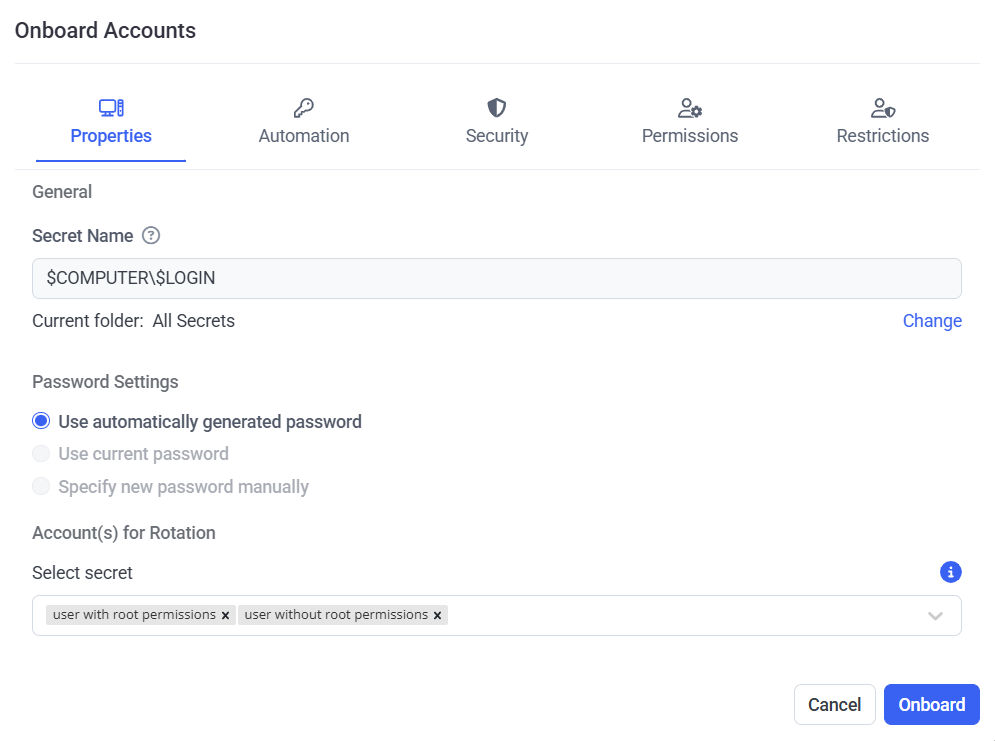
4. In the Onboard Account(s) pop-up window that opens, on the Properties tab, specify the required values to configure the parameters to be used for the new secret(s) that will be added when onboarding the account(s) in the following sections:
• General:
- Secret Name: Enter a name for the secret.
NOTE: This field is disabled when multiple accounts are selected using Bulk Action, as in this case the secret names are generated automatically in the following formats (as displayed):
- For Active Directory accounts: $DOMAIN\$LOGIN (e.g. "domain.local\admin").
- For Windows local accounts: $COMPUTER\$LOGIN (e.g. "WINDESKTOP1\admin").
- For Linux accounts: $COMPUTER\$LOGIN (e.g. "ubuntu1\root").
- Change (optional): Click this button (on the right) to change the Current folder that the secret(s) will be added to (where the user can select any folder they have the Owner/Editor Role Type permissions for).
• Password Settings: Specify either of the following options for the accounts to be added into new secrets:
- Use automatically generated password: To randomly-generate a new password.
NOTE: When using Bulk Action, this option is selected (and cannot be deselected).
- Use current password: To enter the current password (which is not rotated during account onboarding) in the field that is displayed below it.
NOTE: The above option is not available for Linux service accounts.
- Specify new password manually: To enter a new password (which is rotated during account onboarding) in the field that is displayed below it.
- Import Private Key [only available when onboarding Linux accounts with public SSH keys:]: To upload a private SSH key, and enter the passphrase (if used) in the field that is displayed below it.
• Account(s) for Rotation [disabled when the “Use current password” option is selected in the Password Settings section above]: Specify the secret(s) to use for remote password (or SSH key) rotation, that the user has the Owner or Editor Role Type permissions for, either:
- Select secret, and then select either:
- one secret (in the drop-down list of both Active Directory account secrets and Windows account secrets displayed) [when onboarding Active Directory and Windows local accounts only].
- one or multiple secrets (in the drop-down list of Unix account (SSH) secrets with private SSH keys displayed) [when onboarding Linux accounts only].
NOTE: For security reasons, only Unix account (SSH) secrets with private SSH keys can be selected in the "Select secret" field, and these secrets must also have passwordless sudo configured to be able to onboard all types of Linux accounts.
NOTE: The "Add Secret" button (displayed at the top of the "Select secret" drop-down list) can also be clicked to add a new Active Directory account / Windows account / Unix account (SSH) secret with a private SSH key to the drop-down list of secrets available (by adding the secret in the usual way on the Password Management page that opens in a new browser tab).
- Enter credentials manually [not available when onboarding Linux accounts], and then enter the User name and Password of an existing account with local admin privileges.
NOTE: It is recommended to use the same account that was selected in the associated account discovery rule, in the "Select account to use for scans" field.
NOTE: For Active Directory accounts, remote password rotation is performed during the onboarding process using the account defined in the associated LDAP target (added on the Configuration page).
NOTE: For Active Directory accounts, when an automatic LDAP target is used on the computer where Syteca Application Server is installed, the EkranServer service must be run under a domain admin account.
5. On the Automation, Security, Permissions, and Restrictions tabs, configure the settings in the usual way (as when editing or adding a secrets on the Password Management page).
6. Click the Onboard button (in the bottom right of the pop-up window) to onboard the account(s) i.e. to add the associated secret(s) for the account(s).
7. On the System Health page, on the Tasks List tab, the progress of the Account Onboarding tasks (for each of the corresponding accounts) can then be viewed (and optionally Canceled while Queued or In progress).
8. When a task is Finished, the corresponding account is onboarded and has the Managed (