Configuring WMI and PowerShell for Use in Computer Discovery Scanning
NOT AVAILABLE IN SAAS
This page describes best practices on how to configure and troubleshoot WMI (Windows Management Instrumentation) and Windows PowerShell to use them for Syteca’s Account Discovery feature, so as to maximize the number of privileged accounts the system can find when running Computer Discovery rules (i.e. to find local Windows accounts on the target computers).
NOTE: Either of these tools can be used for scanning, but by default both run concurrently, and accounts found are not duplicated (i.e. only one account is discovered and displayed on the Privileged Accounts tab on the Account Discovery page).
The WMI scanner can only find privileged local accounts that are part of the default Administrators group, whereas the Windows PowerShell scanner can also find all local accounts with any privileged permissions (e.g. Act as part of the operating system (SeTcbPrivilege), Back up files and directories (SeBackupPrivilege), etc.) that were granted via GPO.
Table of Contents
1. Keys in the .config File
The values of the keys can be changed by adding/modifying them in the "EkranServer.Settings.config" file, which can be found in the C:\Program Files\Ekran System\Ekran System\Server folder on the computer where Syteca Application Server is installed.
| # | Key in .config File | Description |
| 1. | <add key="WmiScanner" value="1" /> | For the system to use or not use the WMI scanner, depending on the value (1 or 0). If the key is missing, the value of 1 will be applied by default, and the WMI scanner will be used. |
| 2. | <add key="PowerShellScanner" value="1" /> | For the system to use or not use the PowerShell scanner, depending on the value (1 or 0). If the key is missing, the value of 1 will be applied by default, and the PowerShell scanner will be used. |
| 3. | <add key="WmiConnectionTimeoutSeconds" value="20" /> | For the WMI scanner to spend no more than <key value> seconds connecting to one computer (i.e. be timed out). If the key is missing, 20 seconds will be applied by default for the WMI scanner. The key value must be greater than or equal to 1. |
| 4. | <add key="PowerShellConnectionTimeoutSeconds" value="20" /> | For the PowerShell scanner to spend no more than <key value> seconds connecting to one computer (i.e. be timed out). If the key is missing, 20 seconds will be applied by default for the PowerShell scanner. The key value must be greater than or equal to 1. |
| 5. | <add key="PowerShellScannerUseHttps" value="0" /> | For the system to use an HTTP or HTTPS connection for the PowerShell scanner, depending on the value (1 = HTTPS or 0 = HTTP). If the key is missing, the value of 0 will be applied by default, and the PowerShell scanner will use an HTTP connection. |
| 6. | <add key="PowerShellScannerUseHttpPort" value="5985" /> | For the system to use port number <key value> for the HTTP connection for the PowerShell scanner. If the key is missing, the value of 5985 will be applied by default, and this port will be used for the HTTP connection of the PowerShell scanner. |
| 7. | <add key="PowerShellScannerUseHttpsPort" value="5986" /> | For the system to use port number <key value> for the HTTPS connection for the PowerShell scanner. If the key is missing, the value of 5986 will be applied by default, and this port will be used for the HTTPS connection of the PowerShell scanner. |
2. Prerequisites for Computer Discovery
2.1. WMI Scanner Prerequisites
Check the following:
1. Make sure that the value of the "WmiConnectionTimeoutSeconds" key is valid in the EkranServer.Settings.config file (see the table above).
NOTE: The default value of 20 (seconds) should normally be sufficient to find Windows local accounts by the computer where Syteca Application Server is installed, while a high timeout value may increase the time required to scan any target computers in the network that are unreachable.
2. Make sure you have correctly set up the required rules in Windows Firewall on both computers (i.e. on the computer where Syteca Application Server in installed, and on the target endpoint computers that you want to find accounts on).
a) Press Win+R, and then enter firewall.cpl, and press Enter.
b) Click the Allow an app or feature through Windows Defender Firewall option (on the left).
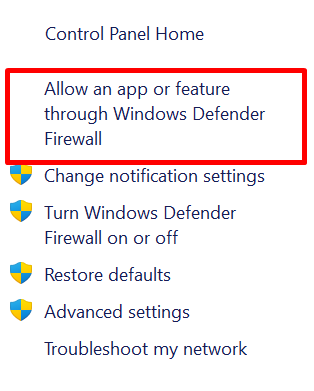
c) Click the Change settings button to disable it.
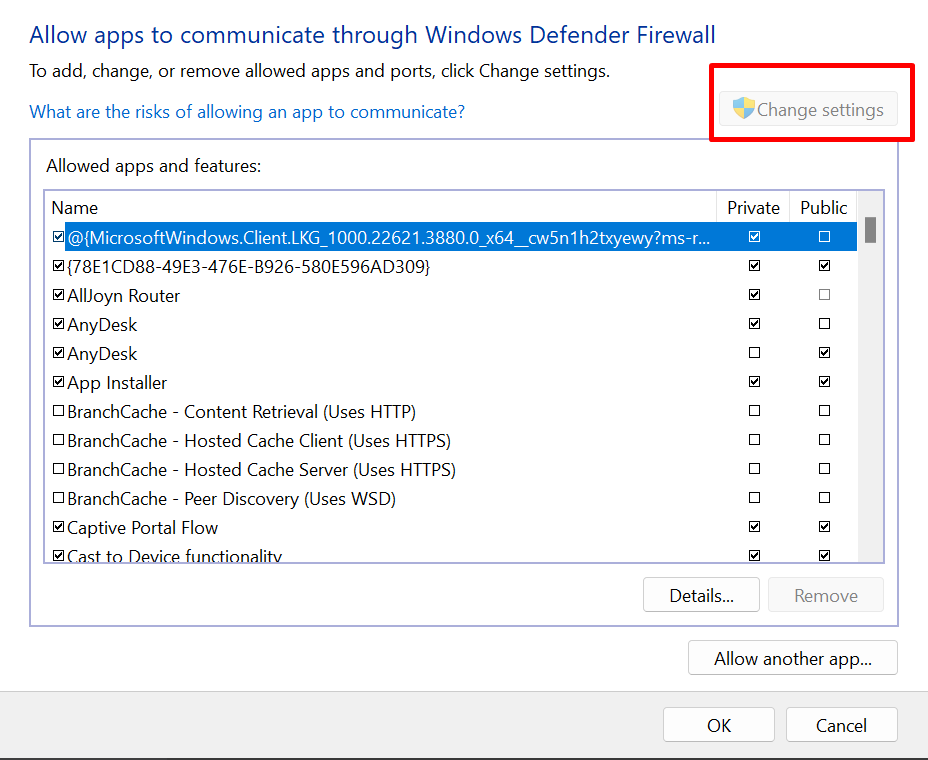
d) In the list of Allowed apps and features, find Windows Management Instrumentation (WMI) and allow it in the Private, Public and Domain columns (or as required).

3. Make sure that the target computers are online (as offline computers cannot be found while scanning), and that the Windows local accounts on these computers have not been disabled.
4. Make sure that the target computers have the latest Windows cumulative updates installed.
2.2. PowerShell Scanner Prerequisites
Check the following:
1. Make sure the value of the "PowerShellConnectionTimeoutSeconds" key is valid in the EkranServer.Settings.config file (see the table above).
NOTE: The default value of 20 (seconds) should normally be sufficient to find Windows local accounts by the computer where Syteca Application Server is installed, while a high timeout value may increase the time required to scan any target computers in the network that are unreachable.
2. Make sure the WinRM service is enabled on both the computer where Syteca Application Server is installed, and the computers to be scanned.
NOTE: The WinRM service is enabled by default only on Windows Server operating systems. If you want to scan computers with OSs such as Windows 10 or 11, you must first turn on this service, which can be done by opening the PowerShell console and running the following command to check that the WinRM service is enabled:
Get-Service WinRM
If it is not enabled, run the following command to turn on this service:
Enable-PSRemoting -Force
NOTE: The above command also sets the service to be Automatic (i.e. automatically -starts after a reboot) and configures the firewall rules to allow incoming WinRM connections.
3. Make sure the computer where Syteca Application Server is installed and the computers to be scanned are located in the same domain. If they are not, you need to add the hostnames or IP addresses of the computers to be scanned to the list of trusted hosts on the computer where Syteca Application Server is installed, by running the following command:
Set-Item wsman:\localhost\Client\TrustedHosts -Value "<hostname or IP>"
NOTE: Multiple hostnames or IP addresses can be specified, separated by commas (e.g. "10.150.1.1,10.150.2.2,MyCompName") or asterisks can be used for a range of IP addresses (e.g. "10.150.*", or even just "*" to trust them all, although the latter is not recommended).
4. Make sure the firewall rules allow WinRM connections, by checking that the Windows Remote Management (HTTP-In) inbound rule on the computers to be scanned is enabled, and port 5985 also needs to be allowed.
5. Make sure the computer where Syteca Application Server is installed and the target computers to be scanned use the same time. NOTE: Different time zones can be used, but a PowerShell remote session cannot be initiated if, for example, a Client computer is 10+ seconds apart from the Application Server computer, so they must use the same time server. An alternative option to resolve this issue is to add the Client hostname or IP address to the list of trusted hosts.
6. Make sure that the computers to be scanned are online, as offline computers cannot be found by scanning.
7. Make sure that the WMI service is running on the computers to be scanned. It should be always running by default on all Windows computers, but may have been turned off manually.
Additionally, if you want to use an HTTPS connection (instead of the default HTTP) for PowerShell scanning, you need to set up an HTTPS listener on the computers you want to scan, by doing the following:
1. Generate a self-signed certificate on the computer you want to scan, by running the following command:
New-SelfSignedCertificate -DnsName "<machine name>.<domain name>", "<machine name>", "<IP address>" -CertStoreLocation Cert:\LocalMachine\My -KeyUsage KeyEncipherment, DigitalSignature -Type SSLServerAuthentication
2. Use the thumbprint of the certificate created when setting up the listener on the computer you want to scan, by running the following command (where the thumbprint is displayed when generating the certificate above):
winrm create winrm/config/Listener?Address=*+Transport=HTTPS @{Hostname="<machine name>.<domain name>"; CertificateThumbprint="<thumbprint>"}
NOTE: Run this command in cmd, as it does not work in the PowerShell console.
3. Configure the firewall on the computer you want to scan to enable port 5986, by running the following command:
New-NetFirewallRule -Name "WinRM HTTPS" -DisplayName "WinRM HTTPS" -Protocol TCP -LocalPort 5986 -Action Allow
4. Export the certificate generated (before copying it to the computer where the Application Server is installed), by running the following command:
Export-Certificate -Cert Cert:\LocalMachine\My\<thumbprint> -FilePath <path>\<certificate name>.cer
5. Import this certificate on the computer where the Application Server is installed, and add it into the Trusted Root Certification Authority, by running the following command:
Import-Certificate -FilePath <path>\<certificate name>.cer -CertStoreLocation Cert:\LocalMachine\Root
NOTE: To set this up for multiple/all computers in the domain, a GPO can be used.
3. Troubleshooting Errors in the Application Server Logs
The Syteca Application Server log files can either be downloaded from the Management Tool or alternatively found C:\Program Files\Ekran System\Ekran System\ServerLogs folder
3.1. Troubleshooting Errors When Using WMI Scanning
| Message in Syteca Application Server Logs | Possible Reasons | How to Fix |
The WMI service on the computer to be scanned is not running or paused. | The WMI service is running on the computer to be scanned, but is paused. | Resume the WMI service. |
| It is not possible to scan this computer due to either: 1) the scanned computer is offline; 2) the firewall does not allow the use of port 135 on the computer to be scanned, or; 3) it is impossible to reach the computer. | Either: | Either: |
| 1) The scanned computer is offline. | 1) Turn on the computer to be scanned. | |
| 2) The firewall does not allow the use of port 135 on the computer to be scanned | 2) Check the firewall rules (see Point 2 of the WMI scanner prerequisites above). | |
| 3) The computer cannot be reached. | 3) Check that the computer to be scanned can be reached via the IP address or computer name by using other tools (e.g. ping). | |
| Access is denied. Either: 1) the credentials stored in the secret are incorrect, or; 2) the account stored in the secret does not have the required permissions. | Either: | Try using another secret for scanning. |
| 1) The credentials entered are incorrect. | ||
| 2) The account stored in the secret does not have the required permissions to establish a remote connection. | ||
The WMI scanner cannot scan the computer where Syteca Application Server is installed. | Syteca Application Server cannot scan the computer where it is installed. | There is no way to fix this, so the PowerShell scanner needs to be used instead to scan the computer where Syteca Application Server is installed. |
The connection to the computer timed out. | The connection to the computer was timed out by Syteca Application Server. | Increase the value of the WmiConnectionTimeoutSeconds key in the .config file (on the computer where Syteca Application Server is installed). |
3.2. Troubleshooting Errors When Using PowerShell Scanning
| Message in Syteca Application Server Logs | Possible Reasons | How to Fix |
| The PowerShell scanner cannot scan the computer. Verify that: 1) the computer is accessible over the network and online; 2) the WinRM service is enabled on the computer to be scanned, and; 3) a firewall exception for the WinRM service is enabled and allows access from this computer. | Either: | Either: |
1) The computer to be scanned is offline. | 1) Turn on the computer to be scanned. | |
2) The WinRM service is disabled on the computer to be scanned. | 2) Turn on the WinRM service (see Point 2 of the PowerShell scanner prerequisites above). | |
3) The firewall does not allow the use of the required port (by default: 5985 for HTTP, or 5986 for HTTPS) on the computer to be scanned. | 3) Check the firewall rules (see Point 4 of the PowerShell scanner prerequisites above). | |
4) A listener on the computer to be scanned is misconfigured, or the wrong HTTP or HTTPS port is used. | 4) Check the listeners by using the winrm enumerate winrm/config/listener command. | |
The PowerShell scanner cannot scan the computer. | When connecting via the computer name, the computer to be scanned is not in the same domain as the Syteca Application Server computer. When connecting via the IP address, it is impossible to connect unless the IP address is first added to the TrustedHosts list. | Add the name or IP address of the computer to be scanned to the TrustedHosts list (see Point 3 of the PowerShell scanner prerequisites above) or use an HTTPS connection instead. |
The PowerShell scanner cannot scan the computer because its name cannot be resolved. | Syteca Application Server cannot resolve the name of the computer to be scanned. | Try reaching this computer by using the IP address instead of the computer name, but for this, the IP address first needs to be added to the TrustedHosts list. |
Access is denied. Either: 1) the credentials stored in the secret are incorrect, or; 2) the account stored in the secret does not have the required permissions. | Either: | Try using another secret for scanning. |
1) The credentials entered are incorrect. | ||
| 2) The account stored in the secret does not have the required permissions to establish a remote connection. | ||
The connection to the computer timed out. | The connection to the computer was timed out by Syteca Application Server. | Increase the value of the PowerShellConnectionTimeoutSeconds key in the .config file (on the computer where Syteca Application Server is installed). |