Viewing and Managing Secrets and Folders
The secrets are displayed in the Management Tool on the Password Management page (on the Secrets tab), where the list of secrets is displayed in any selected folder and the secrets are stored (in the Tree-View folder structure displayed in the additional pane on the left) in the form of a grid which includes the following information in the corresponding columns that are displayed by default:
• 

- The Bulk Action (
NOTE: A secret can only be deleted by a user who has the Owner Role Type permissions for the secret.
- All the secrets selected (
NOTE: A secret can only be moved between folders by a user who has the Owner Role Type permissions for the destination folder.
• Secret Name: The name of the secret, along with one of the following icons indicating the type of the secret (and also displayed in the hints when hovering over the secret name and icon):
- 
- 
- 
- 
- 
- 
• Host: The name of the host (e.g. computer) where the corresponding account is located (i.e. the account that the secret is used to connect to).
• Password: The Copy (

NOTE: After logging in to the Management Tool, the secret's password can be viewed and copied for the first 5 minutes without the user needing to re-enter their password, and for 5 minutes after re-entering their password.
• Details: Additional information is displayed if various features are enabled (in a similar way as when using the Desktop Connection Manager) to indicate their status, including:
- If access approval is required to use a secret (as defined on the secret's Restrictions tab), one of the following status messages is displayed:
- Allowed during working hours: Indicates that approval is not required at the current time, in accordance with the standard work hours defined (i.e. it is only required outside of the times/days defined).
- Requires approval: Indicates that the user needs to request access, but has not yet requested it.
- Waiting for Approval: Indicates that the user has requested access, but access has not yet been granted by an Approver (see the Managing Access Requests section).
- Approved. Expiration date/time [xx:xx]: Indicates that the access request has been granted by an Approver, so the user can now connect to the account.
- Denied: Indicates that the access request has been denied by an Approver, so the user will not be granted access to connect to the account.
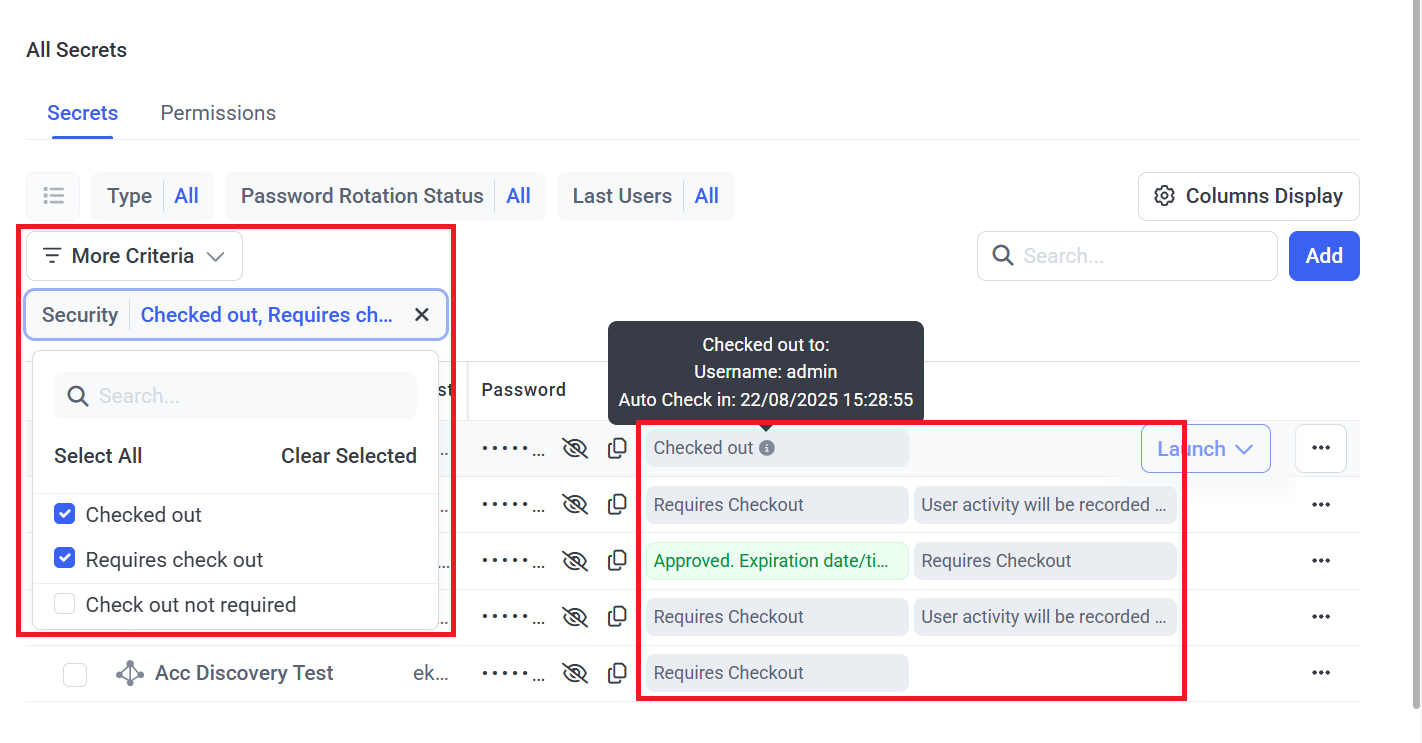
- If the Password Checkout functionality is enabled for a secret (as defined on the secret's Security tab - see below), one of the following status messages is displayed:
- Requires checkout: Indicates that the secret is available for use (i.e. its password is not currently checked out by another user).
- Checked out: Indicates that the secret is not currently available for use (as it is being used by another user), where the following additional information can be viewed in the Checked out to hint by hovering over the Info (
- Username: The user name of the user that the secret's password is currently checked out to (i.e. of the user that is using the secret).
- Auto Check-in: If the Check in automatically after checkbox is selected in the secret, the date & time when the password will be automatically checked back in (i.e. when the secret will become available for use by another user).
- If the Record user activity while the secret is in use checkbox is selected for a secret (as defined on the secret's Security tab), the following status message is displayed:
- User activity will be recorded while the secret is in use: Indicates that user activity will be monitored and recorded whenever a user is connected to the corresponding account.
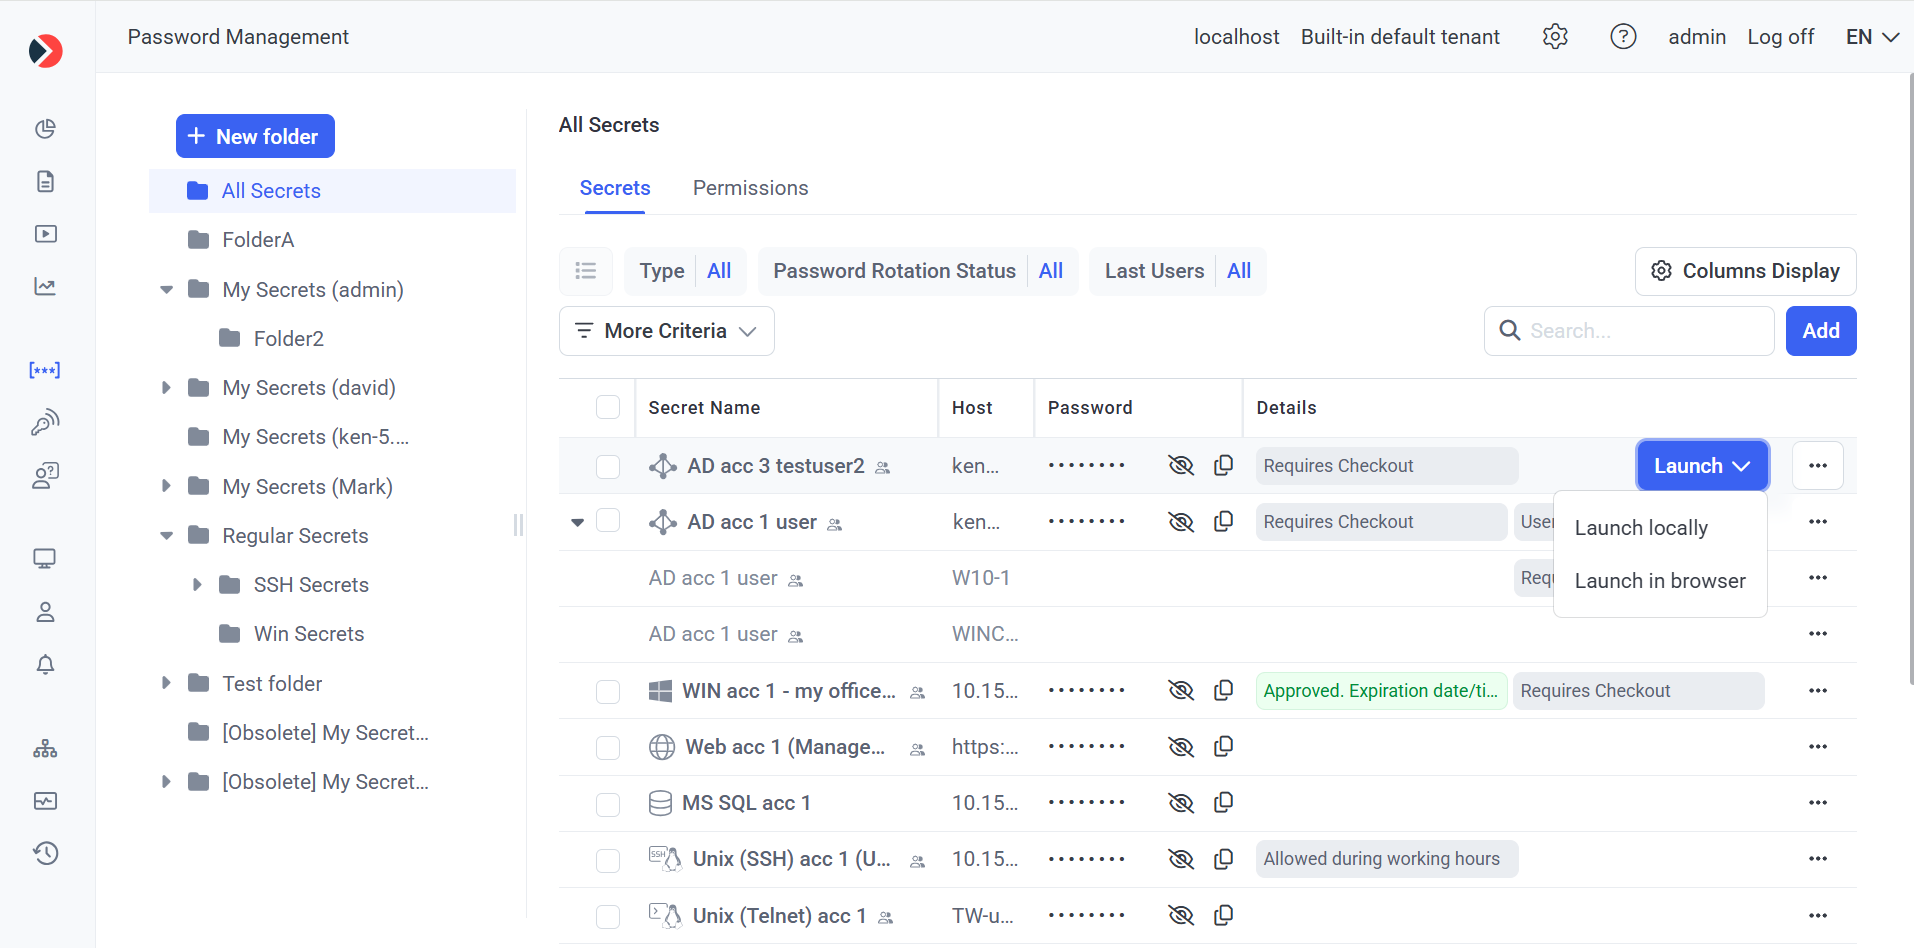
• Launch (button): Only displayed (in the floating bar) when hovering over a secret, and can be clicked to open a menu with the Launch locally and Launch in browser options, which can then be clicked to connect to the corresponding account locally or in the browser respectively (if available) using Syteca Web Connection Manager.
• 
NOTE: As a root user, the built-in default "admin" user of Syteca has the Owner Role Type permissions for all secrets (and folders), and is therefore able to edit all secrets (and folders) added by other Syteca users.
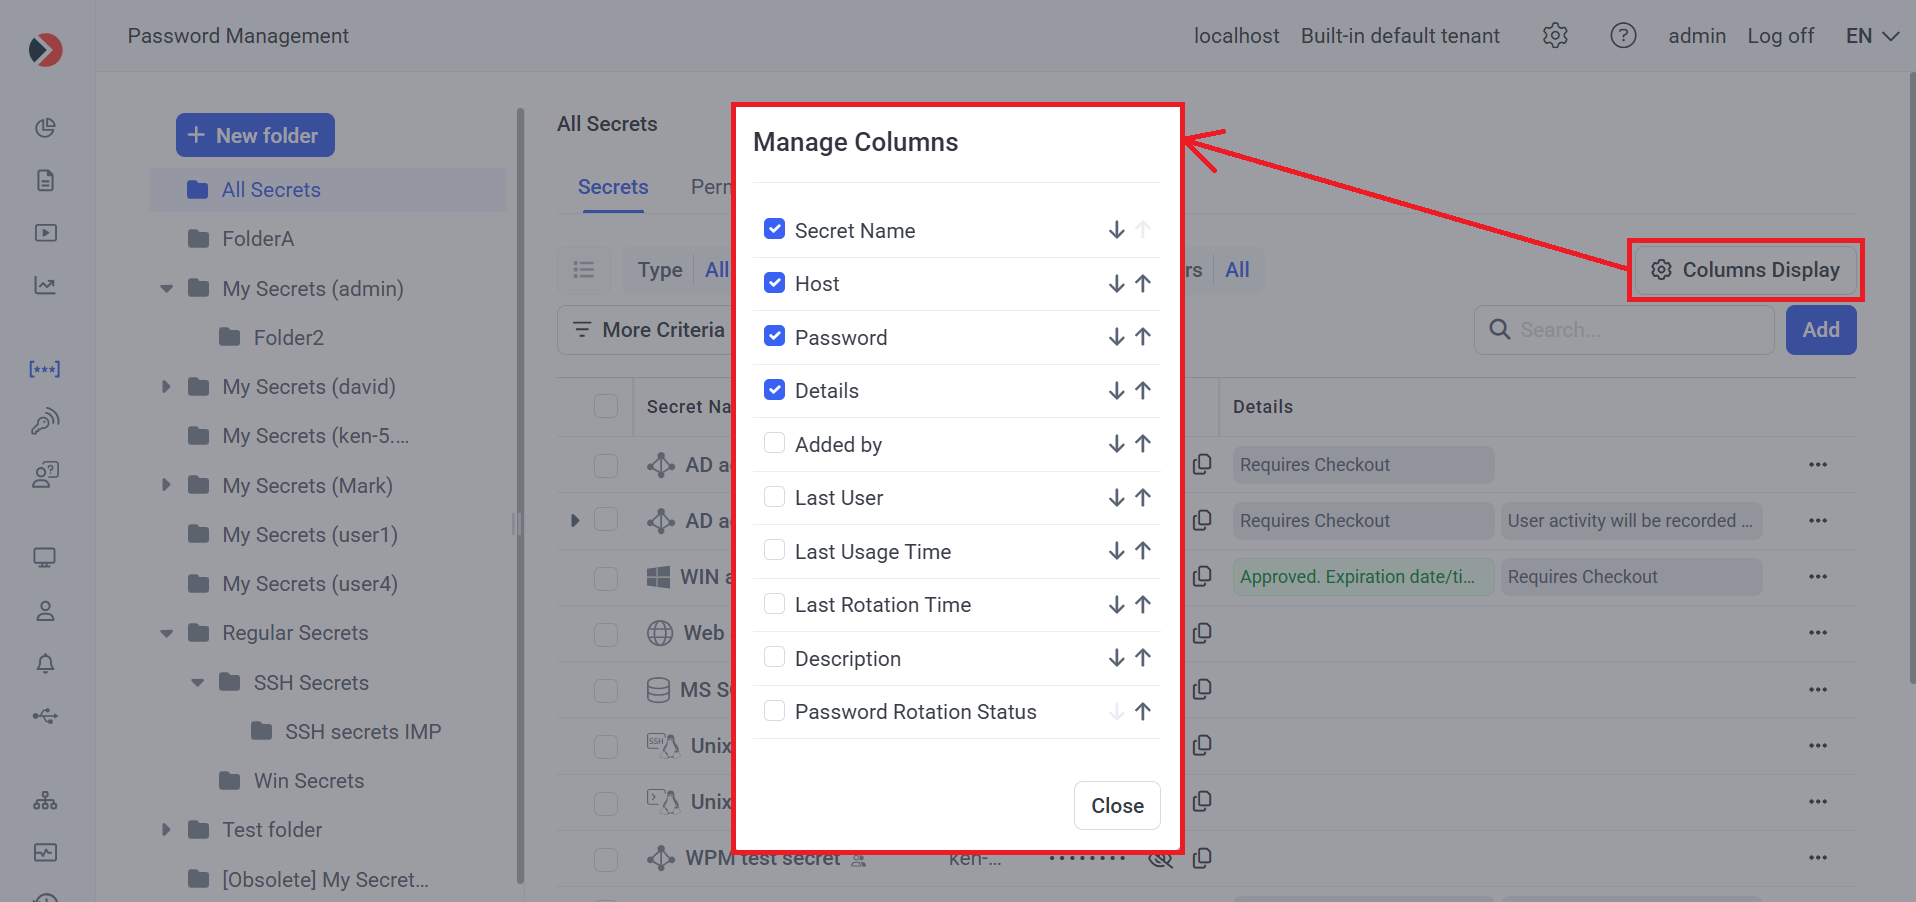
The following non-default columns can also be displayed in the grid on the Secrets tab (and columns can also be deleted, and the order of the columns changed) by clicking the Columns Display button (in the top right of the page):
• Added By: The name of the user who added the secret.
• Last User: The name of the user who last used the secret (to access the corresponding account).
• Last Usage Time: The data & time when the secret was last used (to access the corresponding account) by the user in the Last User column (above).
• Last Rotation Time: The date & time when the secret's password (or SSH key) was last rotated (if rotated).
NOTE: The date & time is only displayed if the user has the Owner Role Type permissions for the secret.
• Description: The description of the secret.
• Password Rotation Status: The status of remote password (or SSH key) rotation, (either Enabled, Disabled, or Failed).
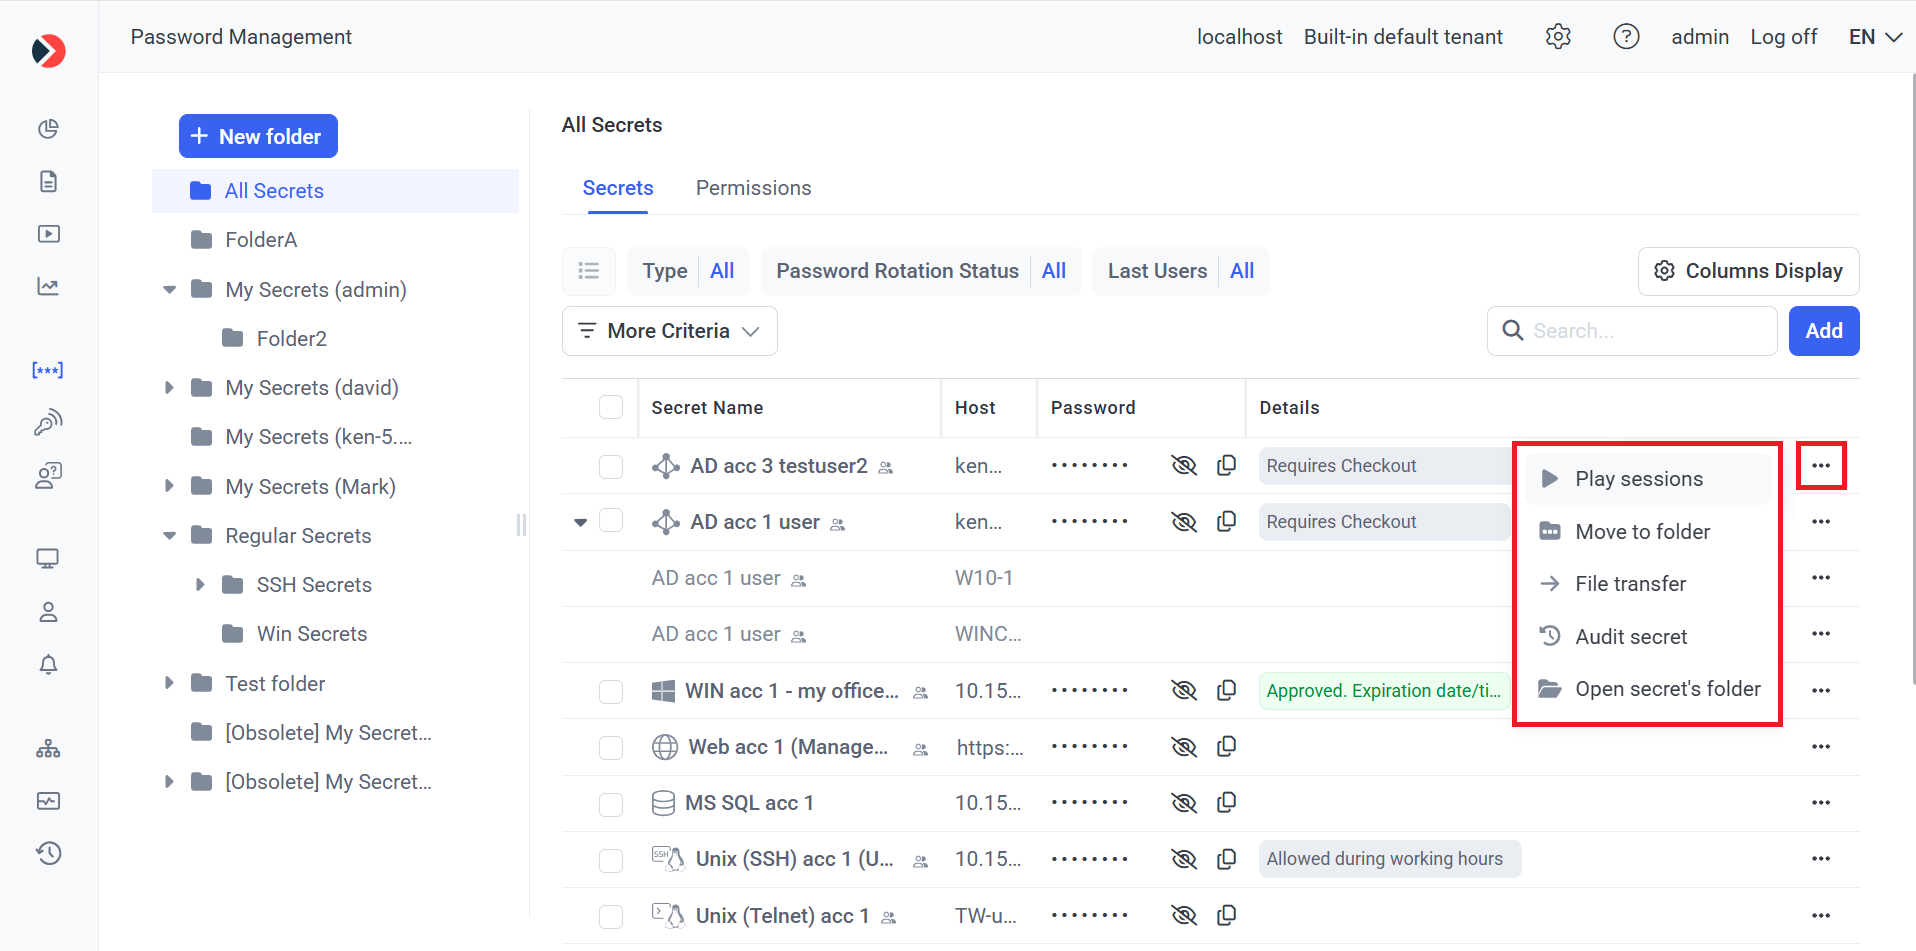
Additionally, when clicking the 3 dots (
• 
• 
NOTE: A secret can only be moved between folders by a user who has the Owner Role Type permissions for the destination folder.
• 
• 
- 
The Tree-View folder structure (in the pane on the left) displays all the folders that the user has either the Owner or Editor Role Type permissions for, as well as the secrets in them (displayed in the grid in the main pane), and can be managed as follows:
• To change the currently selected folder (aka the "current folder"), which is the All Secrets folder by default, and is displayed as highlighted, click on any other folder to display the list of secrets in it (displayed in the grid in the main pane).
• To add a new folder (in the currently selected folder (displayed as highlighted) in the Tree-View folder structure), click the New folder button (at the top of the Tree-View folder structure), and Add the required Users / User groups and permissions on the Permissions tab, and then click Save (in a similar way to when adding the users and permissions for a secret).
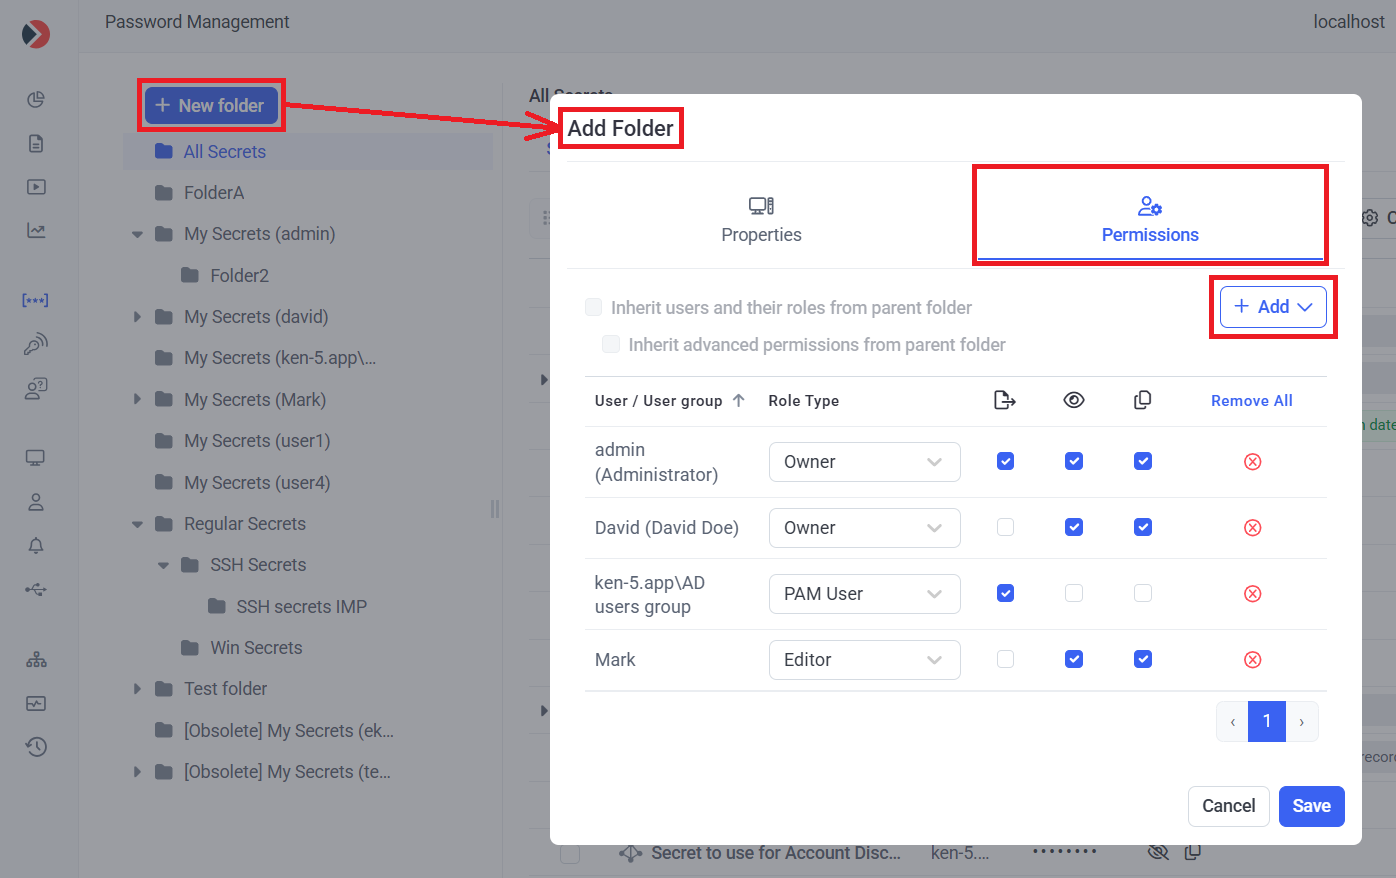
NOTE: Alternatively, the users / user groups who will be able to use the secret, along with their permissions, can be inherited from the parent folder if configured as required in this folder (except from the "All secrets" folder) by selecting the "Inherit users and their roles from current folder" checkbox (to inherit the users / user groups along with their Role Type permissions from the current folder) and the "Inherit advanced permissions from current folder" checkbox (to inherit the "Show Password" and "File Transfer" advanced permissions for the users / user groups from the current folder).
NOTE: Only users specifically added to the Management Tool as separate users, but not those only belonging to an Active Directory user group added, can add secrets/folders (please refer the Management Tool Issues and Error Messages page for more information).
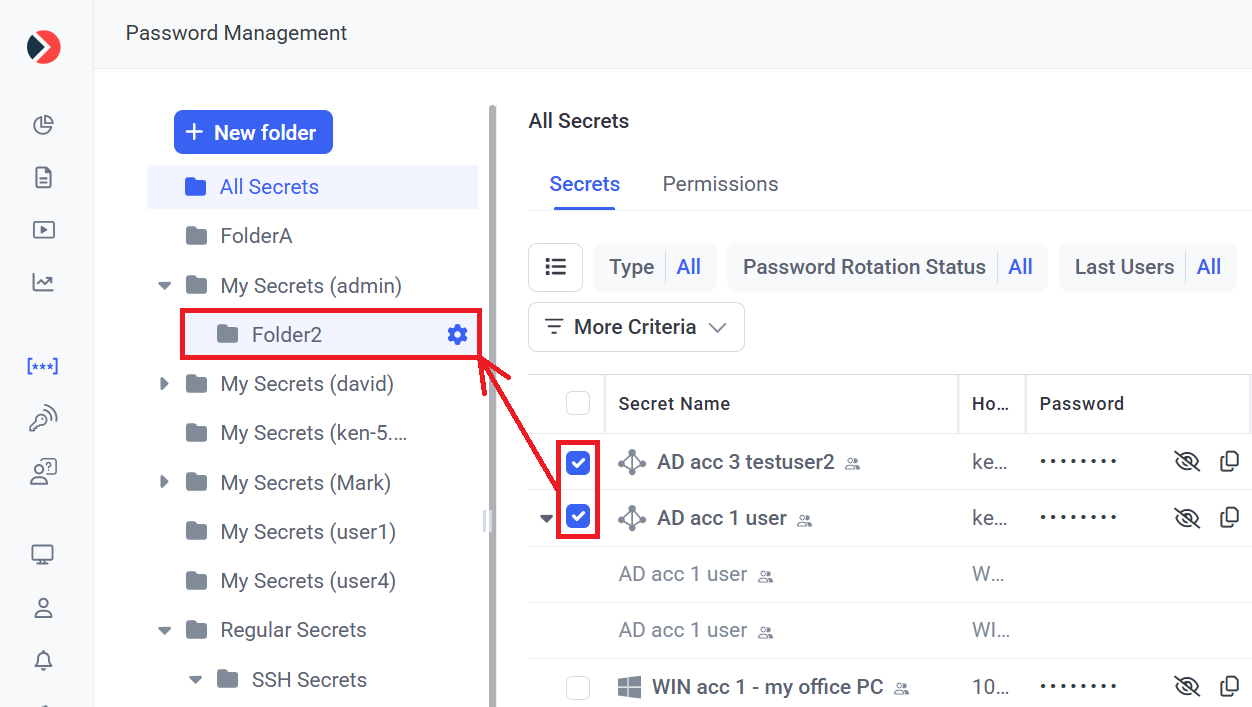
• To move secrets between folders (only available for a user who has the Owner Role Type permissions for the destination folder), either drag & drop any secret (from the grid in the main pane) into the required folder (in the Tree-View folder structure) or first select multiple secrets (by selecting the appropriate (
• To change the Tree-View folder structure (or the permissions for any folder, or to delete any folder), click the Edit (
NOTE: Folders names in the format “My Secrets (<username>)” or "My Secrets (<domain name>\<username>)" are Workforce Password Management (WPM) folders, which contain WPM secrets.
To find a specific secret, enter its name (or part of its name) or Secret ID in the Search box (in the top right of the page).
To sort the secrets in the grid, click the required column header. You can change the column sort order from ascending to descending, and vice versa. To do this, click the Sort arrow in the corresponding column header on the right. If the data is not sorted by a column, the Sort arrow is not shown in the column header.
To filter the secrets in the grid, click the filters and select the required values (in the drop-down menus that open), or click the More Criteria button to add more filters that are available.
For example, the Security filter can be added that allows the filtering of secrets by the status of the Password Checkout functionality, and contains the following statuses (if any secrets currently have this status):
• Checked out: Where the Requires checkout checkbox is selected in the secret, and the secret's password is currently checked out (i.e. while the secret is being used by any user).
• Requires checkout: Where the Requires checkout checkbox is selected in the secret, and the secret's password is currently checked in (i.e. when the secret is not being used by any user).
• Checkout not required: Where the Requires checkout checkbox is not selected in the secret (i.e. when the Password Checkout functionality is not enabled in the secret).