Editing the Windows Client Configuration
You can edit the Client configuration for both online and offline Clients. Configuration changes to online Clients will be applied immediately. Configuration changes to offline Clients will be applied as soon as the Client goes online.
Newly installed Clients have a Custom configuration that can be edited for each Client individually. When Clients are added to a Client group, you can choose whether they keep their Custom configuration or inherit the configuration from the Client group. Whenever the Client group configuration is changed, the Client configuration that is inherited from this Client group will also change.
To edit the Windows Client custom configuration, do the following:
1. Log in to the Management Tool as a user with the Client Configuration Management permission for Clients.
2. Click the Clients navigation link on the left.
3. On the Clients page that opens, find the Windows Client which you want to edit the configuration of, and click on its name in the Client Name column.
NOTE: To find specific Clients, the Search box and filters at the top of the Clients tab can be used.
NOTE: If you do not have the Client Configuration Management permission for this Client, the configuration options will be disabled.
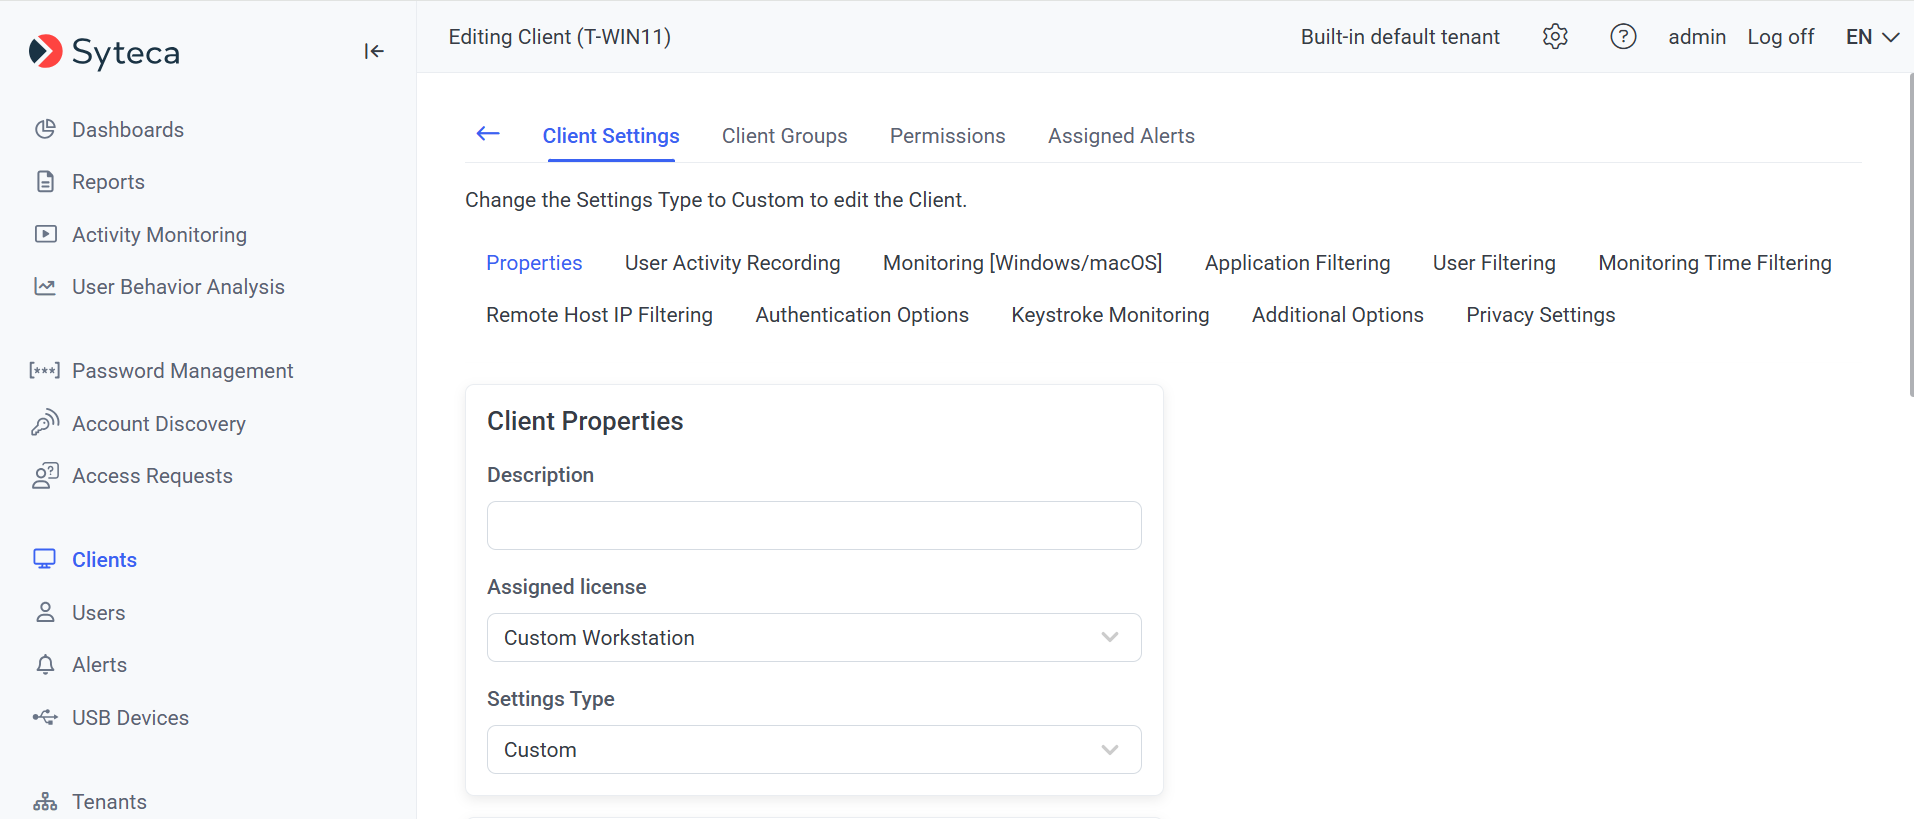
4. On the Editing Client page that opens, on the Properties tab, do the following:
• In the Client Properties section, do the following:
- In the Description field, optionally enter a description for the Client.
- In the Assigned License drop-down list, select the type of license to be assigned to the Client.
- In the Settings Type drop-down list, select the type of settings to be applied to the Client, either:
- Select Custom to be able to edit all the Client settings.
- Select Inherited from <Client group> for the Client settings to be inherited from the selected Client group, and disable these settings (so they cannot be changed).
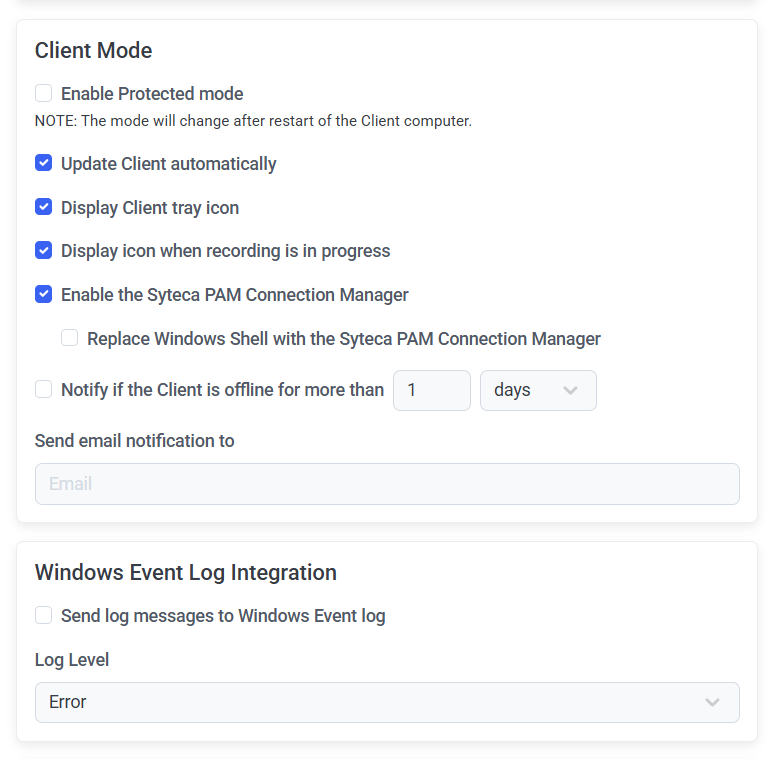
• In the Client Mode section, do the following:
- Select the Enable Protected mode checkbox if you want to enable Protected mode.
NOTE: The Client mode will only be changed after the Client computer is rebooted.
- Select the Update Client automatically checkbox if you want the Client to be updated automatically.
- Select the Display Client tray icon checkbox if you want to display the Client tray icon to the user.
- Select the Display icon when recording is in progress checkbox if you want to inform logged-in users that their actions are being recorded.
- Select the Enable the Syteca PAM Connection Manager checkbox if you want the Client computer to function as a jump server for remote access using secrets.
NOTE: A jump server computer is only required if two or more concurrent sessions are required on the Client computer with the Syteca Connection Manager, and it is recommended to use a Windows Server operating system for the correct functioning of the Syteca Connection Manager on a jump server computer.
- And also select the Replace Windows Shell with the Syteca PAM Connection Manager checkbox if you want to only display the Syteca Connection Manager window (i.e. without the secret user's desktop).
- Select the Notify if the Client is offline for more than checkbox and define the time period after which the Client will be considered as "disconnected" if you want to monitor the Client if it is offline for more than a specified time period. If you also want to receive email notifications about the Client being disconnected, enter the required email addresses, separated by semicolons, in the Send Email Notification to field.
• In the Windows Event Log Integration section, do the following:
- Select the Send log messages to Windows Event log checkbox and select the severity level (Error, Warning, or Information) of the log entries in the Log Level drop-down list if you want to save Syteca events, such as errors, warnings, and informational messages to the Windows Event log on the Client Computer.
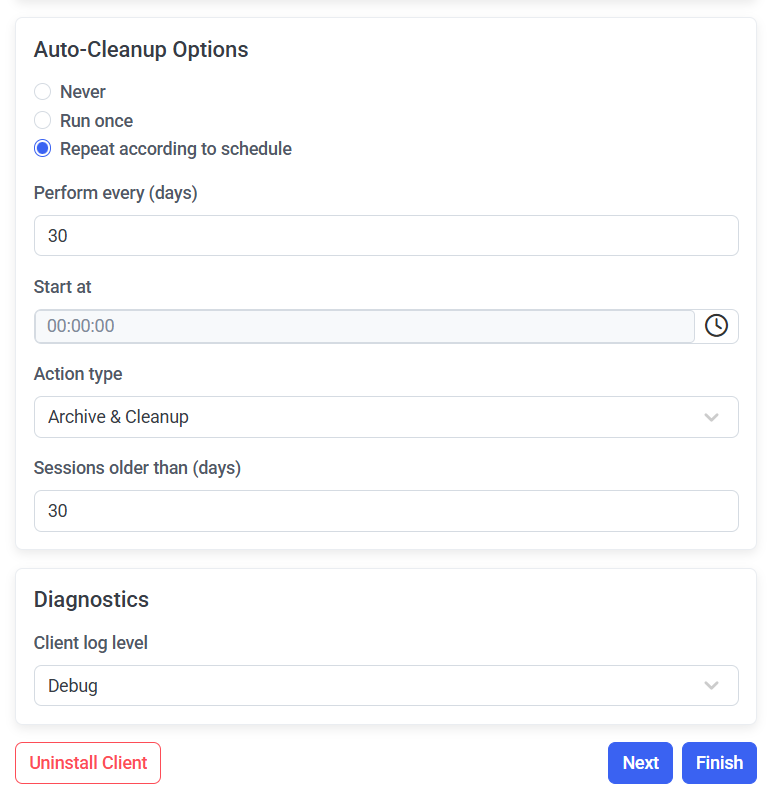
• In the Auto-Cleanup Options section, do the following:
- Select the type of cleanup to be applied to the Client:
- Never: Cleanup operations will not be performed.
- Run once: A one-time cleanup operation will be performed by clicking the Finish button on the Editing Client page.
- Repeat according to schedule: A scheduled cleanup operation will be performed every few days at the specified time, as defined by:
- Perform every (days): The frequency of the cleanup operation.
- Start at: The time at which the cleanup operation will be run.
- In the Action type drop-down list, select either the:
- Cleanup option to delete the monitored data from the database.
- NOT AVAILABLE IN SAAS Archive & Cleanup option to first archive and then delete the monitored data from the database.
NOTE: If the Archive & Cleanup option is selected, the Archive Parameters must be configured on the Configuration page.
- In the Sessions older than (days) field, define the retention period for the monitored data. Sessions stored in the database longer than the defined period of time will be deleted during the Cleanup process.
• In the Diagnostics section, do the following:
- In the Client log level drop-down list, select the severity level of the log entries to be saved to the Client log files.
5. On the User Activity Recording tab, define the required values in the following sections:
• Frequency Settings for User Activity Recording.
• Recording Period Settings.
• NOT AVAILABLE IN SAAS Screen Capture Settings.
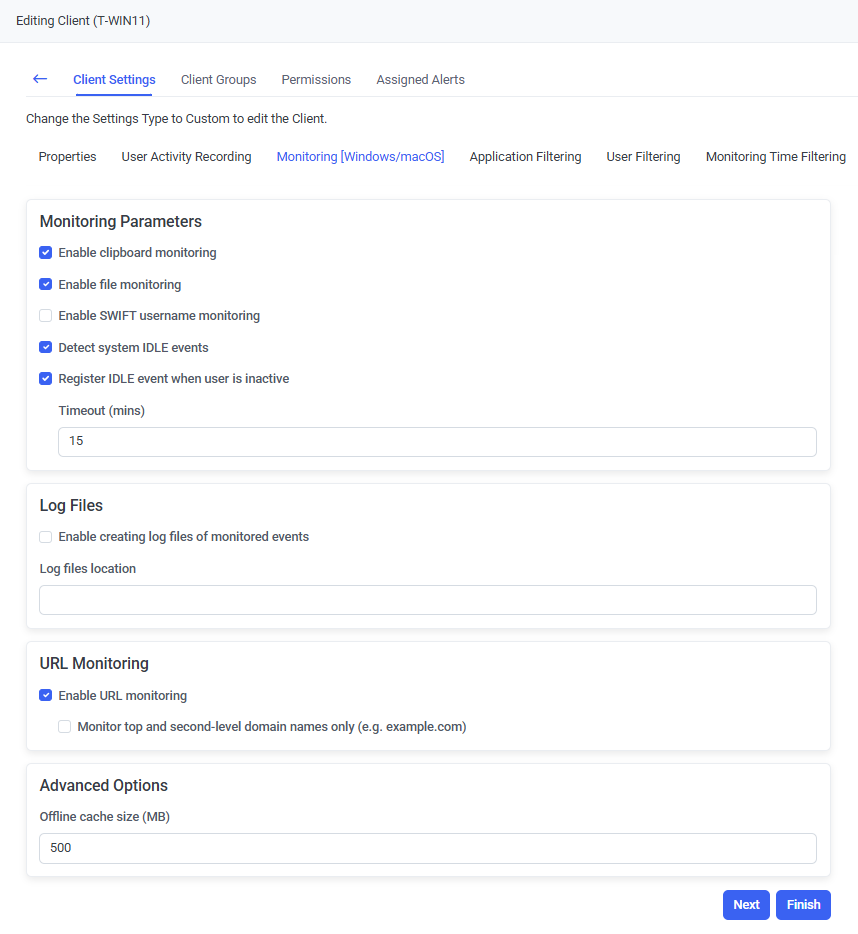
6. On the Monitoring [Windows/macOS] tab, do the following:
• In the In Monitoring Parameters section:
- Select the Enable clipboard monitoring checkbox to enable detection and monitoring of Windows clipboard text data operations performed on the Client computer.
- Select the Enable file monitoring checkbox to enable detection and monitoring of File Upload operations performed on the Client computer.
- Select the Enable SWIFT username monitoring checkbox to record the user name used to log in to the SWIFT network in the log file.
- Select the Detect system IDLE event checkbox to enable the registering of an idle event whenever the user is inactive for more than 15 minutes, the computer is in sleep or hibernation mode, or the screen is turned off automatically.
- Select the Register IDLE event when user is inactive checkbox to enable the registering of an idle event whenever there is no Client activity, i.e. no mouse movement or key pressing for longer than the Timeout (min) value specified (where the default value is 15 minutes).
• In the Log Files section, do the following:
- Select the Enable creating log files of monitored events checkbox to enable the creation of monitoring logs on the Client computer and define the location of the log files.
• In the URL Monitoring section, do the following:
- Select the Enable URL monitoring checkbox to receive information about websites visited by the user of the Client computer, and also:
- Select the Monitor top and second-level domain names only checkbox if you want to monitor only the main part of the URL (e.g. example.com).
• In the Advanced Options section, do the following:
- In the Offline Cache Size (MB) field, define the size of the offline cache.
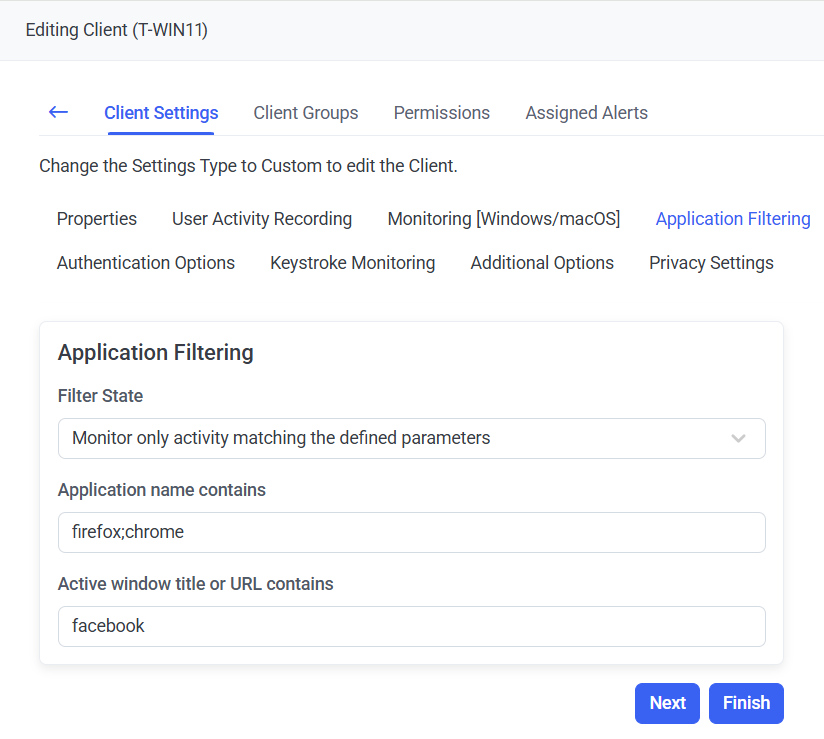
7. On the Application Filtering tab, define the Application Filtering parameters for the Client.
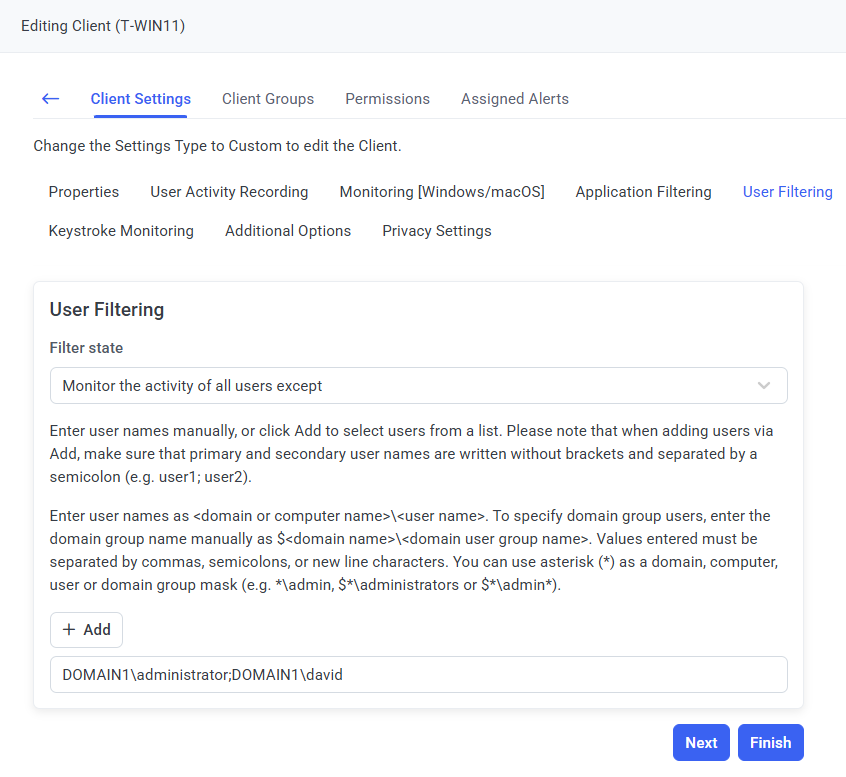
8. On the User Filtering tab, define the User Filtering parameter for the Client.
9. On the Monitoring Time Filtering tab, define the Monitoring Time Filtering parameter for the Client.

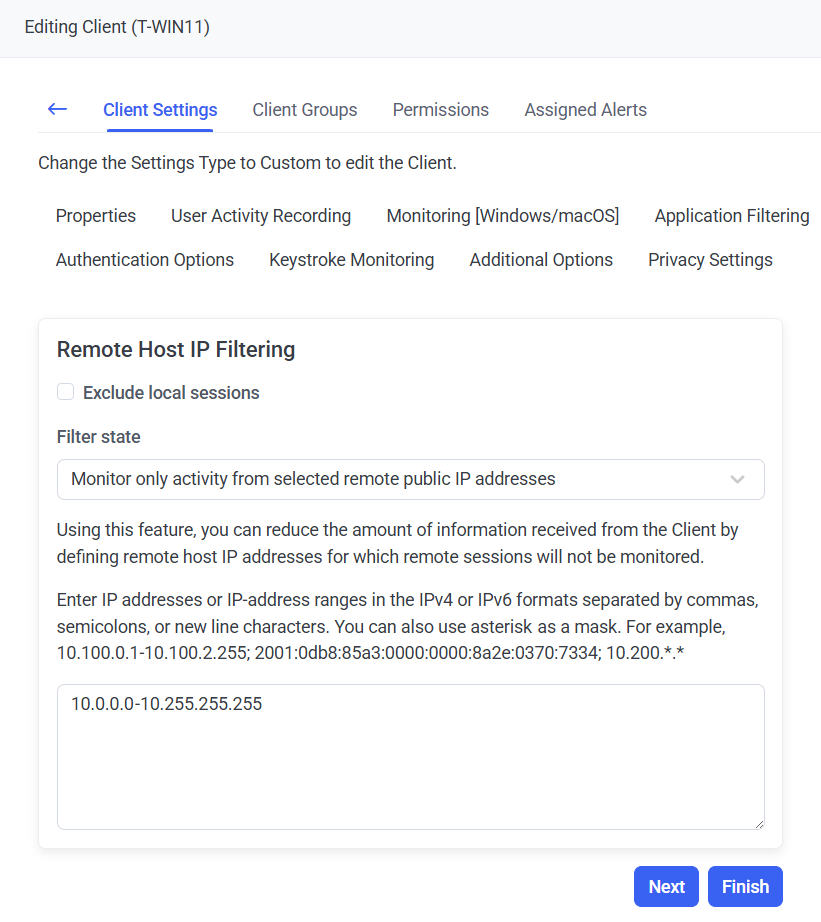
10. On the Remote Host IP Filtering tab, define the Remote Host IP Filtering parameter for the Client.
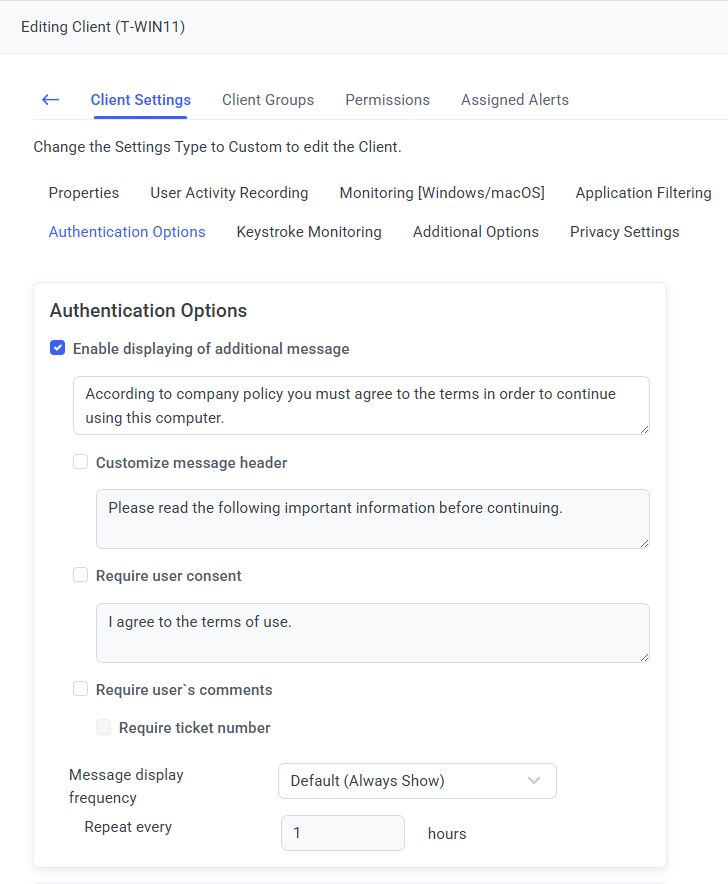
11. On the Authentication Options tab, do the following:
• In the Authentication Options section, do the following:
- Select the Enable displaying of additional message checkbox if you want to an additional message on user login to be displayed to the user, and also:
- Select the Customize message header checkbox, if you want to modify the message to be displayed to the user on login.
- Select the Require user consent checkbox to display a user consent checkbox to force the user to select this checkbox to be able to access the Client computer.
- Select the Require user’s comments checkbox if you want the user to comment in the additional message displayed on login, and also:
- Select the Require ticket number checkbox if you want the user to enter a valid ticket number to access the Client computer.
-Define the Message display frequency options if you want to stop the additional pop-up message being displayed every time any user logs in (on the same day, or until a specified number of hours have passed).
• In the Two-Factor and Secondary Authentication section, do the following:
- Select the Enable secondary user authentication on login checkbox if you want to enable additional authorization for users that log in to the Client computer, and also:
- To customize the text displayed in the Secondary User Authentication login window, modify the default text displayed in the field.
- To exclude any specific users from needing to log in using secondary user authentication, enter the required user names in the Exclude from secondary authentication field (separated by semicolons).
- To exclude all users in any specific Active Directory user groups from needing to log in using secondary user authentication, enter the required Active Directory group names in the Exclude Active Directory user groups from secondary user authentication field (separated by semicolons).
- Select the Allow the use of one-time passwords checkbox if you want to allow users to use one-time passwords to log in to the Client computer, and also:
- In the Users who can approve access drop-down list, select all the users (i.e. Approvers) who will be able to approve one-time password access requests.
- Select the Automatically send one-time passwords to Active Directory users checkbox if you want a one-time password to be generated on the request of the user without approval by the administrator and sent automatically to the email address defined in user’s Active Directory account.
- Select the Automatically send one-time passwords to internal users checkbox if you want the one-time password to be generated on the request of the user without requiring approval by the administrator and sent automatically to the email address of the Syteca internal user.
NOTE: The "Enable secondary user authentication on login" and the "Allow the use of one-time passwords" options cannot be used together, as neither of them will function correctly if both of these checkboxes are selected.
- Select the Enable two-factor authentication checkbox if you want to require users to enter a 2FA time-based one-time password to log in to the Client computer, and also:
- [For Windows Clients only:] Select the Do not generate QR code automatically checkbox in the (unlikely) event that you want to disable the Mass 2FA feature, so that all users of Windows Client computers (who will be required to use 2FA to log in) instead need to be first added manually on the Endpoint Access Control tab on the Access Requests page).

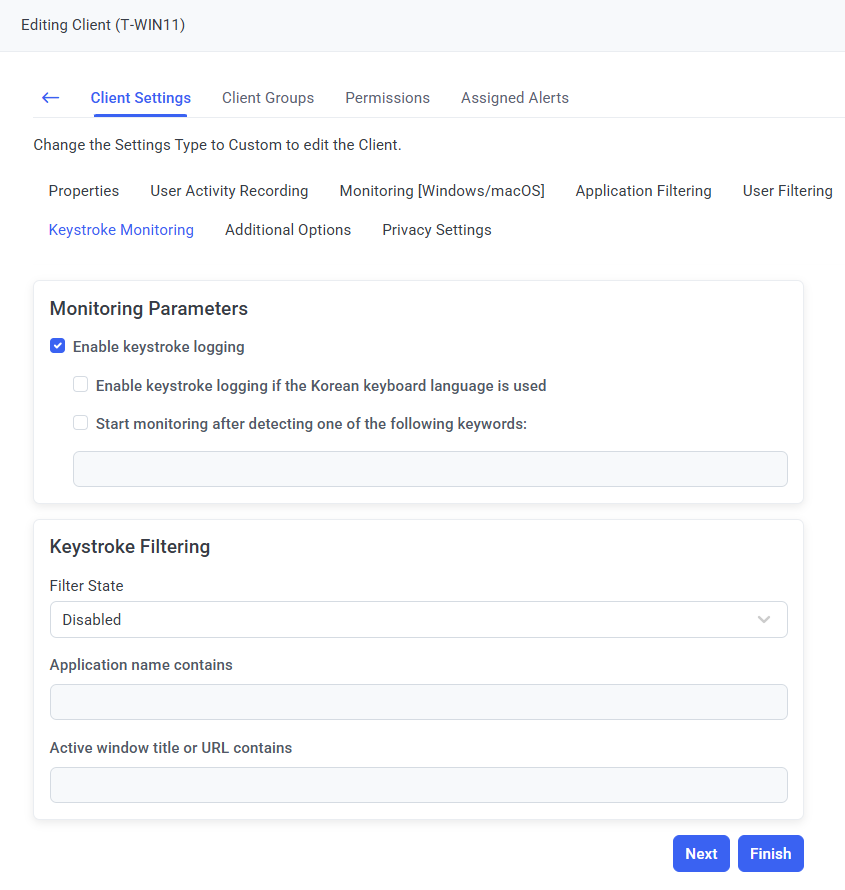
12. On the Keystroke Monitoring tab, do the following:
• In the Monitoring Parameters section, select the Enable keystroke logging checkbox to enable keystroke logging, and optionally also select the following checkboxes:
- Enable keystroke logging if the Korean keyboard language is used for the system to also log keystrokes in the Korean language (in addition to other languages supported).
- Start monitoring after detecting one of the following keywords for the Client to start recording user activity only after the user enters one of the specified keywords on the Client computer.
• In the Keystroke Filtering section, define the Keystroke Filtering parameter for the Client.
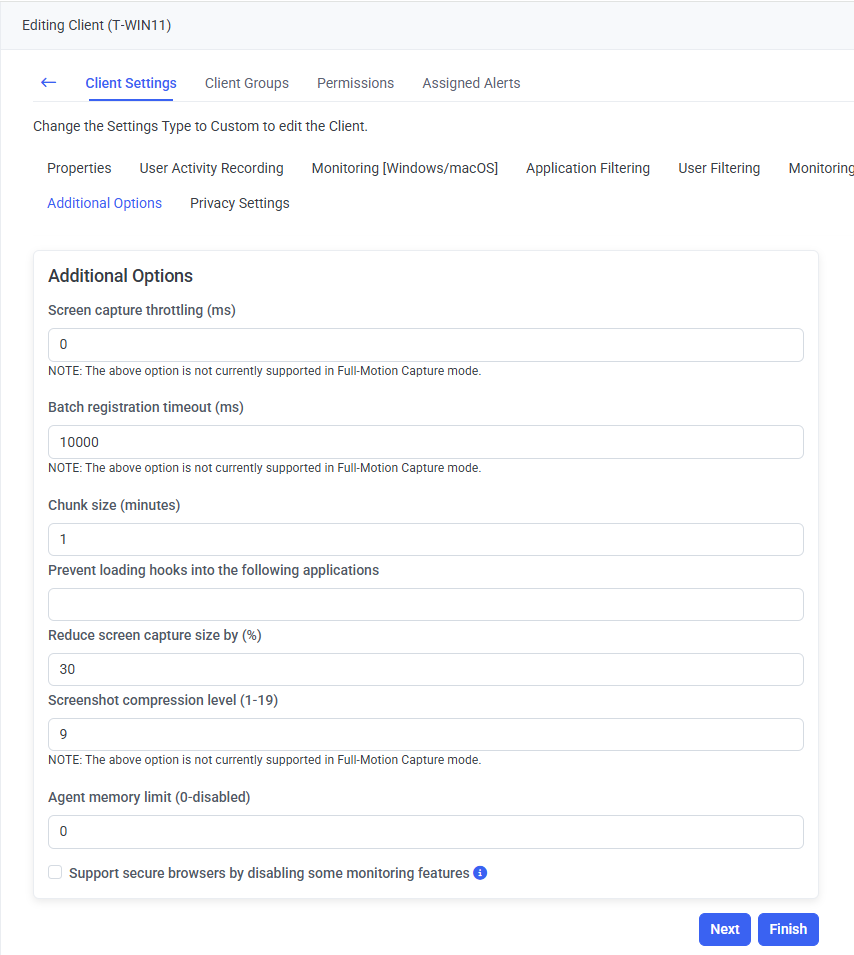
13. On the Additional Options tab, define the various Bandwidth Usage Reduction parameters for the Client.
14. After completing the configuration, click the Next button in the bottom right to proceed to defining the Client Groups which the Client will belong to, permissions for managing the Client, and alerts assigned to the Client, and then click the Finish button to save the changes.
15. The new configuration is applied to the Client immediately.