Pseudonymizer
The Pseudonymizer (also known as Monitored Data Pseudonymization) feature allows compliance with data protection and privacy laws, standards and regulations, such as the European Union’s General Data Protection Regulation (GDPR) law in relation to protecting personally identifiable information (PII). PII means any information that can directly identify an individual person (and is hereinafter referred to as "personal data").
Protection of the personal data of endpoint users, which is recorded during monitoring of their activities by Syteca, is achieved by the system pseudonymizing this data.
In Pseudonymized mode, no Management Tool user, including administrators and other users that have permission to open and view the sessions of endpoint users (e.g. Investigators), can view the personal data of any endpoint users unless a request by them is first approved (by a Supervisor) to temporarily de-anonymize the data of a specific endpoint user (on a specific Client computer). At the same time, Supervisors do not have permission to open and view the sessions of endpoint users.
NOTE: This feature is not available by default, and can only be activated by contacting your Syteca vendor or the Syteca Support Team.
Table of Contents
1. How is User Data Pseudonymized?
As soon as the Pseudonymizer feature is enabled:
1. Syteca pseudonymizes (rather than anonymizes) all the existing personal data of endpoint users, which means that although the data remains stored in the database (i.e. it is not deleted), access to it is restricted in Pseudonymization mode, so that it cannot be viewed, and endpoint users cannot therefore be identified, unless either:
• A request by a Management Tool user to de-anonymize (actually "de-pseudonymize") the data of a specific endpoint user is first approved (see Section 5. Requesting De-Anonymization of User Data below);
• A Management Tool user belonging to the default Supervisors user group adds specific endpoint users / user groups on specific computers to a list to exclude the data of these endpoint users from being pseudonymized when viewed by Supervisor users (see Section 7. Excluding Endpoint Users from Pseudonymization below).
2. Subsequently, all new data is also pseudonymized by the system immediately (whenever it is generated or recorded).
Pseudonymization is achieved by either randomizing, hiding, or obfuscating the personal data (depending on the data type) as follows:
• Randomized data means that a randomly-generated unique value is displayed in the Management Tool instead of the original personal data (e.g. instead of the User Name “john.doe”, the alias “USR-123” is displayed).
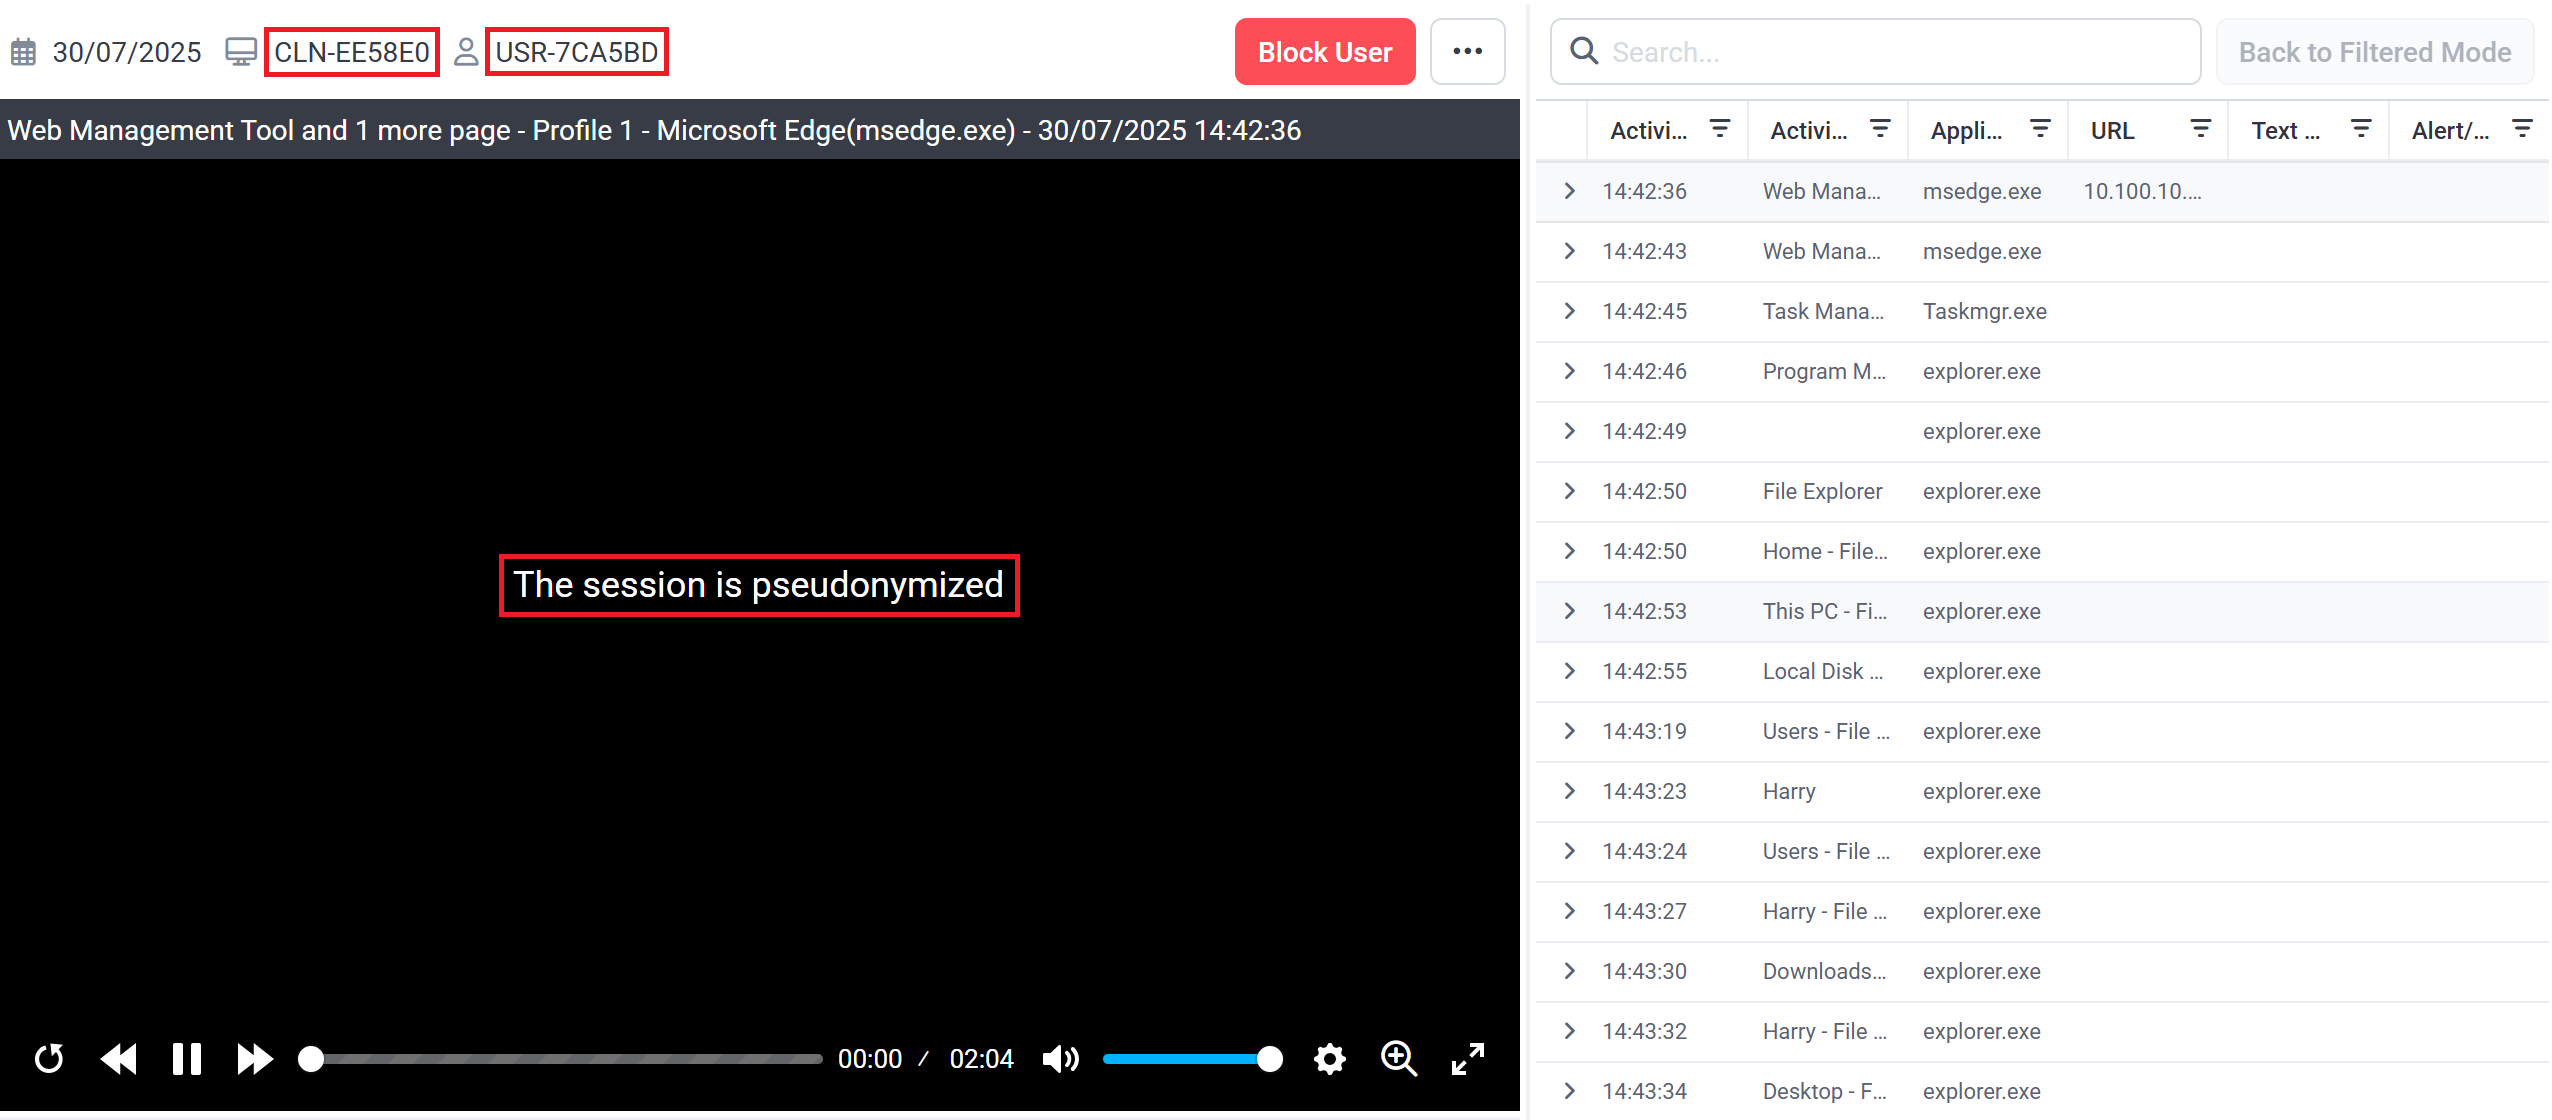
• Obfuscated data means that the data is blurred (or hidden completely for Linux terminal and SSH sessions, as shown in the screenshot above), so as not to be readable, which concerns the screen captures recorded of the activity of endpoint users displayed in the Session Player.
NOTE: None of the metadata which accompanies screen captures is obfuscated, and remains displayed as normal in the Metadata grid of the Session Viewer.
• Hidden data means that the data is not displayed at all.
NOTE: Hidden data is not even displayed after an expose request to de-anonymize a user’s data is approved, and can only be displayed by disabling the Pseudonymizer feature.
2. Viewing User Data in Pseudonymized Mode
Apart from the Session Player (as shown in the screenshot above), the other main page affected is the Client Sessions tab (on the Activity Monitoring page), which is displayed as follows when pseudonymized:
1. An additional (Expose Request) column is displayed (on the right).
2. The values in the following columns of the grid are randomized:
• User Name (plus any secondary User Names are hidden).
• Client Name
• Remote Host Name
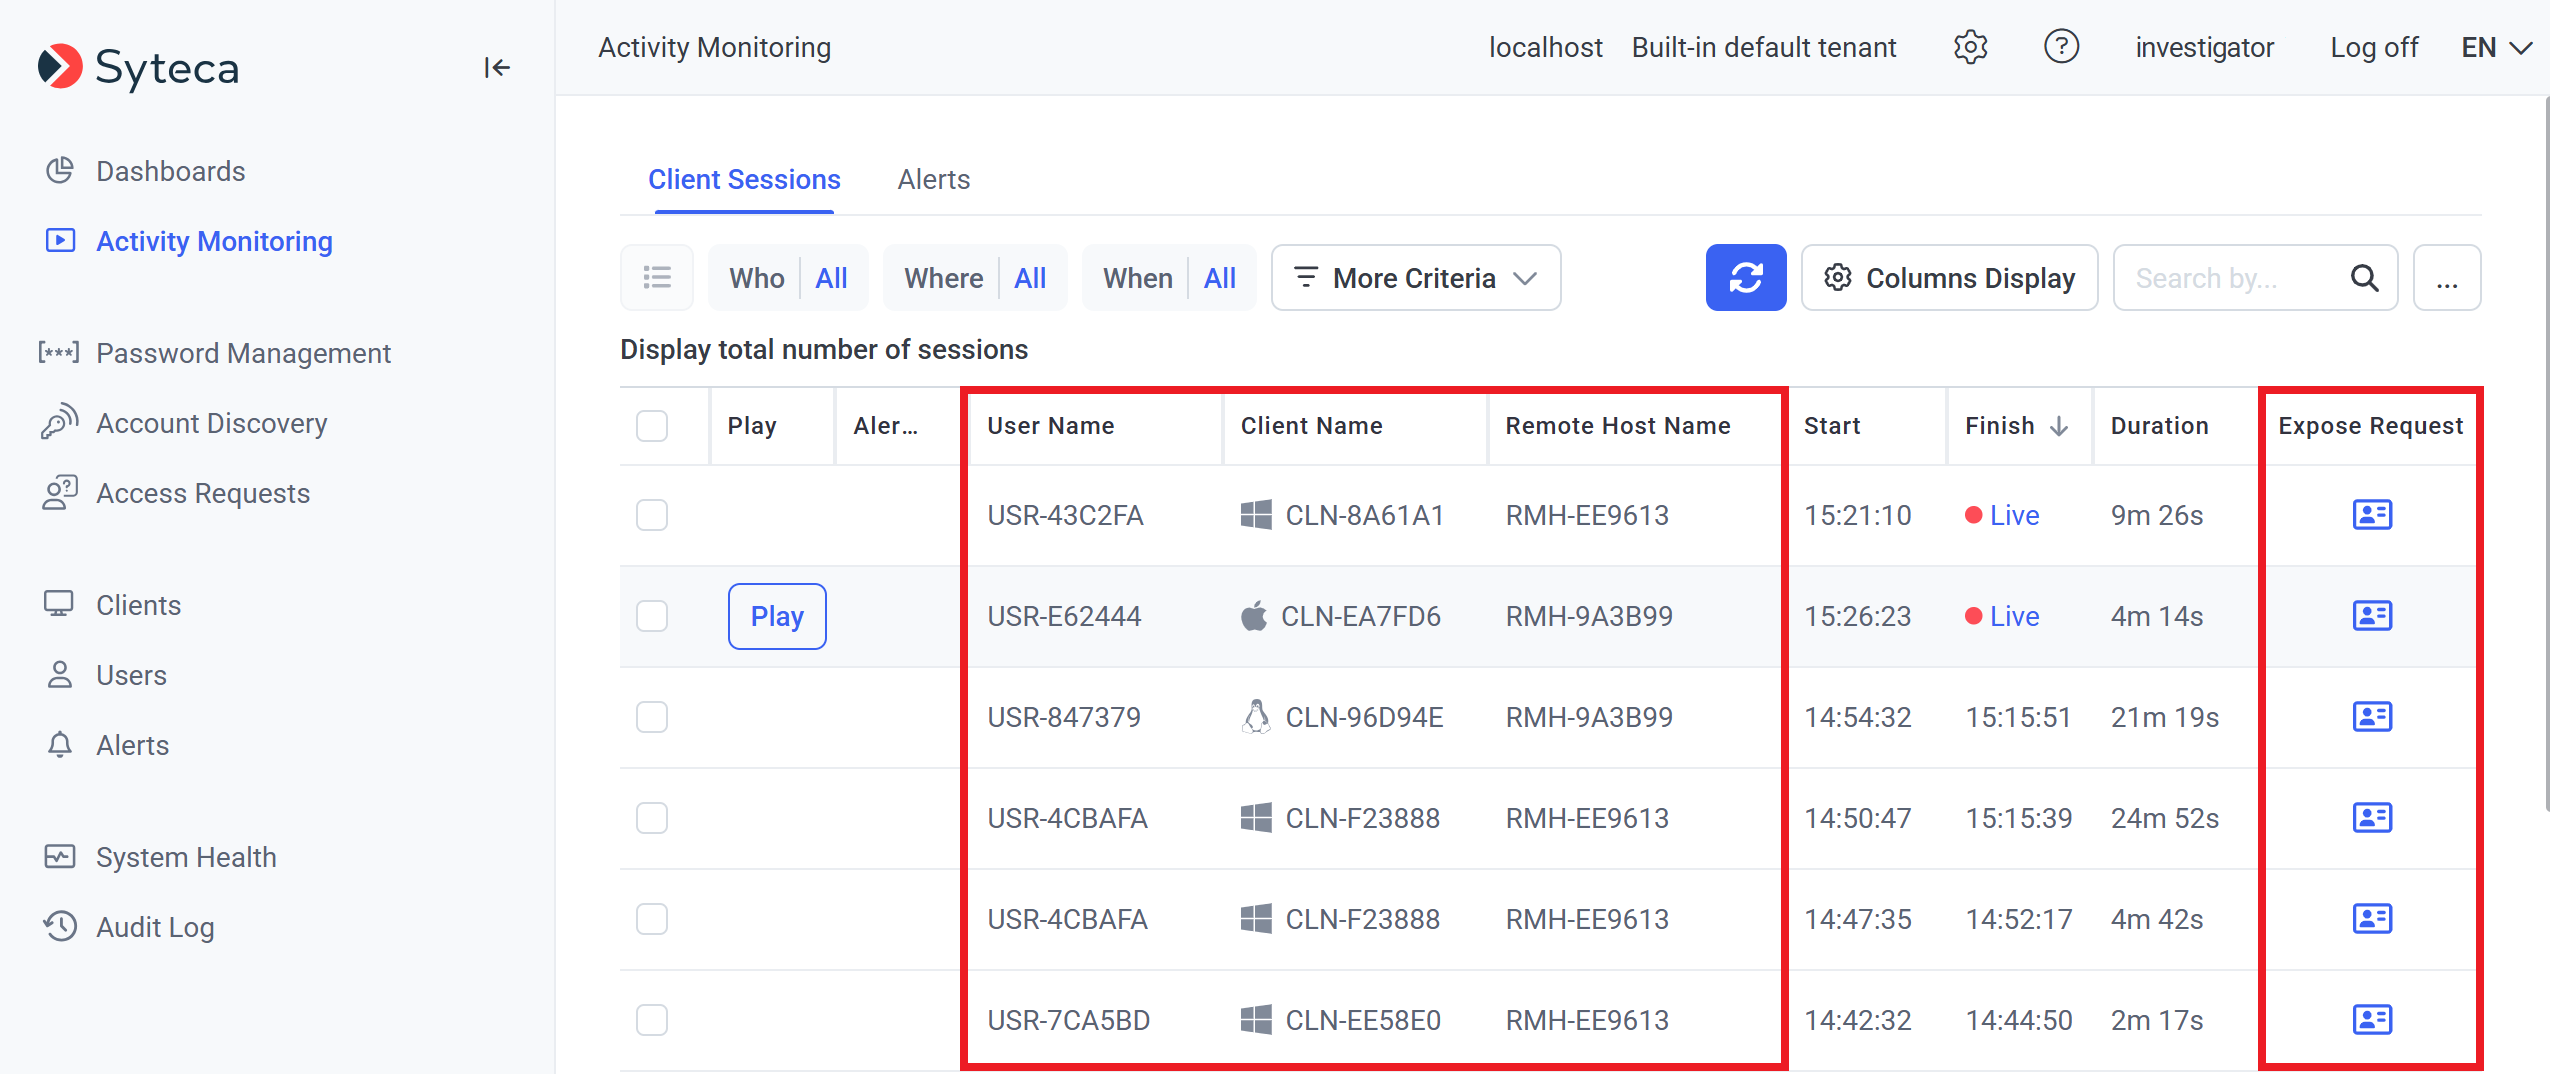
NOTE: Randomized values are always unique and never repeat throughout the system (e.g. "UserX" is replaced by "USR-123" when initially randomized, and then (if the data is de-anonymized and then pseudonymized again) by "USR-765", and then by "USR-1341", etc, while "UserY" is never replaced by "USR-123", "USR-765", or "USR-1341", since these names have already been taken by "UserX"). Furthermore, when values are randomized, they never follow a sequence (e.g. "UserX" is replaced by "USR-123", and "UserY" is replaced by "USR-579", but never by "USR-124").
3. The corresponding values in the following filters are also randomized accordingly:
• Who (i.e. the user name)
• Where (i.e. the Client name)
4. The following columns are hidden, and cannot be displayed by using the Columns Display button (and the corresponding filters are also disabled):
• IP (IPv4/IPv6)
• Remote IPv4
• Remote IPv6
• Remote Public IPv4
• Remote Public IPv6
• Domain
• Description
• User’s Comments
• Client Groups
5. The Search by field can only be used to search the randomized data (and not the original personal data).
Apart from in the Session Player and on the Client Sessions tab (on the Activity Monitoring page), the pseudonymized data is also displayed in a similar way (i.e. randomized or hidden) throughout the system, including on the following pages:
• Alerts tab (on the Activity Monitoring page).
• Session Risk Score page (which opens after clicking on the corresponding icon, e.g. in the Risk Score column on the Client Sessions tab (on the Activity Monitoring page).
• Dashboards.
• Alerts page.
NOTE: On the Alerts page, alerts cannot be created containing any of 3 existing alert rule parameters ("Username", "User Belonging to Domain Group", and "Computer Belonging to Domain Group"), while such alerts are disabled if they were created before the Pseudonymizer feature was enabled.
• Access Requests page.
• Audit Log page.
3. Features Not Currently Supported in Pseudonymized Mode
Functionality not currently supported for use with the Pseudonymizer feature enabled, and which cannot therefore be used, includes the following pages/features (which are disabled/hidden):
• Clients page (incl. User-to-User restrictions on the User Access tab when editing a user / user group).
NOTE: Although the Clients page is not currently supported, it is not disabled/hidden for Management Tool users with the appropriate permissions.
• Archived Sessions tab (on the Activity Monitoring page).
• File Monitoring tab (on the Activity Monitoring page).
• Forensic Export History tab and the Forensic Export feature (on the Activity Monitoring page).
• User Behavior Analysis page.
• Reports page,
• Sending data via APIs.
• Master Panel (stand-alone component of Syteca).
4. Permissions for Investigators and Supervisors
When a Management Tool Investigator user needs to view the original personal data of any endpoint user (e.g. to investigate suspicious user activity), they can request approval by a Management Tool Supervisor user to de-anonymize the personal data of a specific endpoint user (for all the endpoint user’s sessions on the specific Client computer).
On approval, the personal data of the specific endpoint user is de-anonymized and temporarily (for 24 hours) displayed to the Investigator who requested it.
Investigator and Supervisor users need to have the required permissions to carry out their job roles, as follows:
User Role | Description of User Role | Required Permissions / User Group |
Investigator | To investigate suspicious user activity. | The following permissions need to be either assigned directly, or inherited from any user group (except the default Supervisors user group): Administrative permissions: • Management Tool Access • Viewing Monitoring Results Client permissions: • Viewing Monitoring Results |
Supervisor | To approve (or deny) requests to expose (i.e. de-anonymize) the personal data of a specific endpoint user (on a specific Client computer) - see Section 5. Requesting De-Anonymization of User Data below. To add (or remove) specific endpoint users / user groups on specific computers to a list to exclude the data of these endpoint users from being pseudonymized when viewed by Supervisor users - see Section 7. Excluding Endpoint Users from Pseudonymization below. | The required permissions should be inherited from the default Supervisors user group (by adding the Supervisor user to belong to this group). |
NOTE: For more information about permissions and user groups in general (i.e. not specifically for the Pseudonymizer feature), please refer to the Users and User Groups section.
5. Requesting De-Anonymization of User Data
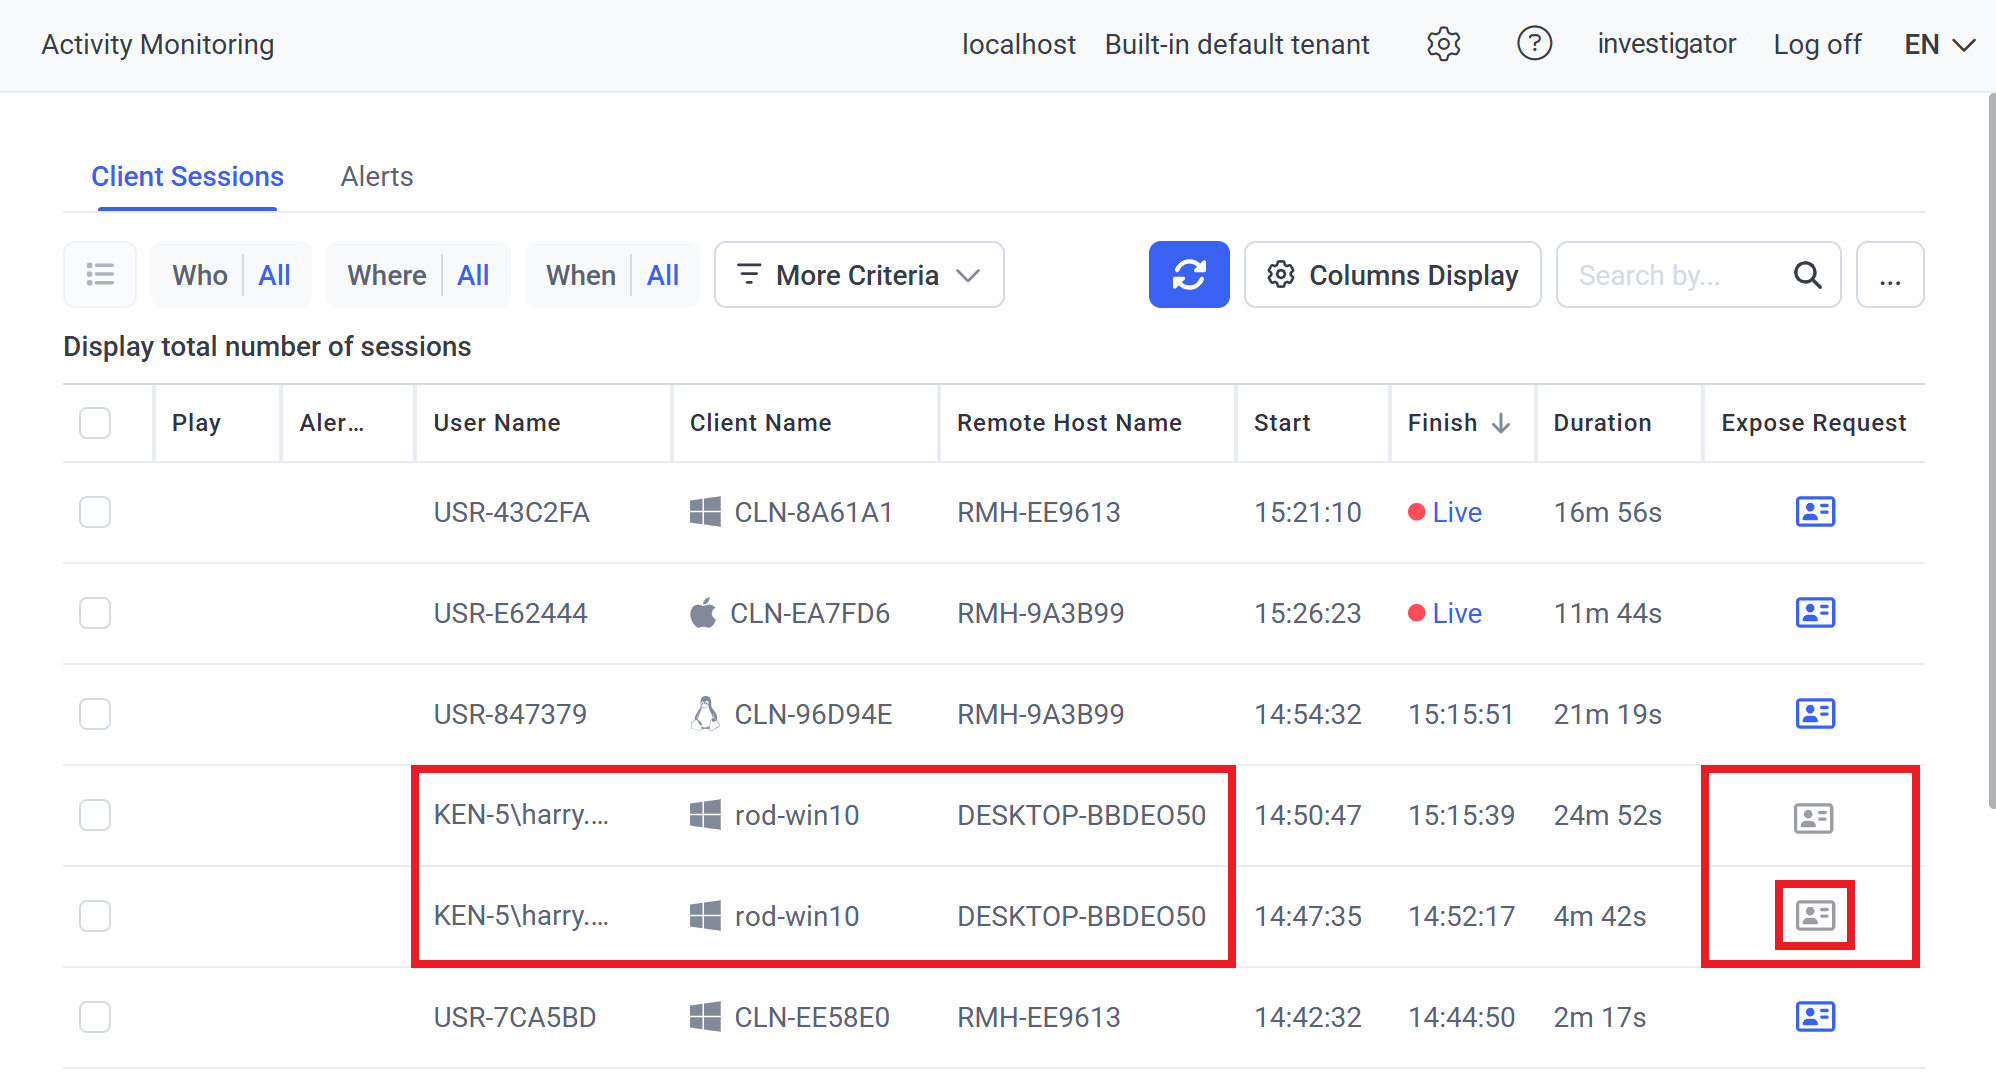
A request to de-anonymize the personal data of a specific endpoint user (for all the endpoint user’s sessions on the specific Client computer) is called an Expose Request. After such a request is approved by a Supervisor user, the Investigator user who requested it will be able to view the following data of the endpoint user:
• Randomized data: The original personal data is displayed, and is no longer randomized, e.g. on the Client Session tab, on the Activity Monitoring page:
- User Name (e.g. “john.doe” is displayed instead of the randomized alias “USR-123”)
- Client name
- Remote Host Name
• Obfuscated data: The screen captures are displayed, and are no longer blurred (or no longer hidden for Linux Terminal and SSH sessions) in the Session Player.
• Hidden data: The hidden columns remain hidden after de-anonymizing the data, and cannot be displayed (except by disabling the Pseudonymizer feature).
To make a request to de-anonymize an endpoint user’s personal data (on a specific Client computer), do the following:
1. On the Client Sessions tab (of the Activity Monitoring page), click the corresponding icon in the Expose Request column (on the right).
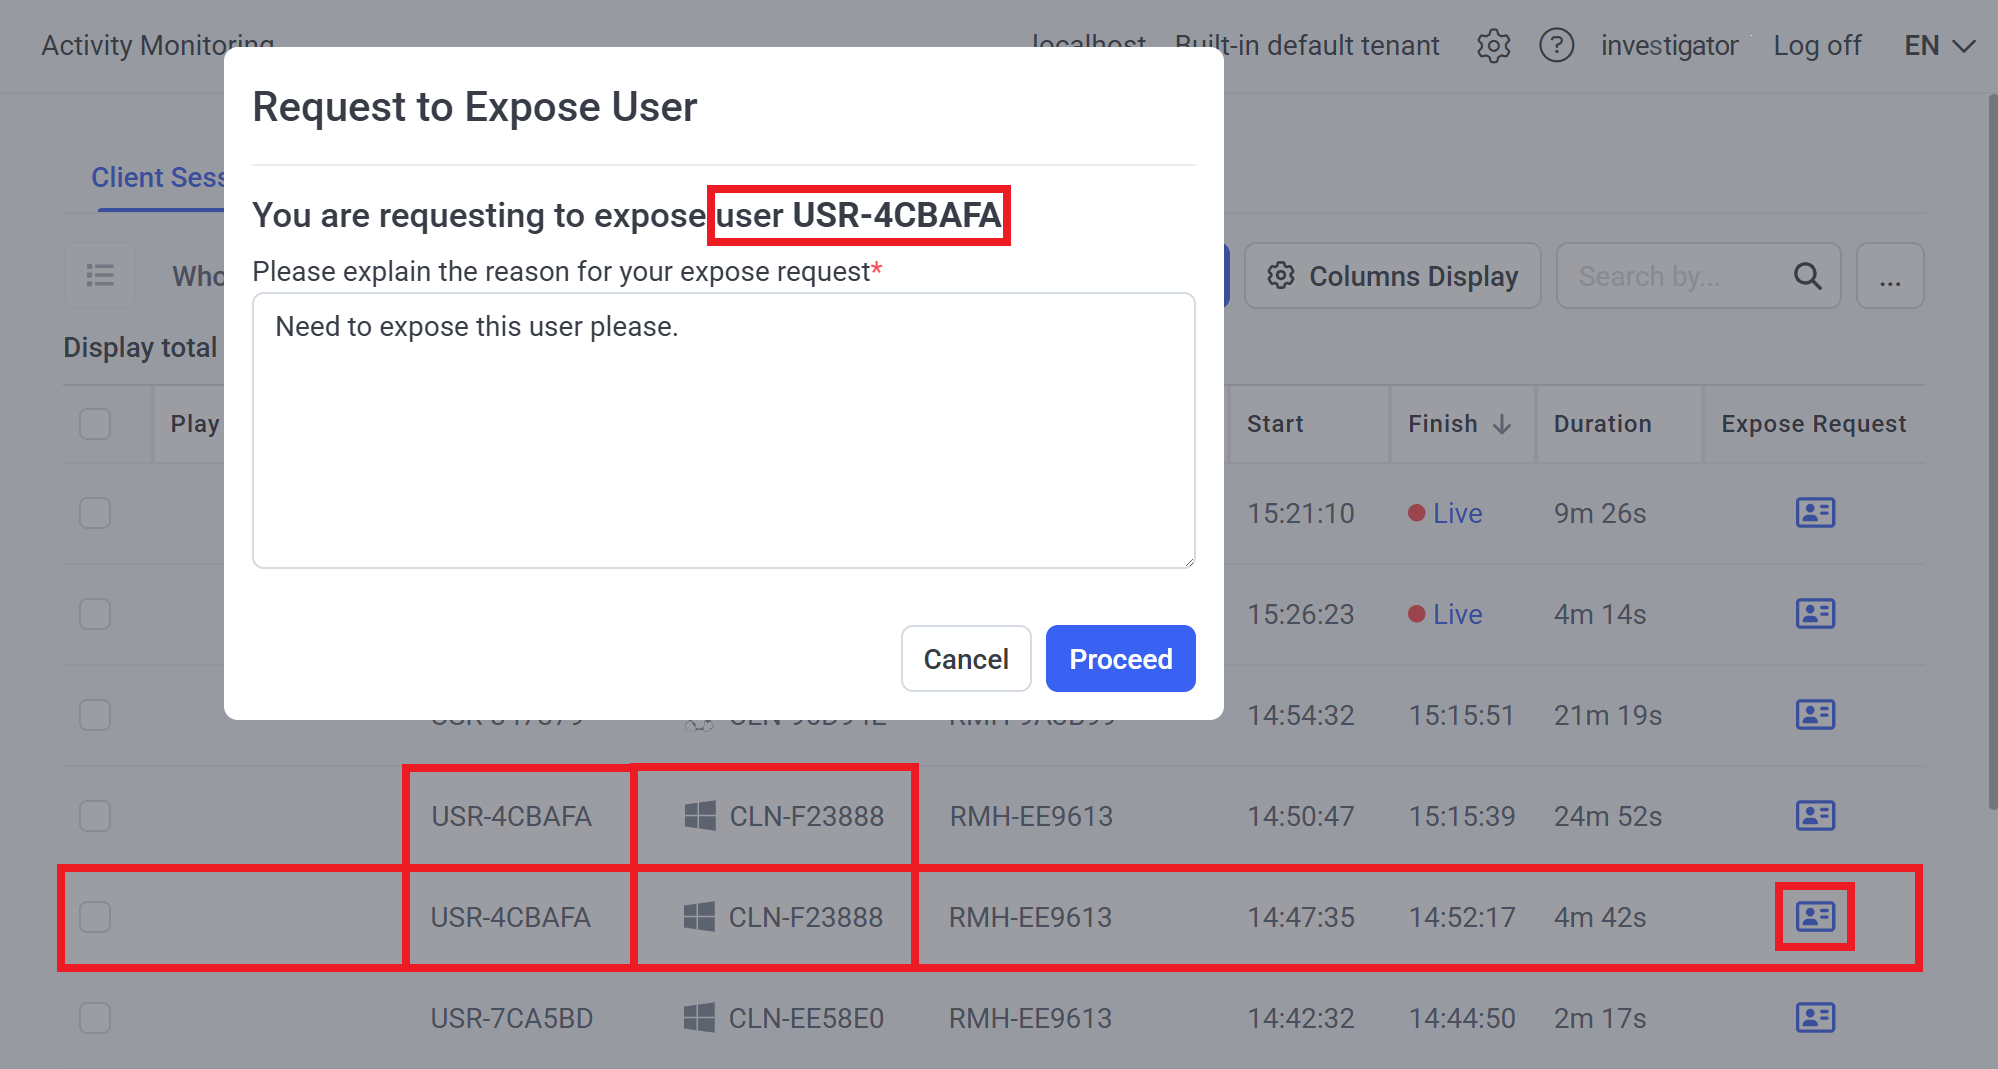
2. In the Request to Expose User pop-up window that opens, enter a reason for your request, and then click Proceed.
3. After a Supervisor user approves the request to expose the endpoint user’s personal data (on the Access Requests tab of the Access Requests page - see Section 6. Requiring a Password to Approve De-Anonymization Requests below), this data (for all the endpoint user’s sessions on the specific Client computer) is de-anonymized for the Management Tool user who requested it, so that the original personal data of the endpoint user is temporarily (for 24 hours) displayed to this Management Tool user only (and they can view the screen captures, which are no longer obfuscated when the session is opened in the Session Player).
6. Requiring a Password to Approve De-Anonymization Requests
A password can optionally be required for Supervisor users to approve requests for de-anonymization.
This functionality can be used to, for example:
1. Comply with corporate policies and contracts.
2. Ensure that Administrator users (i.e. users that have the appropriate administrative permissions, e.g. those that belong to the default Administrators user group), who can change a Supervisor user’s credentials, cannot approve requests for de-anonymization.
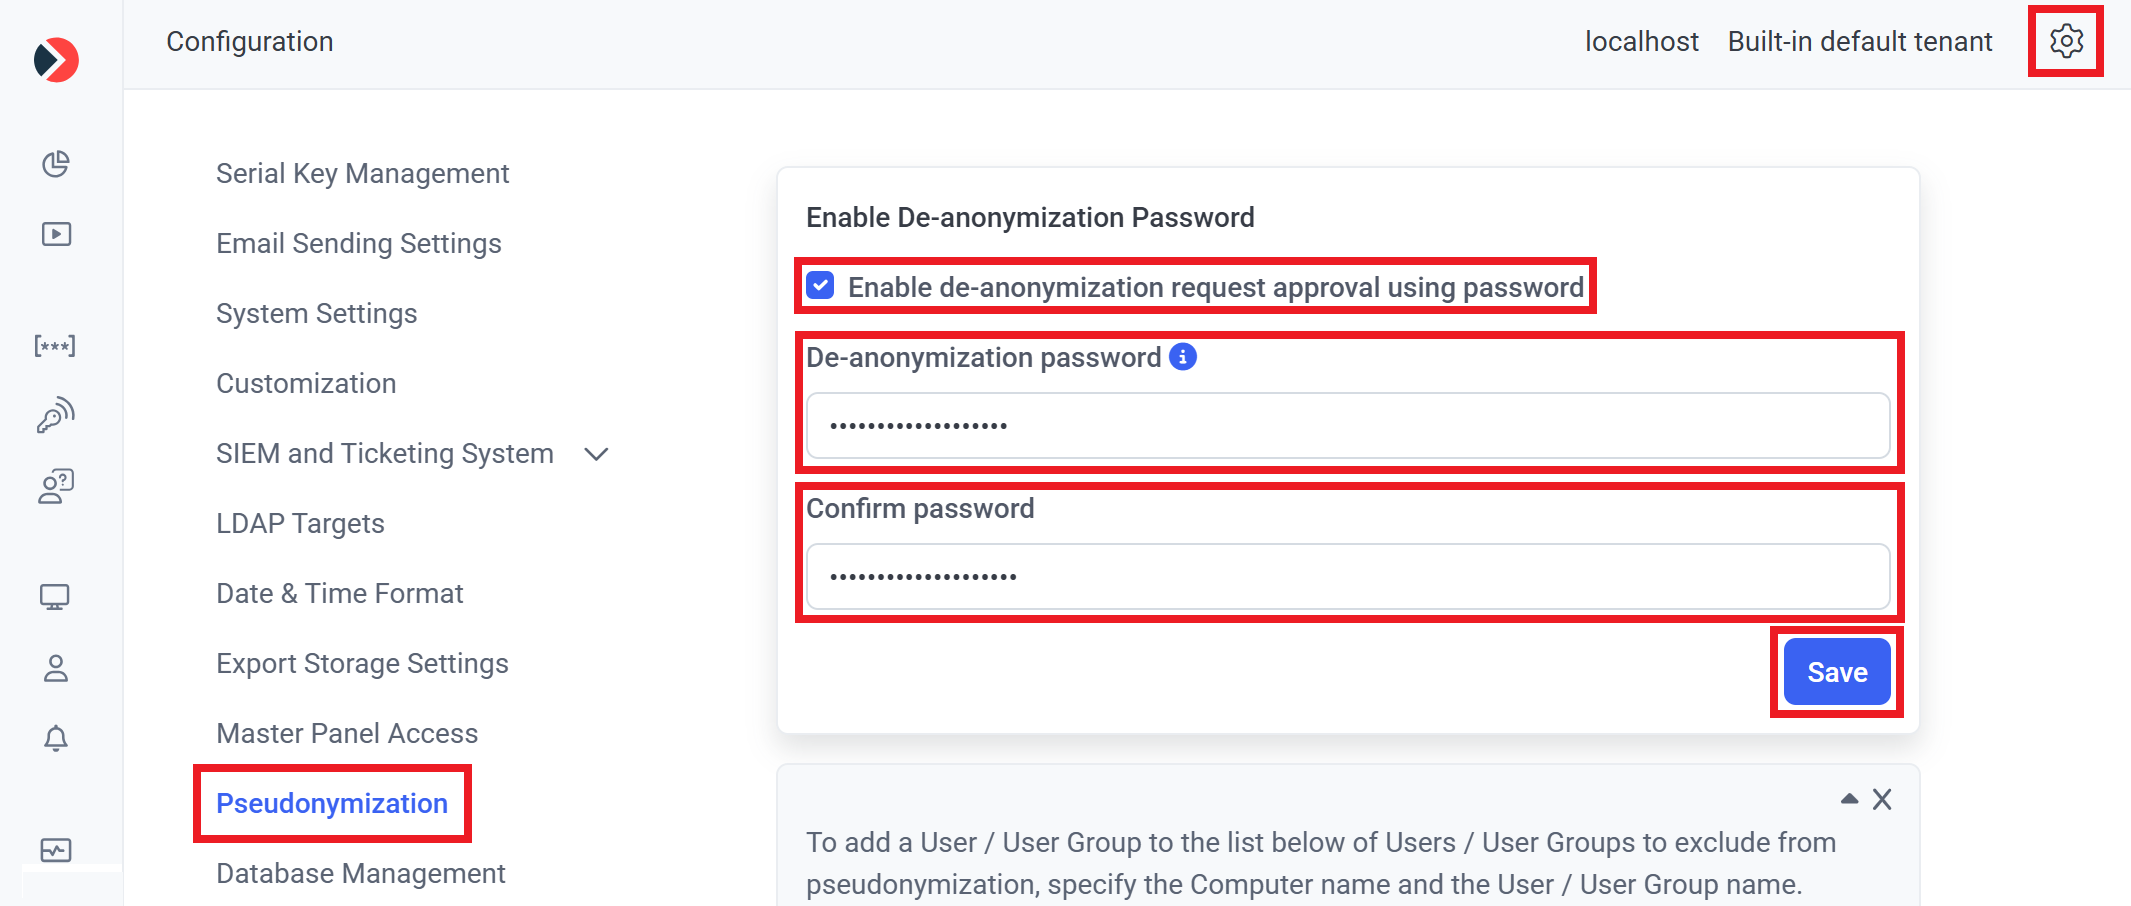
To enable a de-anonymization password (so as to require Supervisor users to enter the password to approve requests for de-anonymization), do the following:
1. Log in as the built-in default "admin” user of Syteca.
2. Open the Configuration page, and select the Pseudonymization tab.
3. Select the Enable de-anonymization request approval using password checkbox, and then enter a password to be used in to both fields (De-anonymization password and Confirm password), and click Save.
NOTE: The password must be between 14 and 50 (alphanumeric and special) characters in length and contain at least one lowercase character, one uppercase character, one numerical character, and one special character (e.g. “.”, ”!”, ”-“, ”%” ,”$” ,”_”, “&” ,“#”).
NOTE: The password is saved in encrypted format in the database.
Once enabled, the de-anonymization password can be changed at any time by the built-in default "admin” user:
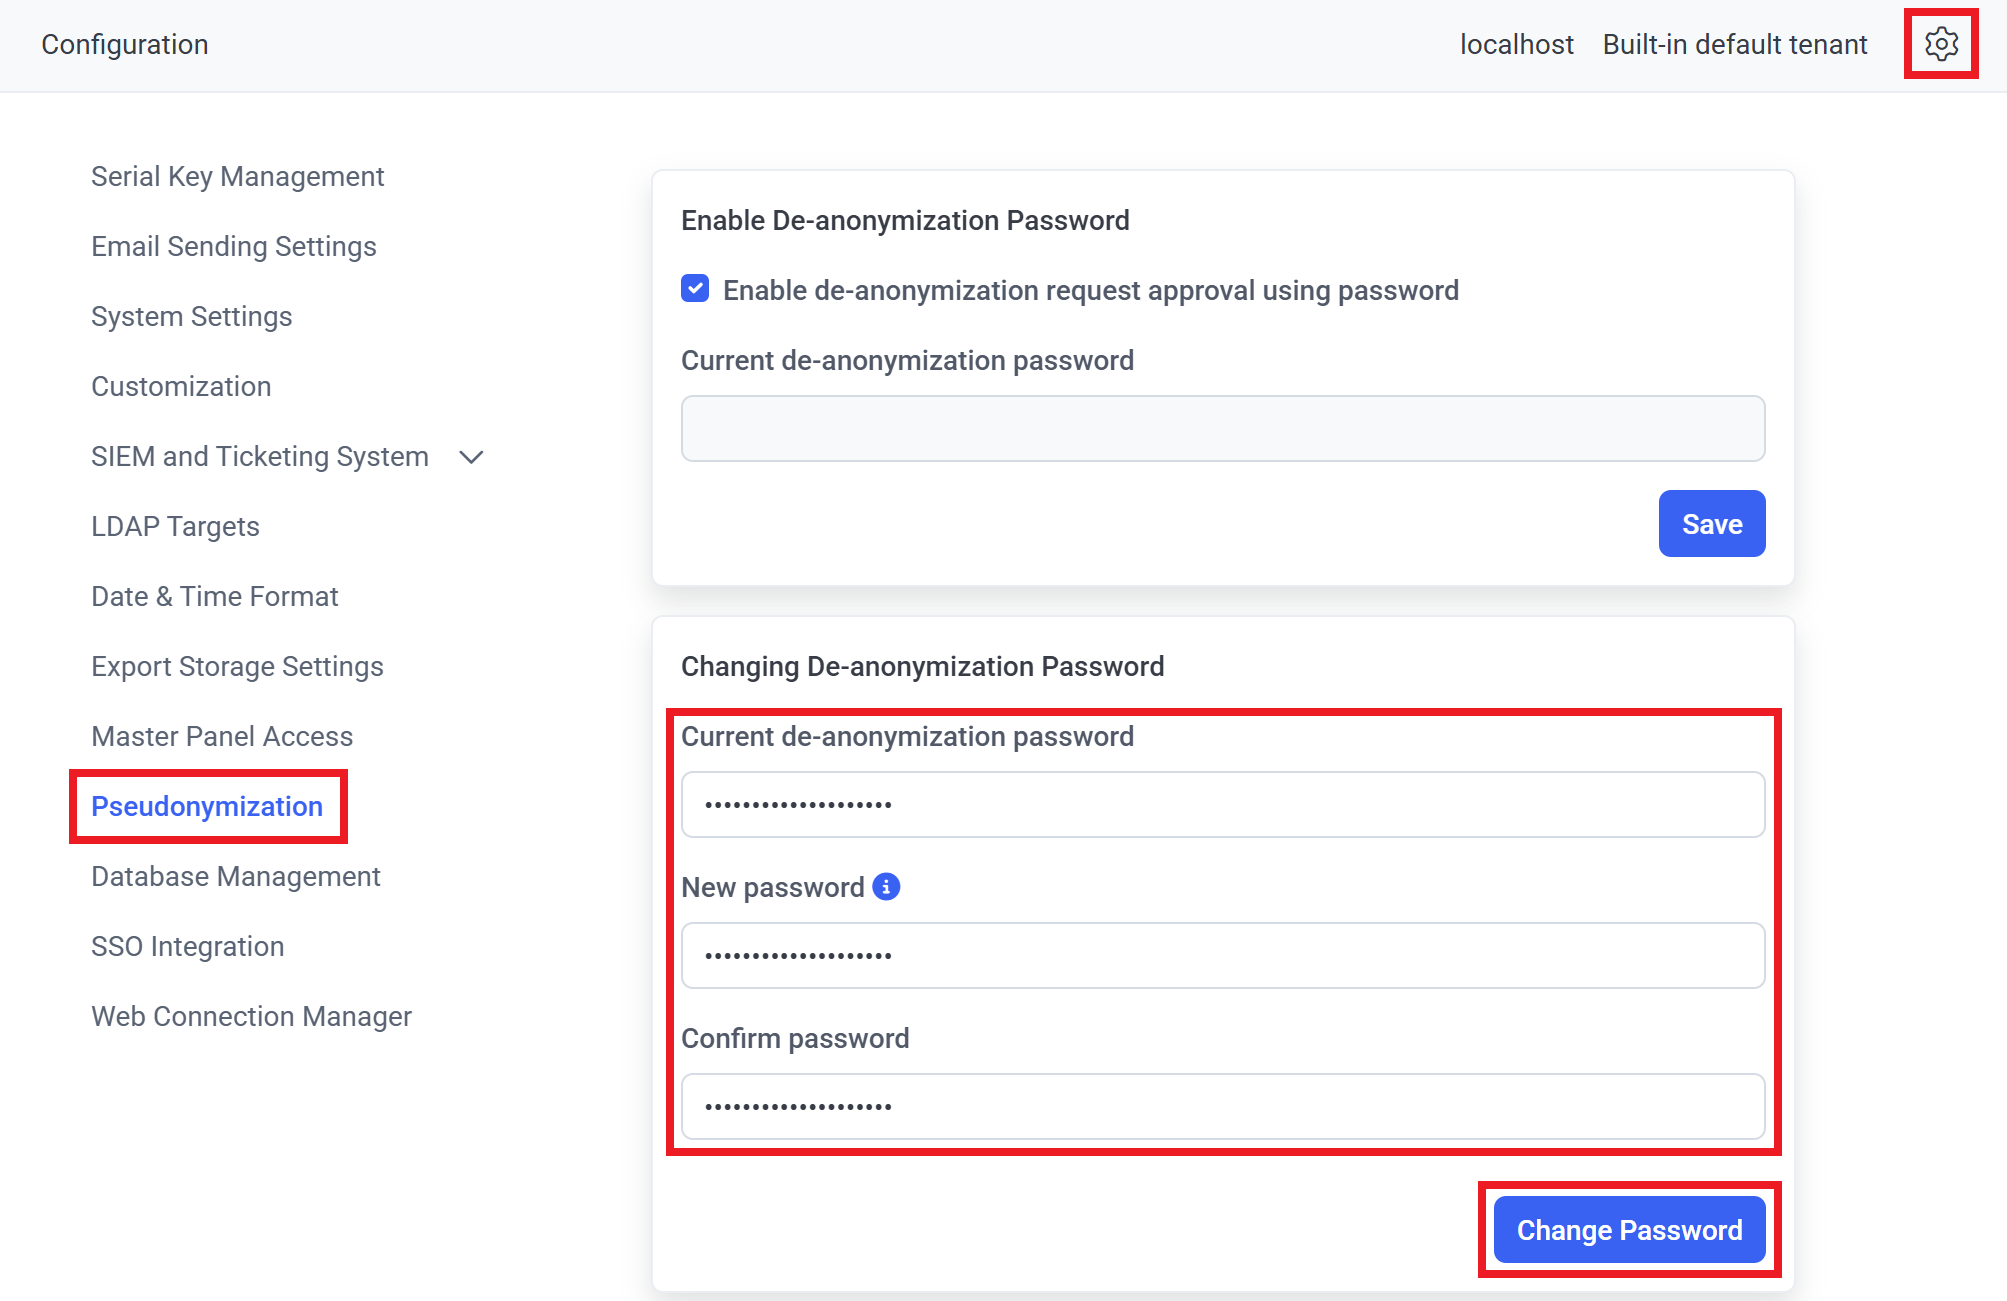
The built-in default “admin” user can also deselect the Enable de-anonymization request approval using password checkbox at any time to disable this functionality (after entering the de-anonymization password correctly when prompted).
NOTE: If the built-in default “admin” user ever forgets the password, it can be reset by contacting the Syteca Support team.
With the Enable de-anonymization request approval using password checkbox selected to enable this functionality, whenever a Supervisor user receives a request from an Investigator user to de-anonymize an endpoint user’s personal data (for all the endpoint user’s sessions on the specific Client computer), the Please enter the de-anonymization password additional field is also added to both:
• The Request Approval pop-up window on the Access Requests tab (on the Access Requests page), that opens after clicking Approve in the request.
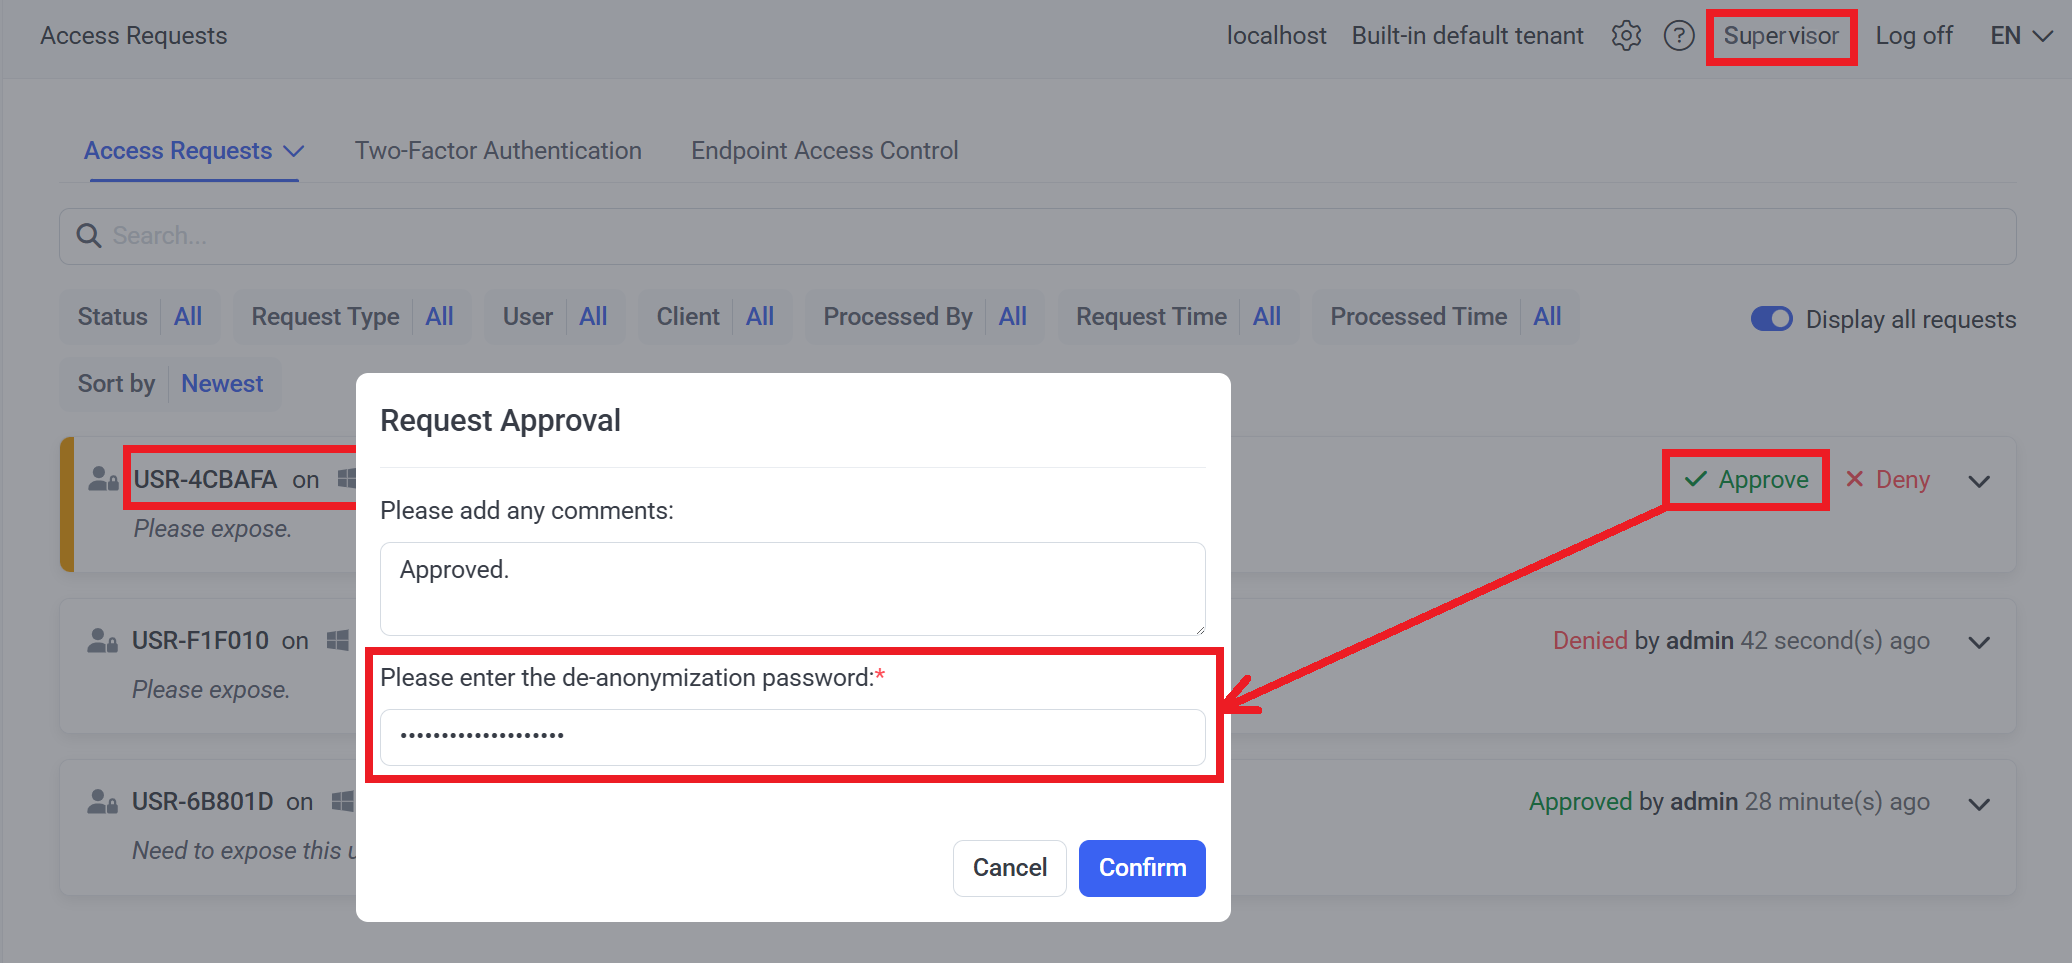
• The Expose Request page that opens after clicking the Approve access link in the email notification received.
In both cases, to approve the request, the Supervisor user needs to enter the current de-anonymization password in the additional field, and then click the Confirm button.
7. Excluding Endpoint Users from Pseudonymization
Any Management Tool users belonging to the default Supervisors user group can add specific endpoint users / user groups on specific computers to a list to exclude the data of these endpoint users from being anonymized, so that all Management Tool users in the default Supervisors user group will be able to view the de-anonymized data for these endpoint users.
In addition to users belonging to the default Supervisors user group, this same functionality is also available to the built-in default "admin" user of Syteca and to tenant admins.
To add (or remove) endpoint users to the list of endpoint users to exclude from pseudonymization (for users belonging to the default Supervisors user group), do the following:
1. Log in to the Management Tool as a user in the default Supervisors user group (or as the built-in default "admin" user of the system, or as a tenant admin).
2. Open the Configuration page, and select the Pseudonymization tab.
3. In the Users to Exclude from Pseudonymization section, click the Add User button.
4. Enter and select the required computers and users / user groups to be de-anonymized in the Computer and the User / User Group fields respectively (in the drop-down lists).
NOTE: Asterisk ("*") characters can also be used as a wildcards, but a single asterisk character only cannot be used in both fields at the same time).
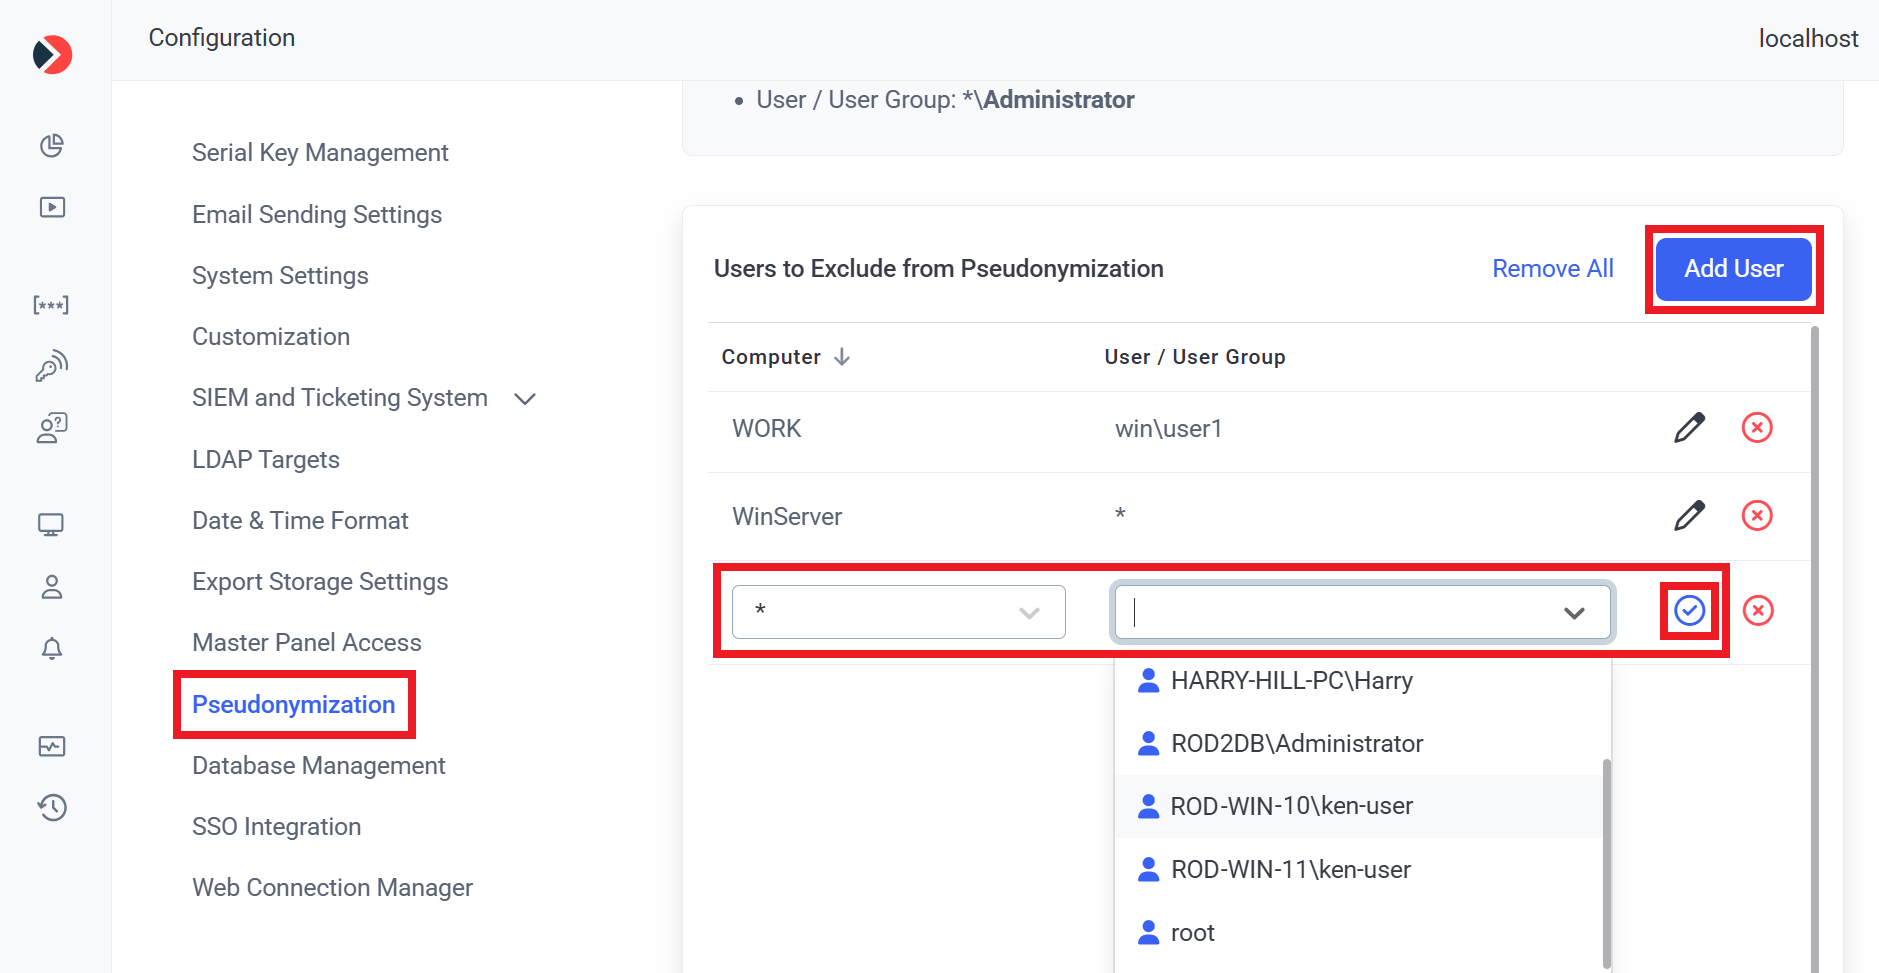
5. After (entering and) selecting each required computer and user / user group, click the Add (


6. After adding all the required user / user groups, click the Save button (in the bottom right) to save the changes.
